

AppRankly
Docker app from primer's Repository
Overview
Readme
View on GitHub
AppRankly — Open-Source Mobile App Analytics & ASO Dashboard
Self-hosted iOS & Android analytics toolkit. A private, unified alternative to App Store Connect and Google Play Console — keep 100% of your data and credentials on your own server.






Privacy-First Cross-Platform Analytics & Keyword Intelligence
Stop context-switching between App Store Connect and Google Play Console. AppRankly unifies your iOS and Android app performance into a single, sleek, self-hosted dashboard. Monitor installs, uninstalls, active devices, retention cohorts, user survival curves, and release markers side-by-side.
Features an AI-Assisted ASO Studio for zero-cost store autocomplete keyword discovery, keyword ranking checks, competitor comparisons, and metadata listing audits using your choice of OpenAI, Anthropic, or Gemini — with 100% of your analytics and API keys remaining securely on your server.
▶ Try the Live Interactive Demo — no installation required, pre-loaded with sample data.
📖 Table of Contents
- Screenshots
- Quick Start
- Key Features
- Authentication & Credentials Setup
- Configuration Reference
- Headless CLI Utility
- Architecture & Tech Stack
- Troubleshooting & FAQ
- Contributing & Support
Screenshots
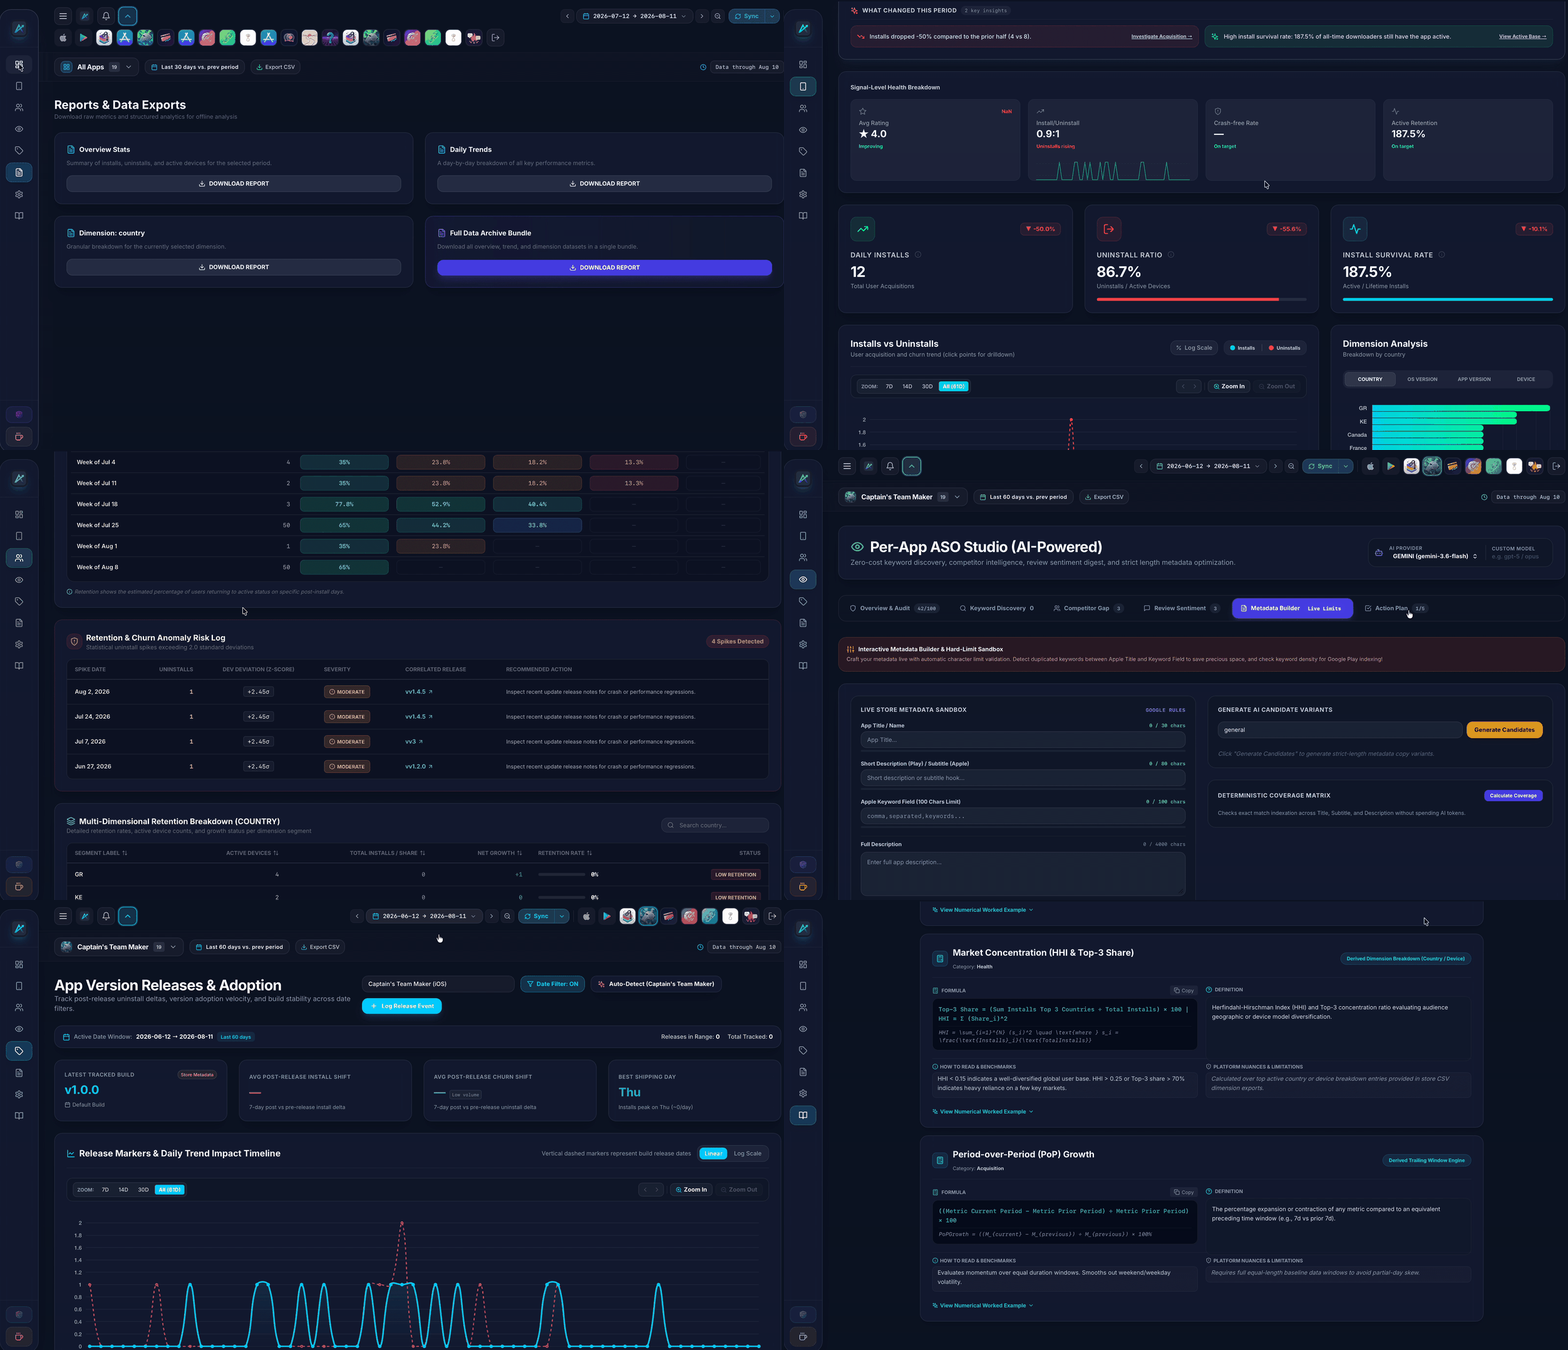
**📷 Click to view individual full-resolution screenshots**
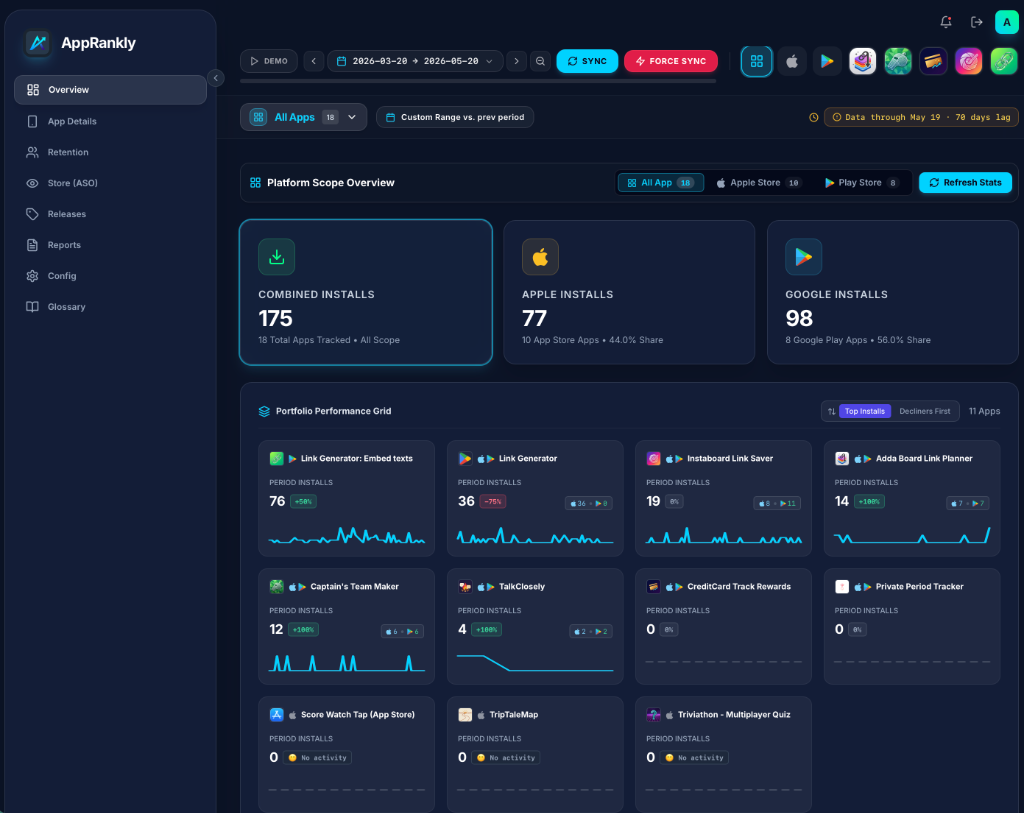
Unified Analytics Dashboard
Installs, uninstalls, active devices, and country breakdowns across Google Play & Apple App Store in one glassmorphic interface.
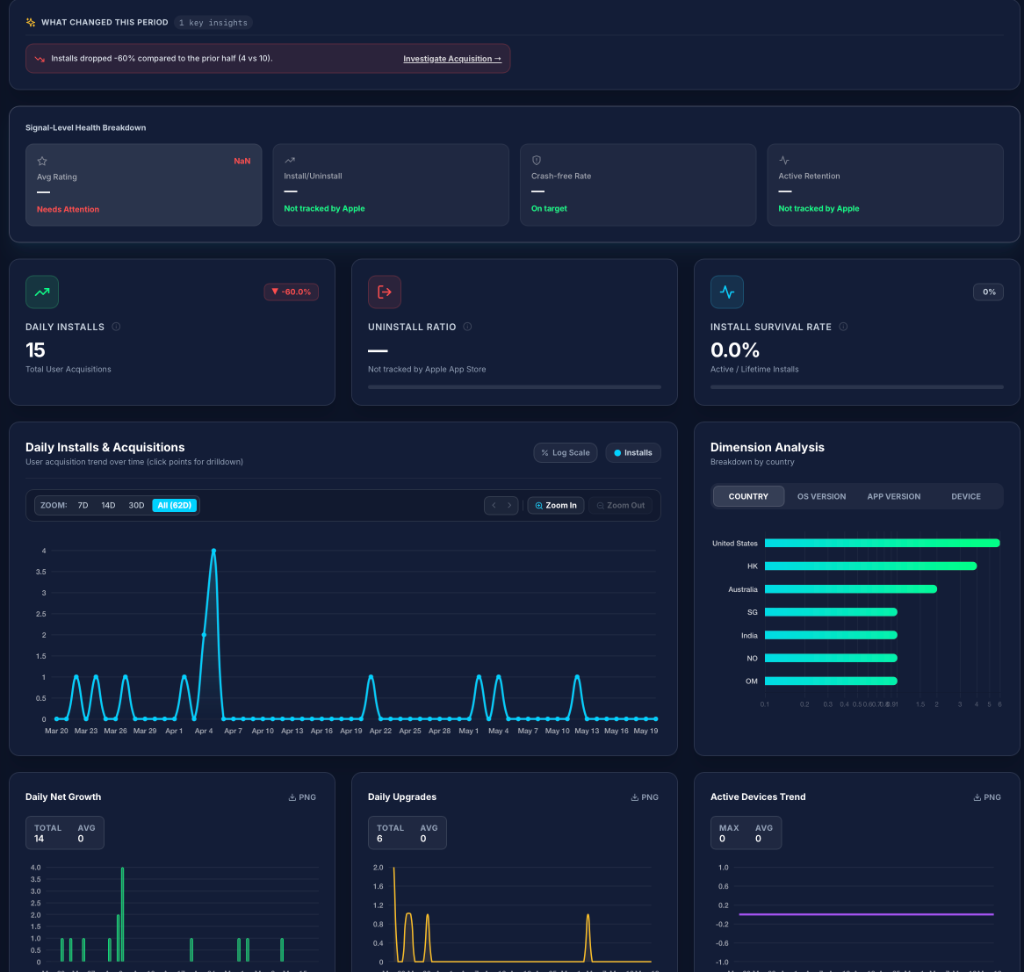
Detailed App Metrics
Per-app drill-down: version performance, daily trends, retention, and country-level distribution.
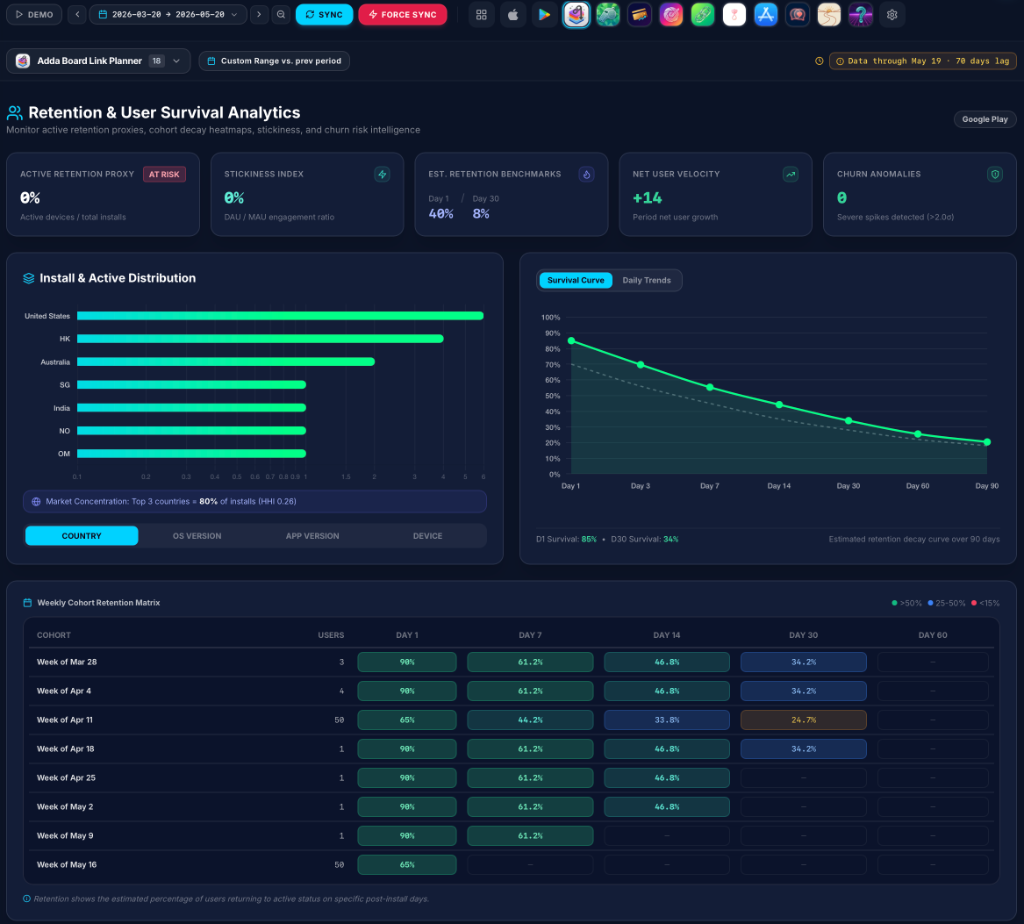
Retention & User Survival Analytics
Cohort retention heatmaps, active retention proxies, survival curves, stickiness index, and churn risk intelligence.
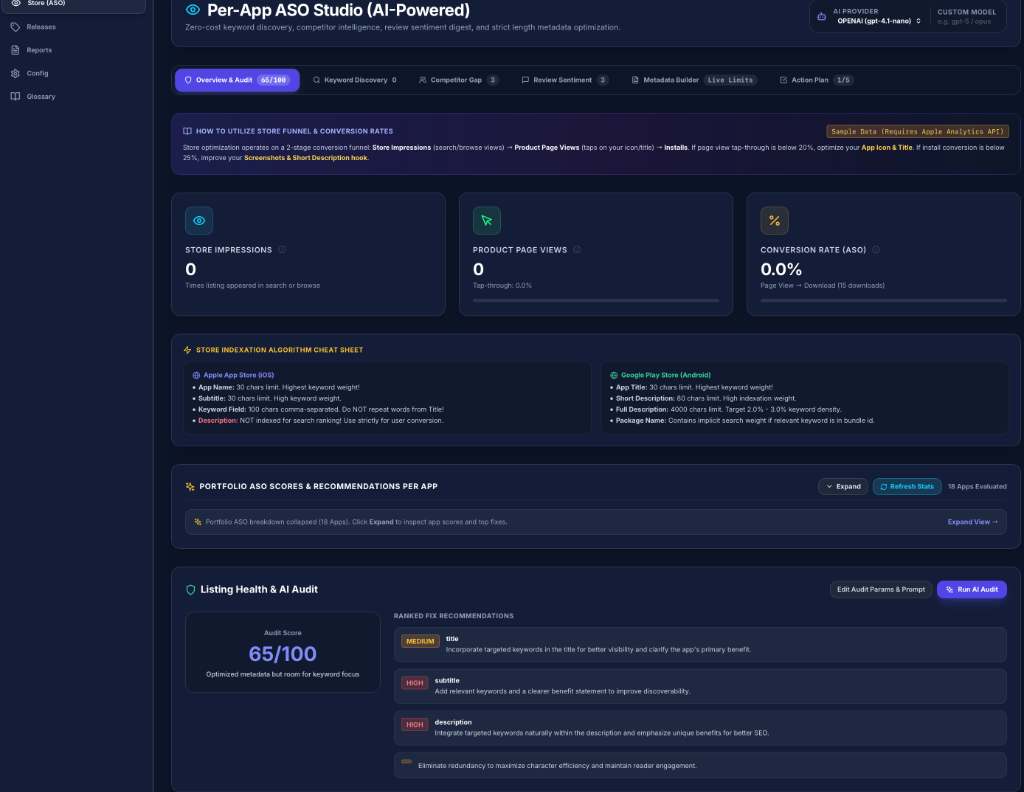
AI-Powered ASO Studio
Mine store autocomplete for zero-cost keyword discovery, check keyword ranks, audit listing health, and generate metadata variants with your choice of AI provider (OpenAI, Anthropic, or Gemini).
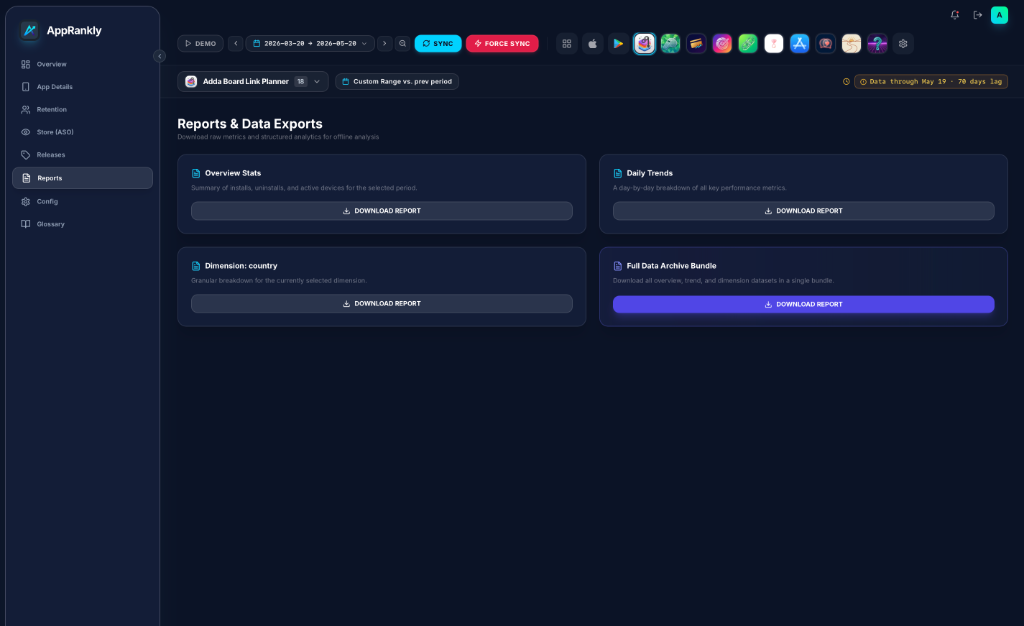
Reports & Data Exports
Export overview stats, daily trends, dimension breakdowns, or full raw data archive bundles for offline analysis.
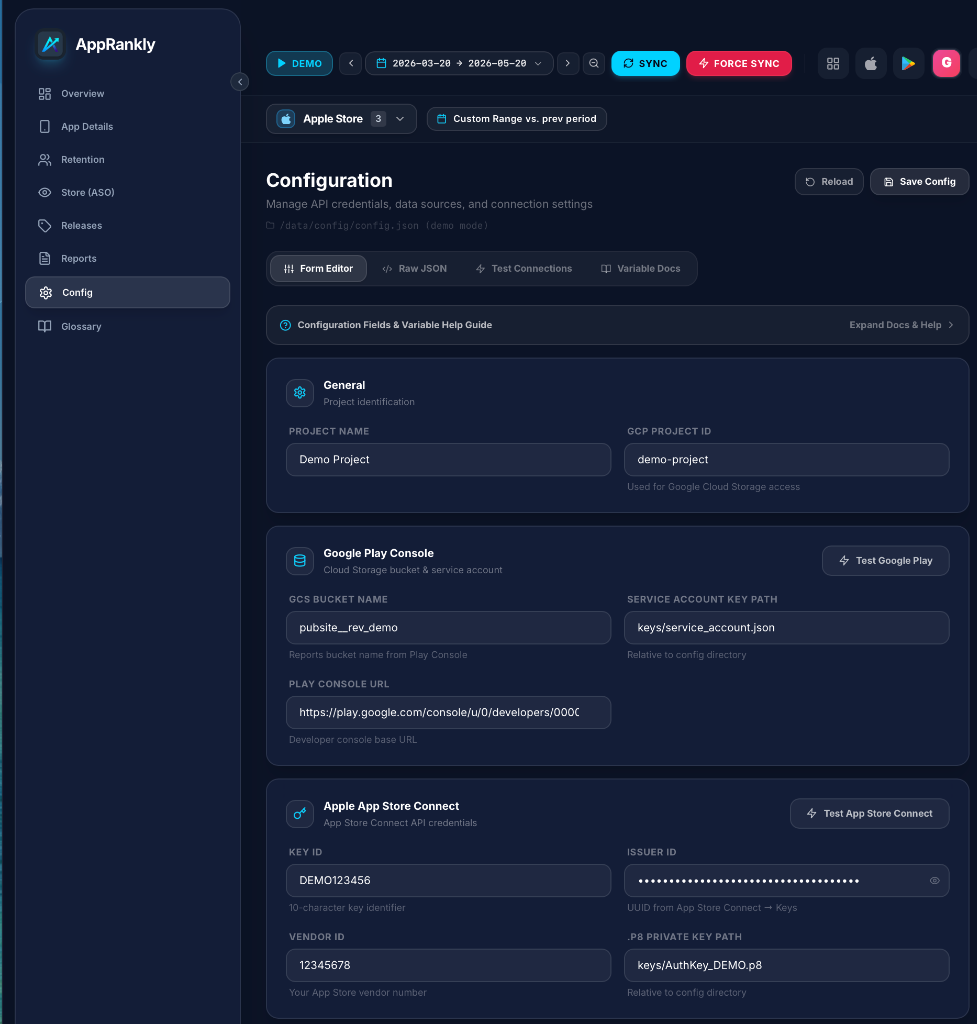
Configuration Editor
Form editor, raw JSON manager, test connection tools, and built-in setup guide for credentials and data sources.
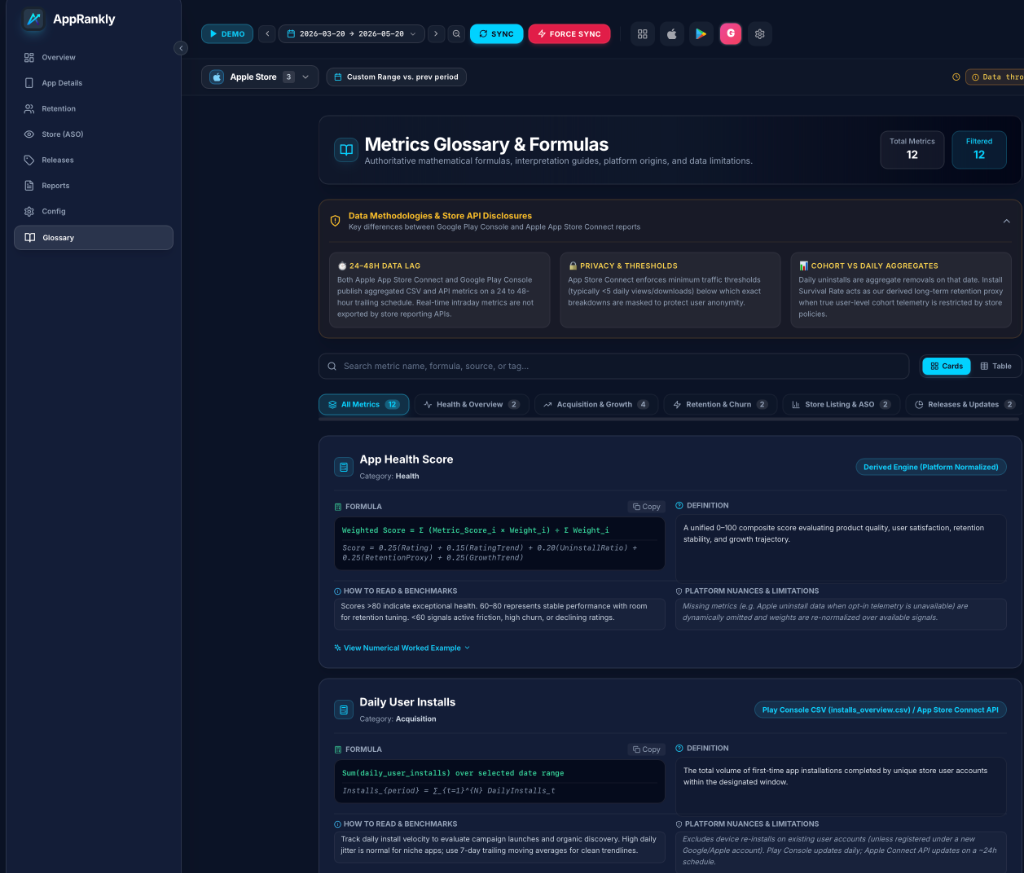
Metrics Glossary & Formulas
Authoritative mathematical formulas, interpretation guides, platform origins, and data lag disclosures used to compute metrics.
Quick Start
Pick your preferred deployment method. Note where config.json lives for each ecosystem:
| Deployment Method | Directory for config.json |
Default Dashboard URL |
|---|---|---|
| Docker Compose | ./config/ |
http://localhost:3000 |
Pre-built Image (docker run) |
./data/config/ |
http://localhost:3000 |
| Unraid | /mnt/user/appdata/AppRankly/config/ |
http://[SERVER-IP]:3020 |
| Docker Compose (Source Build) | ./config/ |
http://localhost:3000 |
| Local Node.js Development | ./data/config/ |
http://localhost:3000 |
[!IMPORTANT] Prerequisite: AppRankly fetches data directly from official store APIs (Google Cloud Storage reports and Apple App Store Connect API) to ensure complete privacy. Before launching, configure your access keys following the Credentials Setup guide.
Option 1: Docker Compose (Recommended)
# 1. Clone the repository
git clone https://github.com/zmsp/AppRankly.git
cd AppRankly

# 2. Setup config files (mounts ./config into the container)
mkdir -p config/keys
cp example.config.json config/config.json
# Edit config/config.json and place API key files (.json for Google, .p8 for Apple) in config/keys/

# 3. Launch the container stack
docker compose up -d
Access the dashboard at http://localhost:3000.
Option 2: Pre-built Docker Image
# 1. Pull the container
docker pull ghcr.io/zmsp/apprankly:main

# 2. Prepare data directory mappings
mkdir -p data/config/keys
cp example.config.json data/config/config.json
# Edit data/config/config.json and place API keys in data/config/keys/

# 3. Spin up the container
docker run -d \
  --name AppRankly \
  -p 3000:3000 \
  -v $(pwd)/data:/app/data \
  -e JWT_SECRET="your-secure-random-secret" \
  ghcr.io/zmsp/apprankly:main
Option 3: Unraid
AppRankly is available natively via Unraid Community Applications.
- Search for AppRankly in your Unraid Apps tab and click Install.
- Alternative Manual Setup: Download the XML template directly:
curl -o /boot/config/plugins/dockerMan/templates-user/apprankly.xml https://raw.githubusercontent.com/zmsp/AppRankly/main/unraid/apprankly.xml
- Set appropriate permissions for the mapped directory:
chown -R 1000:1000 /mnt/user/appdata/AppRankly/ - Access via
http://[YOUR-SERVER-IP]:3020.
(See the detailed unraid/README.md for deeper customization options).
Option 4: Local Node.js Development
Requires Node.js 20+ (Node 22.5+ highly recommended — the SQLite caching layer relies on native node:sqlite features and safely degrades on older versions).
git clone https://github.com/zmsp/AppRankly.git
cd AppRankly

# Setup local workspace configuration
mkdir -p data/config/keys
cp example.config.json data/config/config.json

# Install workspace & UI dependencies, then launch development hot-reload
cd app && npm install
npm --prefix frontend install
npm run dev
Key Features
- 🎯 Unified Cross-Platform Core: Access installs, uninstalls, active devices, software upgrades, and country/device breakdowns across Google and Apple under one cohesive UI.
- 🤖 AI-Powered ASO Studio: Autocomplete keyword mining, keyword rank checks, competitor parsing, metadata health checks, and review sentiment synthesis. Use OpenAI, Anthropic, or Gemini natively.
- ⚡ Zero-Dependency SQLite Cache: Store historical metrics, aggregates, and expensive AI results safely inside
node:sqliteso you never pay double API bills or redundant fetch times. - 📝 Contextual Notebooks: Save persistent notes per application to mark feature additions or marketing campaigns directly inline with data trends.
- 🔔 Background Scheduler & Push Notifications: Automated cron sync cycles that broadcast performance thresholds to your phone using ntfy.sh (free, privacy-preserving, and optional).
- 🚀 Release Tracking: Tag specific application releases or let the app auto-detect updates to trace impact visually across data timelines.
- 🛠 Headless CLI Companion: Pull data payloads, migrate states, or perform manual historical database backfills over custom chron ranges using a scriptable terminal tool.
Authentication & Credentials Setup
1. Google Play (via GCS reports)
Google Play exports structured performance metrics into a private Google Cloud Storage bucket daily. AppRankly authenticates against this bucket securely.
- Generate a GCP Service Account Key:
- Visit the Google Cloud IAM Console and create a service account (e.g.,
playstore-stats-reader). - Navigate to Keys → Add Key → Create New Key (JSON). Save this file to your mapped volume as
keys/google_key.json.
- Assign Play Console Access:
- Navigate to the Google Play Console → Users and Permissions and invite the newly created service account email.
- Assign the "View app information and download bulk reports (read-only)" permissions.
- Note: Permissions across GCS can sometimes take up to 24 hours to replicate completely.
- Capture Your Bucket Endpoint:
- In the Play Console, head to Download reports → Statistics and select Copy Cloud Storage URI (e.g.,
gs://pubsite_prod_12345678/stats/installs/). - Your target bucket name is the unique string value located between
gs://and the subsequent forward slash.
2. Apple App Store Connect (via API)
- Navigate to App Store Connect → Users and Access → Integrations (Keys).
- Generate an API Key with the Sales and Reports access role.
- Download the provided
.p8credential token into your designatedkeys/directory mapping. - Record the Issuer ID listed at the top of the interface and the specific 10-character Key ID.
3. GitHub (for Notes Sync)
AppRankly can sync your application notes and marketing records to a private GitHub repository, ensuring your annotations are versioned and backed up.
- Create a Repository: Create a private repository on GitHub (e.g.,
my-app-notes). - Generate a Personal Access Token:
- Visit GitHub Token Settings.
- Click Generate new token (classic).
- Scope: Select 'repo' (Full control of private repositories).
- Copy the generated token (this will be used as your
passwordin the config).
- Configure in AppRankly: Add the
gitNotesblock to yourconfig.jsonas shown in the Configuration Reference.
Configuration Reference
Duplicate example.config.json inside your designated configuration target directory and adjust the payload schema values:
{
  "name": "Production Apps",
  "projectID": "your-gcp-project-id",
  "bucketName": "pubsite_prod_12345678",
  "keyFilePath": "keys/google_key.json",
  "appleIssuerId": "xxxx-xxxx-xxxx-xxxx",
  "appleKeyId": "XXXXXXXXXX",
  "appleVendorId": "85000000",
  "keyFilePath_apple": "keys/apple_key.p8",
  "PlaystoreConsoleUrl": "https://play.google.com/console/u/0/developers/123456",
  "ntfyTopic": "",
  "refreshIntervalHours": 1,
  "statsCheckRangeDays": 30,
  "activeStartHour": 9,
  "activeEndHour": 20,
  "appMetadata": {
    "com.example.app": { "consoleAppId": "123456" }
  },
  "ignoredPackages": ["com.example.testapp"],
  "ai": {
    "defaultProvider": "openai",
    "providers": {
      "openai":    { "apiKey": "sk-...", "model": "gpt-4.5-preview" },
      "anthropic": { "apiKey": "sk-ant-...", "model": "claude-3-5-sonnet" },
      "gemini":    { "apiKey": "...", "model": "gemini-1.5-flash" }
    }
  },
  "gitNotes": {
    "remoteUrl": "https://github.com/youruser/your-notes-repo.git",
    "username": "your-github-username",
    "password": "your-personal-access-token",
    "branch": "main"
  }
}
Configuration Fields
| Field | Context Ecosystem | Purpose and Definition | Mandate |
|---|---|---|---|
name |
Core Environment | Human-readable identity tag for the accounts dashboard. | Required |
projectID |
Google Play | The target identifier matching your Google Cloud Console project. | Optional |
bucketName |
Google Play | Extracted Cloud Storage ID value containing metric exports. | Optional |
keyFilePath |
Google Play | Relative directory reference parsing your Google IAM .json token file. |
Optional |
appleIssuerId |
App Store Connect | Universal API UUID extracted from your Connect keys management area. | Optional |
appleKeyId |
App Store Connect | Explicit 10-character reference code matching your downloaded key token. | Optional |
keyFilePath_apple |
App Store Connect | Relative directory reference parsing the generated .p8 access key. |
Optional |
ntfyTopic |
Alert Framework | Unique secret path defining your subscription string. Leave empty "" to turn off. |
Optional |
refreshIntervalHours |
Worker Lifecycle | Defines the lookup intervals checking for fresh metrics upstream. | Default: 1 |
statsCheckRangeDays |
Data Aggregation | Window depth processing past timeline metrics during cron sync updates. | Default: 30 |
gitNotes |
Version Control | Configuration for syncing local notes to a remote Git repository (GitHub/GitLab). | Optional |
ai |
Optimization Lab | Object mappings storing keys and customized models across AI vendors. | Optional |
Headless CLI Utility
Run maintenance operations, sync metrics, or handle migrations cleanly via the integrated command interface:
# Sync + verify configuration against index position zero
node app/cli.js -s 0

# Target historical sync tasks by custom environment name
node app/cli.js -s "Production Apps"

# Fully decoupled ingestion parameters bypassing file configurations
node app/cli.js \
  --key="data/config/keys/google_key.json" \
  --projectID="your-gcp-project-id" \
  --bucketName="pubsite_prod_12345678" \
  --packageName="com.example.app"
Internal Engine Maintenance Targets
Execute these utilities directly from inside the localized /app path workspace:
npm run db:migrate    # Force target and process outstanding schema changes
npm run db:backfill   # Pull file archives historically (e.g., cli.js backfill --since YYYY-MM)
npm run db:status     # Output active table indices, row weight, and localized scope coverage
npm run cache:clear   # Drop cached timeline states to force total downstream cache regeneration
Architecture & Tech Stack
- Backend Application Core: Node.js 20+ alongside Express. Secured with JWT tokens. Employs zero-native dependency performance pipelines like
node:sqlite, raw UTF-16 streaming buffers using Fast-CSV, and native cryptographic integrations signing asymmetric ES256 tokens for Apple integrations. - User Interface Engineering: React 18 powered alongside Vite. Implements fully dynamic visual charting using
react-chartjs-2running over an adaptive Tailwind CSS engine optimized for fluid dark environments. - Scraping, Optimization & LLM Adapters: Integrates multi-channel store hooks parsing active listings data concurrently while standardizing multi-tenant inference models cleanly across the native SDK layers of OpenAI, Anthropic, and Google Gemini.
Flow Architecture
graph TD
    User([Browser]) --> SPA["React SPA"]
    SPA <-->|"JWT API"| API["Express Server"]

    subgraph Backend["Node.js Backend Engine"]
        direction TB
        API --> Resolver["Data Resolver"]
        API --> ASO["ASO Studio"]
        API --> Notes["Notes Module"]

        DB[("SQLite Cache")] <--> Resolver
        DB <--> Notes

        Scheduler["Cron Sync"] --> Resolver
        CLI["CLI Utility"] --> Resolver
    end

    %% Grouping External Integrations Vertically
    subgraph Integrations["Subsystems & Integrations"]
        direction TB

        subgraph Metrics["Metric Sources"]
            GCS[("Google Play GCS")] <--> Resolver
            ASC[("App Store API")] <--> Resolver
        end

        subgraph Intelligence["AI & Intelligence"]
            Scrape["Store Scrapers"] <--> ASO
            AI{{"AI: LLM Models"}} <--> ASO
        end

        subgraph Persistence["Notes & Sync"]
            Git[("GitHub Remote")] <--> Notes
            FS[("Markdown Files")] <--> Notes
        end
    end

    SPA -.->|"static"| Pages[("GitHub Pages")]
Troubleshooting & FAQ
Contributing
We love contributions! Review our detailed CONTRIBUTING.md to learn how to prepare local tracking environments, map diagnostic test workflows, and open up performance patches inside our pipelines cleanly.
For security concerns, vulnerabilities, and disclosures, please see our Security Policy.
☕ Support & Ecosystem
Discover additional utilities and self-hosted tools on my homepage at apps.shahadat.us or support ongoing open-source maintenance here:
License
AppRankly is distributed as open-source software protected under the terms of the GNU Affero General Public License v3.0 (AGPL-3.0).
Media gallery
1 / 7Categories
Related apps
Explore more like this
Explore allDetails
ghcr.io/zmsp/apprankly:mainRuntime arguments
- Web UI
http://[IP]:[PORT:3000]- Network
bridge- Privileged
- false
Template configuration
The web interface host port mapped to container port 3000.
- Target
- 3000
- Default
- 3020
- Value
- 3020
Main host path for persistent files (config.json, API keys, and cached stats). Ensure ownership is set to 1000:1000 (chown -R 1000:1000 /mnt/user/appdata/AppRankly).
- Target
- /app/data
- Default
- /mnt/user/appdata/AppRankly
- Value
- /mnt/user/appdata/AppRankly
Secret key used for signing JWT authentication tokens. Set to a secure random string.
- Target
- JWT_SECRET
- Default
- change-me-to-something-random
- Value
- change-me-to-something-random
Internal application listening port.
- Target
- PORT
- Default
- 3000
- Value
- 3000
Internal path to the config.json configuration file.
- Target
- CONFIG_PATH
- Default
- /app/data/config/config.json
- Value
- /app/data/config/config.json
Internal directory path where app data is stored.
- Target
- DATA_DIR
- Default
- /app/data
- Value
- /app/data