
All apps · 0 apps

zigbee2mqtt
Docker app from digiblur's Repository
Overview
Zigbee to MQTT bridge allows you to use your Zigbee devices without the vendors bridge or gateway. This template has the port 9442 forwarded for the front end on 8080 and does NOT require a USB passthrough to accomodate POE based adapters.
All users MUST edit the configuration.yaml file in the appdata zigbee2mqtt folder to specify the serial port (or tcp port) for the zigbee adapter. If you are using a USB adapter add it via dev serial ID and point it to /dev/zigbee for ease of use. Example value: /dev/serial/by-id/usb-1a86_USB_Serial-if00-port0:/dev/zigbee
Attempt to start the container at least once and the yaml will be created for you. Then modify it to include the MQTT host info and the USB or TCP port for the Zigbee adapter.
How to determine the Zigbee adapter USB ID: https://www.zigbee2mqtt.io/guide/installation/01_linux.html#determine-location-of-the-adapter-and-checking-user-permissions
To enable the dev branch, change the repository value to koenkk/zigbee2mqtt:latest-dev
Readme
View on GitHub






Zigbee2MQTT 🌉 🐝
Allows you to use your Zigbee devices without the vendor's bridge or gateway.
It bridges events and allows you to control your Zigbee devices via MQTT. In this way you can integrate your Zigbee devices with whatever smart home infrastructure you are using.
Getting started
The documentation provides you all the information needed to get up and running! Make sure you don't skip sections if this is your first visit, as there might be important details in there for you.
If you aren't familiar with Zigbee terminology make sure you read this to help you out.
Integrations
Zigbee2MQTT integrates well with (almost) every home automation solution because it uses MQTT. However the following integrations are worth mentioning:
Home Assistant

Home Assistant OS using the official addon (other installations)
Homey

Integration implemented in the Homey App (documentation & support)
Domoticz

Integration implemented in Domoticz (documentation).
Gladys Assistant

Integration implemented natively in Gladys Assistant (documentation).
ioBroker

Integration implemented in ioBroker (documentation).
Architecture
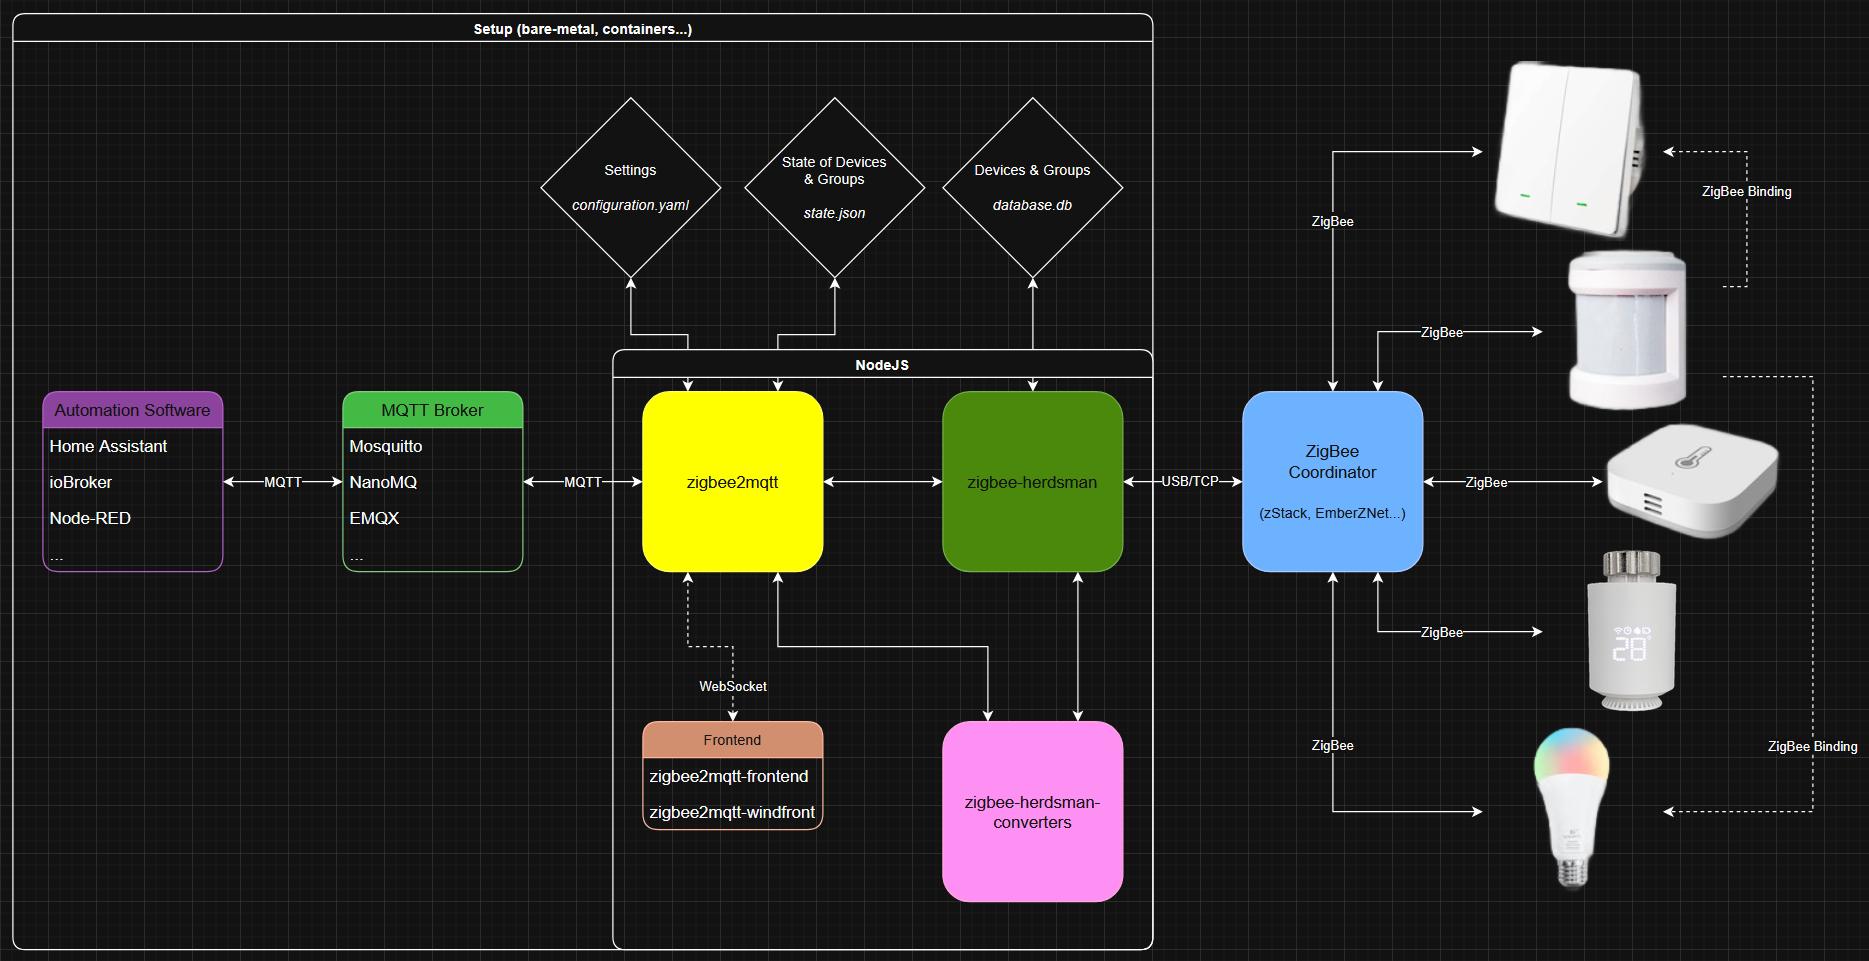
Internal Architecture
Zigbee2MQTT is made up of three modules, each developed in its own Github project. Starting from the hardware (adapter) and moving up; zigbee-herdsman connects to your adapter to handle Zigbee communication and makes an API available to the higher levels of the stack. For e.g. Texas Instruments hardware, zigbee-herdsman uses the TI zStack monitoring and test API to communicate with the adapter. The module zigbee-herdsman-converters handles the mapping from individual device models to the Zigbee clusters they support. Zigbee clusters are the layers of the Zigbee protocol on top of the base protocol that define things like how lights, sensors and switches talk to each other over the Zigbee network. Finally, the Zigbee2MQTT module drives zigbee-herdsman and maps the zigbee messages to MQTT messages. Zigbee2MQTT also keeps track of the state of the system. It uses a database.db file to store this state; a text file with a JSON database of connected devices and their capabilities. Zigbee2MQTT provides several web-based interfaces (zigbee2mqtt-frontend, zigbee2mqtt-windfront) that allows monitoring and configuration.
Developing
Zigbee2MQTT uses TypeScript. Therefore after making changes to files in the lib/ directory you need to recompile Zigbee2MQTT. This can be done by executing pnpm run build. For faster development instead of running pnpm run build you can run pnpm run build:watch in another terminal session, this will recompile as you change files.
Before running any of the commands, you'll first need to run pnpm install --include=dev.
Before submitting changes run pnpm run check:w then pnpm run test:coverage.
Supported devices
See Supported devices to check whether your device is supported. There is quite an extensive list, including devices from vendors like Xiaomi, Ikea, Philips, OSRAM and more.
If it's not listed in Supported devices, support can be added (fairly) easily, see How to support new devices.
Support & help
If you need assistance you can check opened issues. Feel free to help with Pull Requests when you were able to fix things or add new devices or just share the love on social media.
Categories
Download Statistics
Total Downloads Over Time
Related apps
Explore more like this
Explore allLinks
Details
koenkk/zigbee2mqttRuntime arguments
- Web UI
http://[IP]:[PORT:8080]/- Network
bridge- Privileged
- false
Template configuration
Container Path: /app/data
- Target
- /app/data
- Default
- /mnt/user/appdata/zigbee2mqtt
Container Port: 8080
- Target
- 8080
- Default
- 9442