
All apps · 0 apps

Smart-Gallery-for-ComfyUI
Docker app from martial's Repository
Overview
Readme
View on GitHubSmartGallery DAM
The Open Source Digital Asset Manager & Gallery Built for ComfyUI & AI Production Libraries




🚀 Quick Install • ✨ What's New (v2.24) • ⚡ Core Features • 🌐 Official Website •
🎯 Who is SmartGallery DAM for?
🌱 The ComfyUI Newbie: You just installed ComfyUI and want a clean, intuitive gallery right from day one.
📈 The Active Creator: You have 50,000+ generations scattered everywhere and can't find anything anymore.
🧠 The Power User: You want total control over your library, shifting from a workflow-centric canvas to a gallery-centric hub.
⚡ The Speed Demon: You need to generate variations directly from your gallery in seconds, without opening or waiting for the ComfyUI canvas.
🛋️ The Couch Potato: You prefer managing, filtering, and triggering generations directly from your phone while lounging on the sofa.
💼 The Production Studio: You work with professional clients and need seamless asset reviews, production briefs, and approvals.
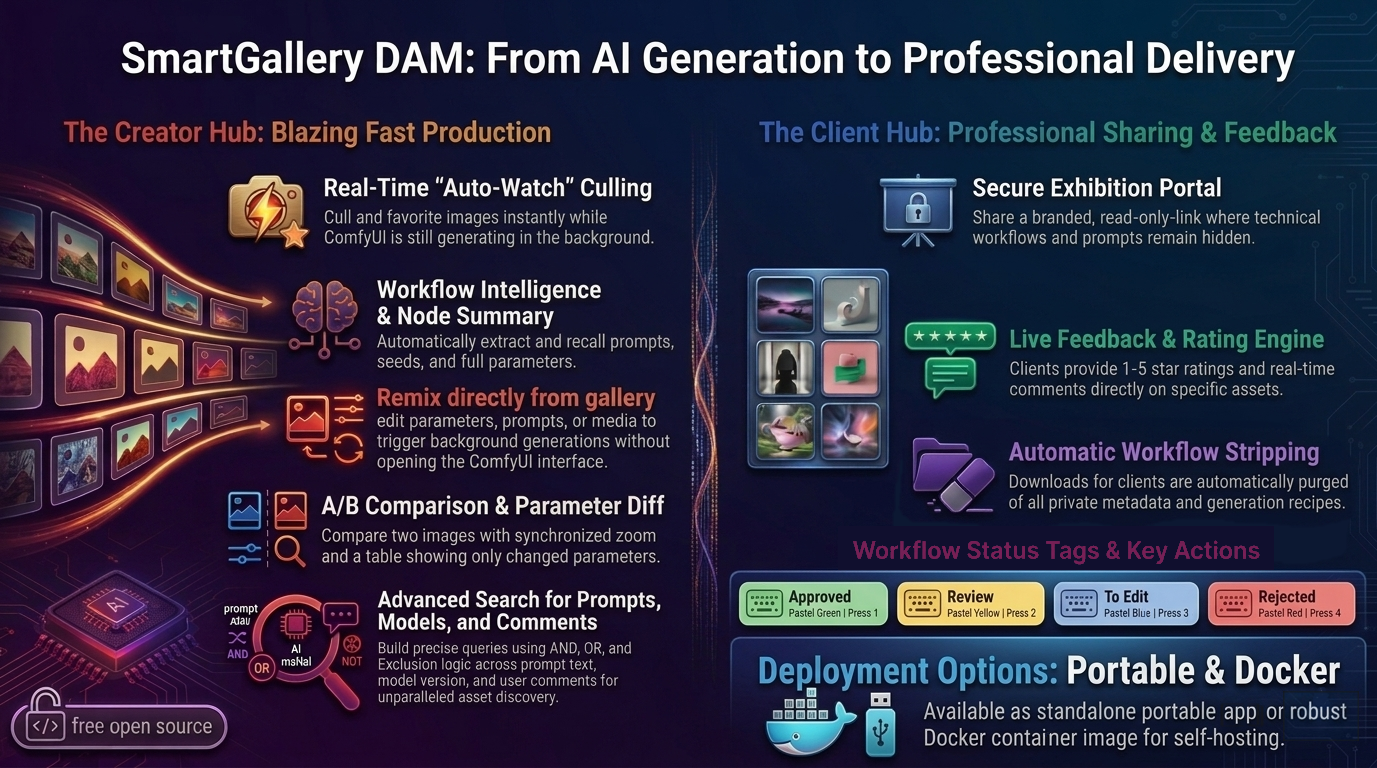
- 🖼 Ultra-Fast Browsing: Explore and review massive volumes of AI generations with an instantly responsive gallery interface.
- 📂 Effortless Organization: Sort, tag, and catalog huge volumes of images, videos, and audio files with powerful automated tools.
- 🔎 Deep Search: Locate any asset instantly using prompts, models, parameters, metadata, or advanced SQL queries.
- 🎨 Remix Engine & Nodepad: Generate, edit node JSONs, and create variations through a clean native interface, without ever opening the ComfyUI spaghetti UI.
- ⚡ ComfyUI Queue Deck: Manage, monitor, and control your Comfy generation queue and system telemetry directly within SmartGallery, bypassing the messy node canvas.
- 👥 Client Sharing Portal: Share curated galleries securely with clients while keeping your workflows, prompts, and IP private.
- 📱 Mobile-First Experience: Access, search, and monitor your entire creative asset library and generation pipeline from any device.
We are not aware of any other self-hosted media manager with a mobile experience this complete.
Browse, search, rate, review, organize, remix, read production briefs, and use high-density List View directly from your phone.
A gallery-centric hub for your work and decisions.
🌐 smartgallerydam.com · full documentation, wiki and feature reference · ▶️ Presentation Video
⚡ Why SmartGallery DAM?
| Feature | Why It Matters |
|---|---|
| 🗂️ File Manager | Rename, move, copy, delete, create folders in-browser |
| ⚡ ComfyUI Queue Deck | Real-time mission control for execution queues, step tracking, live stream preview & GPU/VRAM load (Shift+Q) - NEW ▶️ Look at the Video |
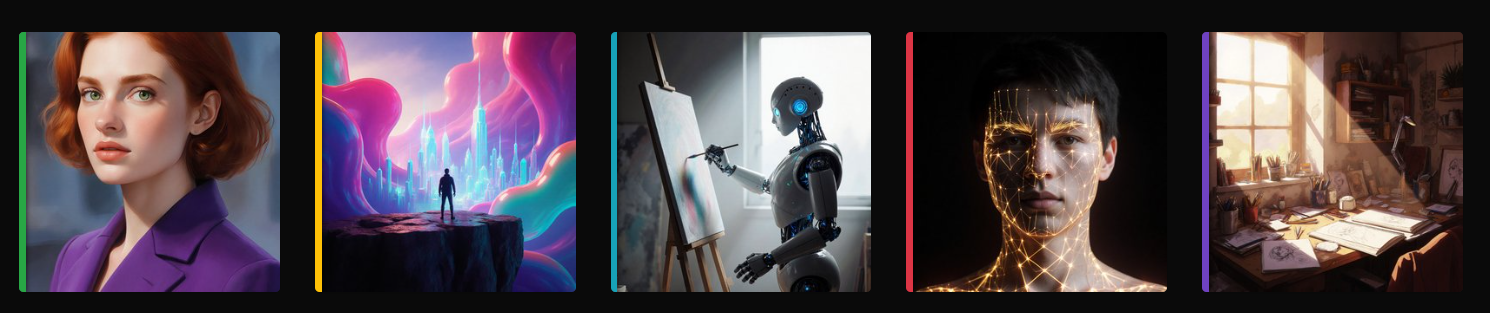
| 🧬 Smart Asset Clustering | Group generations by node architecture or prompt text (Shift+C) using colorful #HASH badges for at-a-glance visual grouping ▶️ Look at the Video |
| 📋 Full Asset Details | Instant 360° inspector for disk paths, symlink targets & node pipelines (I) |
| 📝 Collection Notes & Briefs | Attach rich Markdown specs & checklists to virtual albums |
| 🔍 Instant Search | Find by prompt, checkpoint, LoRA (with live autocomplete), date or comment |
| 🧠 OmniQuery | Search your gallery in plain English, any criteria. Let AI write complex SQL queries to find hyper-specific cross-referenced media |
| 🔗 Any Folder & Drive Mounts | Point at any ComfyUI output, NAS, symlink or network path |
| 📤 Magic Upload | Drag & drop from PC/smartphone, auto-extract & index workflows |
| 📑 Grid & List Views | Browse the way you prefer (with inline audio player in List View) |
| 🪄 Remix Engine | Generate without opening ComfyUI. A 3-tier workspace to extract workflows, build custom dashboards, edit raw JSON with live dictionary lookups, and queue directly |
| 🔌 LoRA Synergy™ | Fully offline matchmaker. Scans Safetensors to guarantee checkpoint compatibility (SD1.5, SDXL, Flux), surfaces trigger words, and auto-wires the workflow |
| ⚖️ Compare Generations | A/B slider with automatic parameter diff |
| 👥 Team Ready | Roles, per-image comments, star ratings |
| 🗃️ Nested Collections | Virtual albums & tree hierarchies, zero duplication on disk |
| 🏷️ Status Tags | Track approval status across the whole library |
| 🛡️ Client Portal & Filtering | Share curated collections with clients; new filter overlay for Exhibition Mode |
| 🎬 Video & Audio | Multimedia, transcoding included. Thumbnails, storyboard preview, dynamic audio waveforms, and on-the-fly FFmpeg transcoding |
| 🌐 Cross Platform | Windows, macOS, Linux, Docker: everywhere |
| ⚡ Simple Installation | Zero-config Portable App for Windows (unzip & run) and official Docker image |
💡 ComfyUI-Aware. ComfyUI-Independent.
SmartGallery DAM runs as a fully independent process, outside ComfyUI's environment. It keeps indexing and organizing your library whether ComfyUI is up, down, updating, or completely uninstalled. No custom node, no shared dependencies.
SmartGallery DAM is ComfyUI-aware (it reads workflows, extracts prompts, understands models and LoRAs) but ComfyUI-independent by design. Your DAM outlives any tool it connects to.
What this means in practice:
- ComfyUI is broken after a Python update? SmartGallery keeps running.
- Run it alongside ComfyUI on the same machine on a different port. Or install it on a separate machine or laptop and just link the output folder over the network.
- You switched tools entirely? SmartGallery works on any folder of media. It was never ComfyUI-only to begin with.
📌 Table of Contents
- OVERVIEW & CONCEPTS
- SETUP & CONFIGURATION
- INTERFACE WALKTHROUGH
- 3.1 The Main Workspace (Creator Hub)
- 3.2 Advanced Media Inspection
- 3.2.1 The Lightbox (Media Viewer)
- 3.2.2 Full Asset Details Panel (📋 / Shortcut I)
- 3.2.3 Smart Asset Clustering & Inspector (🧬 / Shortcut Shift+C)
- 3.2.4 ComfyUI Node Summary (📝 / Shortcut N)
- 3.2.5 Remix Workflow & The { } Nodepad (✦ / Shortcut B)
- 3.2.6 ComfyUI Queue Deck (⚡ / Shortcut Shift+Q)
- 3.2.7 LoRA Synergy™
- 3.2.8 Compare Mode
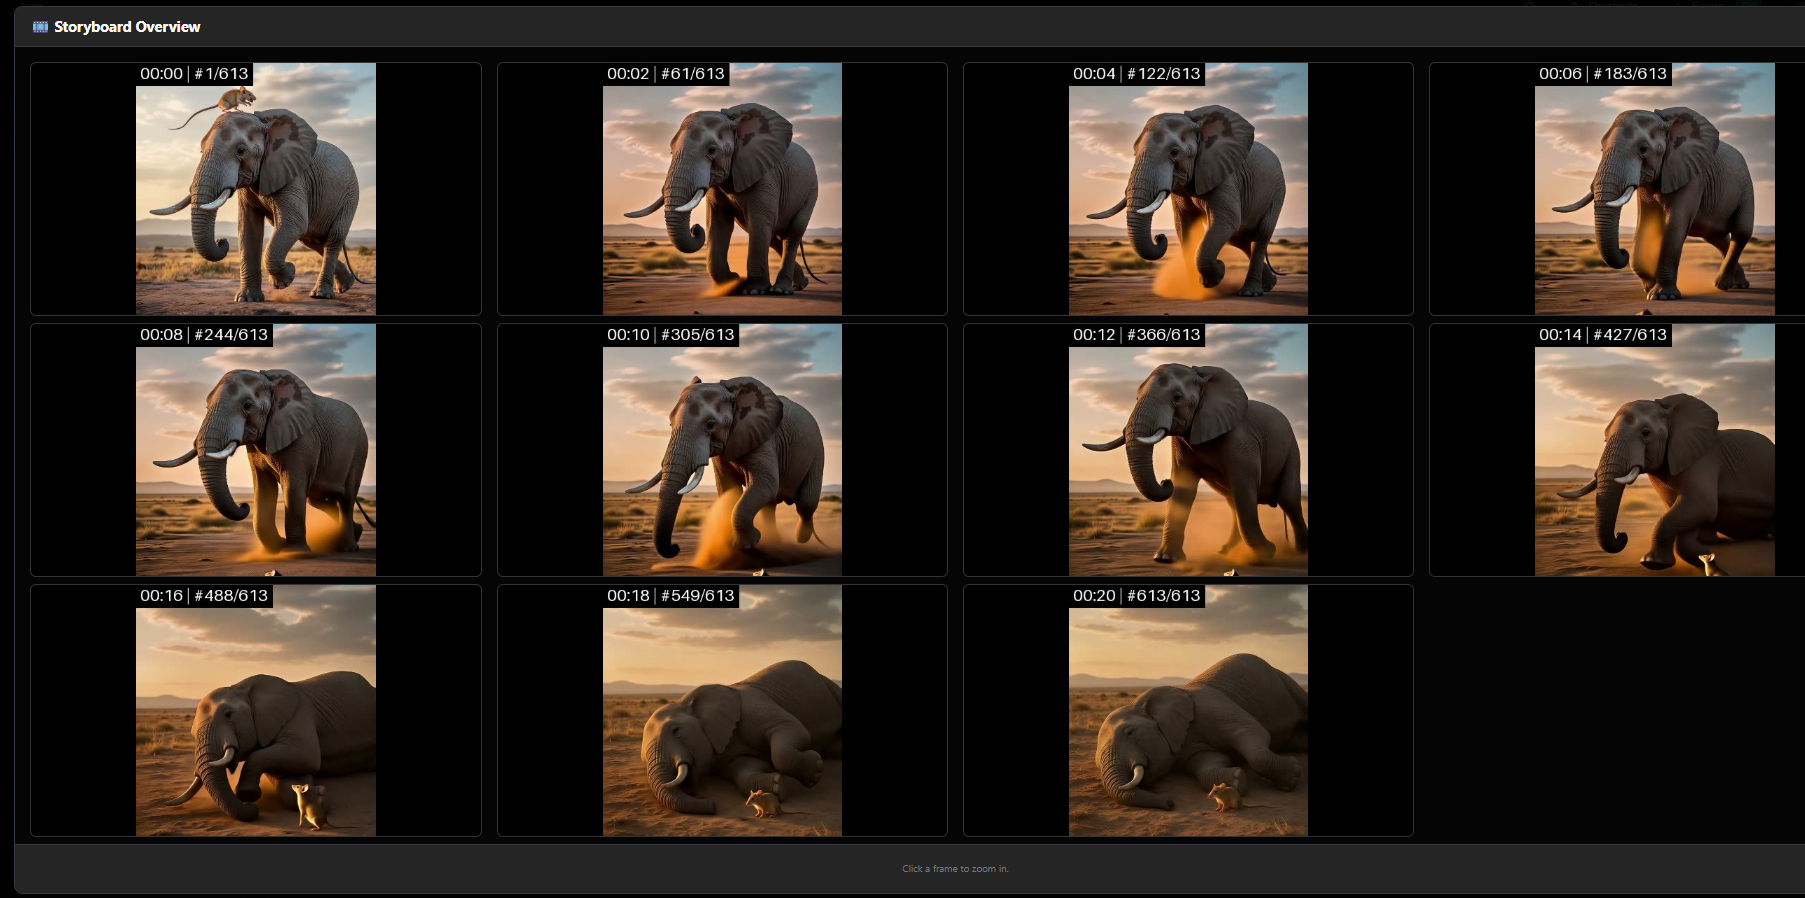
- 3.2.9 Video Storyboard
- 3.3 Digital Asset Management (DAM) & Communication
- 3.4 User Management & Access Control
- 3.5 The Exhibition Portal (Client Hub)
- ADVANCED TOPICS & REFERENCE
1. OVERVIEW & CONCEPTS
1.1 What is SmartGallery DAM?
SmartGallery DAM is the evolution of SmartGallery for ComfyUI. What started as a fast local gallery for browsing outputs has grown into a powerful and easy-to-use Digital Asset Management system.
Evolve your workflow from a simple collection of files into a structured, searchable library. Designed for individual creators and professional teams, this platform is ridiculously simple to use, yet powerful enough to act as the ultimate file manager for your generations. Every asset is automatically indexed, linked to its original generative parameters, and ready for secure review. The system is open-source, private, and entirely local: no cloud dependencies and no recurring costs.
Who is this for?
- The AI Artist & Creator. You run ComfyUI all day. Your output folder has tens of thousands of files and you can never find anything. SmartGallery lives outside that chaos. It indexes every generation with its full workflow, groups variations automatically using Smart Asset Clustering (
Shift+C), lets you search by prompt, model, or LoRA with live auto-suggest, manage generation queues in real time with the Queue Deck (Shift+Q), and cull while batches are still running. When ComfyUI breaks, SmartGallery doesn't even blink. - The Creative Pro or Team. You deliver AI visuals to clients. Sharing via Google Drive or Dropbox feels unprofessional. SmartGallery gives you Production Briefs (
.md/.txt) attached to collections, status tags, and an optional Exhibition portal where clients rate and comment on images in real time, while your prompts and workflows stay completely invisible to them. - Everyone else. You just want to organize photos, videos, or art and share them nicely. SmartGallery works with any folder on your system.
- The Remote or Multi-Machine User. You want your gallery on a dedicated machine (a laptop, a NAS, a home server) without installing ComfyUI there. Install SmartGallery on that machine, link your ComfyUI output folder over the network, and access the full DAM from any browser, on any device, including your phone.
1.2 What's New in v2.24
🚀 Features & Enhancements [v2.24.2] - 2026-10-03
- Generation Data Overlay (
Shift+M): Added a toggleable overlay (via shortcutShift+Mor the Settings & Info menu) that displays key generation parameters on focused thumbnails in Grid View and inside the Lightbox. Supports both ComfyUI and AUTOMATIC1111 (A1111 / WebUI) metadata formats. - Full Asset Details: Added a dedicated "Generation data" tab inspecting structured generation parameters for both ComfyUI and A1111 assets.
- Remix Workflow (Auto-Form): Enhanced input image resolution management with instant dimension inheritance, zero-dimension aspect ratio preservation, integrated aspect ratio locking (
🔒/🔓), quick scaling, and guidance to Nodepad when preset resolution nodes are detected.
[v2.24] - 2026-09-21
- ⚡ ComfyUI Queue Deck (
Shift+Q): Introduces a unified mission control dashboard to monitor live progressive sampling steps (Step X / Y (Z%)), stream live video/image previews during generation, track driver-level VRAM & GPU compute loads (nvidia-smi), manage the execution queue (reorder, interrupt, delete, clear all), and inspect recent completed job graphs and metadata. Access it instantly via Shift+Q or from the Tools menu. 👉 READ the ComfyUI Queue Deck Manual ▶️ Look at the Video. - ✨ Interactive Node JSON Inspector: All node chips across both the Full Asset Details Panel (I) and the Cluster Inspector (Shift+C) are now interactive and clickable, opening a global viewer to inspect the raw JSON parameters and configuration for any individual node in the workflow.
- 🐛 Auto-Watch GPU Resource Optimization: Resolved an issue where enabling the "Auto-watch" feature caused disproportionate GPU compute usage on the client side even while idle.
Previous Highlights:
- 📁 Folder File Count Badges & Dynamic Tree Collapse: Real-time file count badges across the directory tree in the sidebar and file management dialogs, with dynamic
+Nbadges for nested subfolders.- 🧬 Smart Asset Clustering & Visual Inspector (
Shift+C): Instantly group and compare media generated by identical ComfyUI graph architectures (workflow_hash) or identical positive prompts (prompt_hash). 👉 READ the Smart Asset Clustering Manual ▶️ Look at the Video.- 📋 Full Asset Details Panel (I Key): High-density two-tab diagnostic inspector for file metrics, Megapixel density, absolute disk paths vs. real symlink targets, and node execution flow. 👉 READ the Full Asset Details Manual.
- 📝 Interactive Collection Notes & Production Briefs: Attach rich Markdown production briefs (
.mdor.txt) to Virtual Collections. 👉 READ the Collection Notes Manual.- 🧠 OmniQuery (AI-Powered SQL Explorer): Ask complex questions to your DAM in natural language via LLMs. 👉 READ the OmniQuery Manual.
- 🔌 LoRA Synergy™: Offline LoRA matchmaker that reads safetensors headers to guarantee checkpoint compatibility and auto-wire nodes. 👉 READ the LoRA Synergy Manual.
- 📑 List View with Audio Player: High-density table layout with inline audio playback controls.
[!NOTE] Read the Full Changelog so you don't miss out on all the quality-of-life improvements and bug fixes!
1.3 Core Features
Live Workspace, Queue Control & File Management
- ComfyUI Queue Deck (
Shift+Q): Live execution dashboard to monitor progressive sampling steps, stream previews in real time, track GPU compute & VRAM load, reorder/cancel queued jobs, and inspect recent job outputs. - Cross-platform, Cross-device: Runs locally on Windows, macOS, Linux, and Docker. The responsive web interface works flawlessly across desktops, tablets, and smartphones.
- Auto-Watch: Detects new ComfyUI outputs the moment they are saved. Cull with
Del, favorite withF, move withM, all while generation is still running. - Magic Upload: Drag & drop or upload files from your PC or smartphone directly into any folder via the web interface. ComfyUI metadata is extracted automatically.
- Full File Manager: Select files individually or in bulk. Move, copy, delete, or ZIP directly from the browser.
- Focus Mode: Press
Qto hide all UI chrome. Maximum screen space for pure curation. - External Drive Mounting: Link any external drive, NAS, or network path via Symlinks directly from the UI.
- List View with Audio Player: High-density table layout with inline audio playback controls.
Workflow Intelligence & Asset Clustering
- Smart Asset Clustering (
Shift+C): Group generations by identical node graph architecture or exact prompt text across folders. Includes the Cluster Inspector for pipeline visualization and one-click clustering. - Full Asset Details Panel (
I): High-density 2-tab inspector for metrics, Megapixels, physical disk paths, real symlink targets, collection ancestry, and model inventories. - Interactive Node JSON Inspector: Click on any node chip in the Info Panel or Cluster Inspector to inspect its raw JSON parameters and links.
- LoRA Synergy: Zero-API offline matching that prevents architecture mismatch errors by reading safetensors and automatically wiring your graph.
- Node Summary Dashboard (
N): PressNon any image to see Seed, CFG, Steps, Sampler, Scheduler, all active Models, LoRAs with weights, and full positive/negative prompts. - Remix 3-Tier Workflow (
B): PressBto break out of the canvas. Use the Auto-Form for simple prompts, build a custom dashboard in My Panel, or edit raw backend JSON safely with the revolutionary { } Nodepad. - Workflow Download and Copy: Press
Wto download the raw JSON workflow,Cto copy it to clipboard and paste directly back into ComfyUI. - Clean Export: Press
Shift+Wto download a pixel-perfect copy stripped of all EXIF data and embedded workflows. Safe to share externally. - Compare Mode: Select two generations, open the A/B slider with synchronized zoom and pan. A parameter diff table shows only the values that changed.
Organization (DAM) & Search
- Collection Notes & Production Briefs: Attach rich Markdown
.mdor.txtbriefs to Virtual Collections. Collections with notes feature a yellow accent, top toolbar access button, tabbed multi-note reader, and interactive rating/commenting. - Fuzzy Workflow Search & Auto-Suggest: Search models and LoRAs with alphanumeric normalization (
wan 2.2->wan2.2_i2v_high.safetensors), live two-line autocomplete dropdown, and "Did You Mean?" suggestions. - OmniQuery (AI SQL Explorer): Query the database using AI to answer complex questions safely (read-only).
- Virtual Nested Collections: Group files from different physical folders into a hierarchical tree of albums without duplicating a byte on disk.
- Collection Sharing: Keep collections private, mark them as Exhibition Ready for all guests, or share them exclusively with specific users.
- Status Tags: Keyboard shortcuts
1to5apply color-coded team statuses: Approved, Review, To Edit, Rejected, Select. - Favorites: Press
Fto toggle a Favorite flag on any file. - Search by Anything: Prompt keywords, checkpoint name, LoRA name, comment text, date range, file extension, or star rating ranges.
Media Tools & Exhibition Mode
- Exhibition Mode & Filter Panel: A separate, secure portal for clients or collaborators. Physical folder browsing is disabled. Includes a dedicated filter overlay for external stakeholders.
- Blind Rating System: Hides global average ratings from users to prevent group bias during review sessions.
- Video Storyboard: Press
Ein the Lightbox to generate a grid of 11 evenly-spaced frames from start to last frame. - Dynamic Audio Waveforms: Real-time amplitude scaling (🌊) without media regeneration.
- Video Transcoding: ProRes, MKV, AVI, MOV are auto-transcoded via FFmpeg for smooth browser playback.
1.4 Use Case Scenarios
SmartGallery has two interfaces: the Main Interface (your personal workspace) and Exhibition (an optional sharing portal for clients, collaborators, or friends). They are completely independent. You can run just the Main Interface forever and never touch Exhibition. You can launch Exhibition only when you have something to share and shut it down when the review is over. Neither requires the other to be running.
Scenario 1: Solo user, no sharing needed (upgrading from v1)
If you used SmartGallery v1 as an advanced file manager and have no need to share your work, nothing changes. Launch it exactly as before, with no extra parameters:
python smartgallery.py
ComfyUI is generating hundreds of files. As each one appears in the grid, you decide in real time: delete the bad seeds immediately with Del, move the keepers to the right folder with M, mark favorites with F, or tag them with a color status. You do all of this while generation is still running. When you want to review later, you search by prompt keywords, model name, or LoRA, pull up the full node summary for any image from months ago, monitor the queue in real time with Shift+Q, or compare two generations side by side with a parameter diff.
When ComfyUI is not running, the same interface works as a full file manager for all your media. No Exhibition needed, ever, unless you decide you want it.
What is new in v2 that you can start using immediately, with no additional setup:
- ComfyUI Queue Deck: press
Shift+Qto open the live execution center, track generation steps, preview ongoing renders, and manage the execution queue. - Virtual Collections: group files from different folders into named albums without moving anything on disk. Open the Collections tab in the left sidebar and click + to create one.
- Status Tags: mark any image with a workflow state using keys
1to5. For example, press3to flag a file as "To Edit" and come back to it later. Browse all files with a given status from the Status tab in the sidebar. - Ratings and personal notes: press
Gon any image to open the Details panel. Assign a 1 to 5 star rating and write a note to yourself. These notes are searchable: use the comment keyword filter to find any image by words you wrote in your own comments. - Clean Export: to send a file to someone without exposing your ComfyUI workflow and models, press
Shift+W. You get a pixel-perfect copy with all metadata stripped.
Scenario 2: Sharing your work with Exhibition
Exhibition is a separate, read-only portal you share with clients, collaborators, or anyone you want to show your work to.
Step 1: Launch the Main Interface with authentication.
The line below shows only the launch command with the relevant parameters. In practice you should add these parameters to your platform launch script (the
.bator.shfile you created during installation), which also sets your folder paths and ffprobe location. If you have not created a launch script yet, see the Installation section, pick your platform, and follow the instructions there first.
python smartgallery.py --port 8189 --admin-pass yourpassword --force-login
Log in at http://localhost:8189 with username admin (always lowercase) and the password you set above.
Step 2: Create Collections and set Permissions. In the left sidebar, open the Collections tab and click +. Give each collection a name. You can toggle it as "Exhibition Ready" (public for everyone in the portal), or click the ⋮ menu -> 👥 Share / Permissions to assign it exclusively to a specific client.
Step 3: Create user accounts. Click the user management icon in the sidebar. Create an account for each person who will access Exhibition. For clients and external viewers, assign the role CUSTOMER or USER. Share their credentials and the Exhibition URL with them directly.
Step 4: Launch Exhibition.
Same as above: add these parameters to a second launch script for Exhibition (a separate
.bator.shfile), keeping your folder paths and other settings identical to the Main Interface script. Run it from a second terminal when you are ready to share.
python smartgallery.py --exhibition --port 8190 --admin-pass yourpassword
Share http://youraddress:8190 with your users. They will see only the collections assigned to them, with no prompts, no workflow data, and no folder structure. They can leave star ratings and write comments on individual images. You can read and reply to their feedback from the Main Interface at any time.
Scenario 3: Small team working together (Blind Rating)
The team lead runs the Main Interface with --force-login and --admin-pass so the workspace is password-protected. Each team member gets a STAFF account and logs into the same Main Interface remotely to review files, apply status tags, and leave internal comments on specific images.
python smartgallery.py --port 8189 --admin-pass yourpassword --force-login
When work is ready for a client, a CUSTOMER account is created, the relevant Collections are mapped, and Exhibition is launched on a separate port. To prevent the client (or team members) from being influenced by what others voted, the lead launches Exhibition with the --blind-rating flag:
python smartgallery.py --exhibition --port 8190 --admin-pass yourpassword --blind-rating
Now, when clients log into http://youraddress:8190, they cannot see the global average score. They only see their own stars. Admins reviewing the gallery can press B to toggle the blind mode off temporarily and see the real consensus.
All feedback runs through the same database, with no file transfers, no email threads, and no ZIP files.
2. SETUP & CONFIGURATION
2.1 Installation
Requirements:
- Portable/Docker Installation: No installation required. Everything is pre-configured (Python is already embedded).
- Manual Installation: Python 3.10+ installed on your system.
- Strongly Recommended: FFmpeg/FFprobe (for advanced video features).
Windows Installation Guide
There are two ways to run SmartGallery on Windows: using the ready-to-use Portable Version (Recommended) or the Manual Git Installation.
Method 1: Portable Version (Recommended)
This version includes a fully self-contained environment. You do not need to install Python or any dependencies on your system—it is completely plug-and-play.
1. Download & Extract
- Direct Download: SmartGallery-v2.24.2-Windows-Portable.zip
- Releases Page: Alternatively, view all builds on the Releases page.
- Extract the archive into a folder of your choice.
2. Configure and Run
- Read First: Before launching, open the
00_START_HERE.txtfile included in the root folder for essential setup instructions. - Customize: Rename
sample_run_smartgallery.battorun_smartgallery.bat, right-click it, and select Edit. - Setup Paths: Update the
CONFIGURATIONsection to point to your specific ComfyUI folders (ensure you use forward slashes/). - Launch: Save the file and double-click
run_smartgallery.batto launch the server!
3. Updating to a Newer Version To update to a newer release while preserving your settings:
- Download and extract the new Portable ZIP into a fresh folder.
- Simply copy your existing
run_smartgallery.bat(and any custom.batfiles for Exhibition Mode) into the new folder. - Launch your copied
.batfile; your configuration will be preserved automatically.
Note: SmartGallery DAM is completely standalone; your database and settings are kept safe in your chosen configuration path.
Method 2: Manual / Git Installation
For advanced users who prefer managing their own Python virtual environments and updating via Git.
1. Clone and setup
git clone https://github.com/biagiomaf/smart-comfyui-gallery
cd smart-comfyui-gallery
python -m venv venv
venv\Scripts\activate
pip install -r requirements.txt
Or download the Source Code ZIP from Releases, extract, and run the pip commands above.
2. Create your launch script
Create run_smartgallery.bat in the root folder:
@echo off
cd /d %~dp0
call venv\Scripts\activate.bat

:: --- CONFIGURATION: replace with your real paths ---
:: Use forward slashes (/) even on Windows
set "BASE_OUTPUT_PATH=C:/Path/To/ComfyUI/output"
set "BASE_INPUT_PATH=C:/Path/To/ComfyUI/input"
set "BASE_SMARTGALLERY_PATH=C:/Path/To/ComfyUI/output"
set "FFPROBE_MANUAL_PATH=C:/Path/To/ffmpeg/bin/ffprobe.exe"
set SERVER_PORT=8189

:: --- OPTIONAL LAUNCH PARAMETERS ---
:: Add any of the following to the python command below depending on your scenario:
::
::   --admin-pass yourpassword   Set the admin password (log in as: admin / yourpassword)
::   --force-login               Require login on the Main Interface (use with --admin-pass)
::   --exhibition                Start in Exhibition Mode instead of the Main Interface
::   --port 8190                 Use a different port (default: 8189)
::   --enable-guest-login        Allow anonymous guest access in Exhibition
::   --blind-rating              Hide global averages to prevent user bias
::
:: Example – Main Interface with login enforced:
::   python smartgallery.py --port 8189 --admin-pass yourpassword --force-login
::
:: Example – Exhibition on port 8190 with Blind Rating:
::   python smartgallery.py --exhibition --port 8190 --admin-pass yourpassword --blind-rating

:: --- START ---
python smartgallery.py
pause
Double-click run_smartgallery.bat to start.
3. Update
cd smart-comfyui-gallery
git pull
venv\Scripts\activate
pip install -r requirements.txt
macOS Installation Guide
1. Clone and setup
git clone https://github.com/biagiomaf/smart-comfyui-gallery
cd smart-comfyui-gallery
python3 -m venv venv
source venv/bin/activate
pip install -r requirements.txt
2. Create your launch script
Create run_smartgallery.sh and make it executable (chmod +x run_smartgallery.sh):
#!/bin/bash
source venv/bin/activate

# Fix for "Too many open files" on macOS
ulimit -n 4096

# --- CONFIGURATION: replace with your real paths ---
export BASE_OUTPUT_PATH="$HOME/ComfyUI/output"
export BASE_INPUT_PATH="$HOME/ComfyUI/input"
export BASE_SMARTGALLERY_PATH="$HOME/ComfyUI/output"
export FFPROBE_MANUAL_PATH="/opt/homebrew/bin/ffprobe"
export SERVER_PORT=8189

# --- OPTIONAL LAUNCH PARAMETERS ---
# Add any of the following to the python command below depending on your scenario:
#
#   --admin-pass yourpassword   Set the admin password (log in as: admin / yourpassword)
#   --force-login               Require login on the Main Interface (use with --admin-pass)
#   --exhibition                Start in Exhibition Mode instead of the Main Interface
#   --port 8190                 Use a different port (default: 8189)
#   --enable-guest-login        Allow anonymous guest access in Exhibition
#   --blind-rating              Hide global averages to prevent user bias
#
# Example – Main Interface with login enforced:
#   python smartgallery.py --port 8189 --admin-pass yourpassword --force-login
#
# Example – Exhibition on port 8190 with Blind Rating:
#   python smartgallery.py --exhibition --port 8190 --admin-pass yourpassword --blind-rating

# --- START ---
python smartgallery.py
Run with: ./run_smartgallery.sh
Install FFmpeg via Homebrew: brew install ffmpeg
3. Update
cd smart-comfyui-gallery && git pull
source venv/bin/activate && pip install -r requirements.txt
Linux Installation Guide
1. Clone and setup
git clone https://github.com/biagiomaf/smart-comfyui-gallery
cd smart-comfyui-gallery
python3 -m venv venv
source venv/bin/activate
pip install -r requirements.txt
2. Create your launch script
Create run_smartgallery.sh and make it executable (chmod +x run_smartgallery.sh):
#!/bin/bash
source venv/bin/activate

# --- CONFIGURATION: replace with your real paths ---
export BASE_OUTPUT_PATH="$HOME/ComfyUI/output"
export BASE_INPUT_PATH="$HOME/ComfyUI/input"
export BASE_SMARTGALLERY_PATH="$HOME/ComfyUI/output"
export FFPROBE_MANUAL_PATH="/usr/bin/ffprobe"
export SERVER_PORT=8189

# --- OPTIONAL LAUNCH PARAMETERS ---
# Add any of the following to the python command below depending on your scenario:
#
#   --admin-pass yourpassword   Set the admin password (log in as: admin / yourpassword)
#   --force-login               Require login on the Main Interface (use with --admin-pass)
#   --exhibition                Start in Exhibition Mode instead of the Main Interface
#   --port 8190                 Use a different port (default: 8189)
#   --enable-guest-login        Allow anonymous guest access in Exhibition
#   --blind-rating              Hide global averages to prevent user bias
#
# Example – Main Interface with login enforced:
#   python smartgallery.py --port 8189 --admin-pass yourpassword --force-login
#
# Example – Exhibition on port 8190:
#   python smartgallery.py --exhibition --port 8190 --admin-pass yourpassword --blind-rating

# --- START ---
python smartgallery.py
Run with: ./run_smartgallery.sh
3. Update
cd smart-comfyui-gallery && git pull
source venv/bin/activate && pip install -r requirements.txt
Docker & Unraid Setup Guide
Special thanks to Martial Michel (@mmartial) for orchestrating Docker support and contributing to the core application logic.
Pre-built image on DockerHub and Unraid Community Apps.
Run:
docker run \
  --name smartgallery \
  -v /your/host/output:/mnt/output \
  -v /your/host/input:/mnt/input \
  -v /your/host/SmartGallery:/mnt/SmartGallery \
  -e BASE_OUTPUT_PATH=/mnt/output \
  -e BASE_INPUT_PATH=/mnt/input \
  -e BASE_SMARTGALLERY_PATH=/mnt/SmartGallery \
  -e WANTED_UID=`id -u` \
  -e WANTED_GID=`id -g` \
  # -e CLI_ARGS="..."   # Optional: add launch parameters here (see below) \
  -p 8189:8189 \
  mmartial/smart-comfyui-gallery
The CLI_ARGS environment variable passes optional launch parameters to SmartGallery inside the container. Add it to the command above depending on your scenario:
| Scenario | CLI_ARGS value | Port mapping |
|---|---|---|
| Main Interface with login | --admin-pass yourpassword --force-login |
-p 8189:8189 |
| Exhibition | --exhibition --admin-pass yourpassword |
-p 8190:8189 |
| Exhibition with guest access | --exhibition --admin-pass yourpassword --enable-guest-login |
-p 8190:8189 |
| Exhibition with Blind Rating | --exhibition --admin-pass yourpassword --blind-rating |
-p 8190:8189 |
For Exhibition scenarios, replace -p 8189:8189 in the docker run command above with -p 8190:8189. This maps port 8190 on your host to the container's internal port 8189, so clients reach Exhibition at http://youraddress:8190.
When using --admin-pass, log in with username admin (always lowercase) and the password you set.
For running both instances simultaneously, see the dedicated section under Launch Parameters.
Update:
docker pull mmartial/smart-comfyui-gallery
docker stop smartgallery && docker rm smartgallery
# Re-run the docker run command above
Full Docker guide: docs/DOCKER_HELP.md
Once installed, open SmartGallery at:
http://127.0.0.1:8189/galleryout
[!IMPORTANT] When you update to a new version:
- For Portable Installations: Simply download the new version, extract it, and overwrite your existing files. Remember to keep your existing launch scripts (
.bator.shfiles) to preserve your custom paths and settings.- For Docker Installations: Pull the latest image and restart your container. Your configuration is preserved via your volume mappings.
- For Manual Installations: Remember to keep your existing launch scripts (
.bator.shfiles). After updating your files, refresh your environment dependencies by running:pip install -r requirements.txt
2.2 Launch Parameters
The Main Interface and Exhibition are completely independent. You can run just one, both at the same time, or alternate between them. Neither requires the other to be running.
Main Interface parameters
All parameters are optional. Launched with no flags, SmartGallery runs on port 8189 and treats you as admin automatically when accessed from a local network.
| Flag | Required | Description |
|---|---|---|
--port <number> |
Optional | Override the default port (8189). |
--admin-pass <pwd> |
Optional* | Set the Admin password. Required to enable user management. Minimum 8 characters. Log in with username admin (always lowercase) and the password you set here. |
--force-login |
Optional* | Enforces authentication. Must always be combined with --admin-pass. Use when accessing from outside the local network. |
--blind-rating |
Optional | Forces Blind Rating mode. Useful if you want team members in the main UI to vote without bias. |
* --admin-pass and --force-login must be used together when either is specified.
Accessing the main interface from outside your local network? Always use
--admin-passand--force-logintogether, without exception. Without these two flags the interface is open to anyone who finds the URL.
Exhibition parameters
| Flag | Required | Description |
|---|---|---|
--exhibition |
Yes | Start in Exhibition Mode. Only assigned or public collections are visible. Physical folder browsing is disabled. |
--admin-pass <pwd> |
Yes | Set the Admin password. Required to protect the instance and enable user management. Minimum 8 characters. |
--port <number> |
Yes | Use a different port when running Exhibition alongside the main interface. Typically 8190. |
--enable-guest-login |
Optional | Shows a "Login as Guest" button. No account needed to browse Exhibition. |
--blind-rating |
Optional | Blind Rating Mode. Hides global average ratings from the UI. Users see and sort only by their own personal ratings, ensuring unbiased curation feedback from clients and guests. |
Running both instances: together or independently
The two instances can run at the same time from two separate terminals or scripts, or independently whenever needed. Launch Exhibition only when you have something to share. There is no requirement to keep both running permanently.
Python: two terminals or scripts
# Terminal 1: Main interface
python smartgallery.py --port 8189 --admin-pass yourpassword --force-login

# Terminal 2: Exhibition (launch only when needed, with Blind Rating active)
python smartgallery.py --exhibition --port 8190 --admin-pass yourpassword --blind-rating
Docker: same image, launched twice
# Main interface container (port 8189 on host)
docker run --name smartgallery-main \
  -v /your/host/output:/mnt/output \
  -v /your/host/input:/mnt/input \
  -v /your/host/SmartGallery:/mnt/SmartGallery \
  -e BASE_OUTPUT_PATH=/mnt/output \
  -e BASE_INPUT_PATH=/mnt/input \
  -e BASE_SMARTGALLERY_PATH=/mnt/SmartGallery \
  -e WANTED_UID=`id -u` \
  -e WANTED_GID=`id -g` \
  -e CLI_ARGS="--admin-pass yourpassword --force-login" \
  -p 8189:8189 \
  mmartial/smart-comfyui-gallery

# Exhibition container (port 8190 on host)
docker run --name smartgallery-exhibition \
  -v /your/host/output:/mnt/output \
  -v /your/host/input:/mnt/input \
  -v /your/host/SmartGallery:/mnt/SmartGallery \
  -e BASE_OUTPUT_PATH=/mnt/output \
  -e BASE_INPUT_PATH=/mnt/input \
  -e BASE_SMARTGALLERY_PATH=/mnt/SmartGallery \
  -e WANTED_UID=`id -u` \
  -e WANTED_GID=`id -g` \
  -e CLI_ARGS="--exhibition --admin-pass yourpassword --blind-rating" \
  -p 8190:8189 \
  mmartial/smart-comfyui-gallery
Docker port mapping: the syntax is HOST:CONTAINER. Both containers run internally on port 8189, but are reachable at :8189 and :8190 respectively on your machine. They share the same data volumes, so files, tags, and collections are visible in both.
2.3 FFmpeg Integration
FFmpeg is optional but strongly recommended. Without it, video files will not generate thumbnails, the storyboard feature will not work, and formats like ProRes, MKV, AVI, and MOV will not transcode for browser playback.
If you only work with images, you can skip this entirely.
What FFmpeg enables
- Thumbnail generation for MP4, WEBM, and all transcoded formats
- Video Storyboard: the 11-frame grid preview (
Ekey in the Lightbox) - Interactive Audio Waveforms (
GENERATE_WAVEFORMS=true) - On-the-fly transcoding of ProRes, MKV, AVI, MOV to a browser-compatible format
- Workflow extraction from video files generated by ComfyUI
SmartGallery uses ffprobe (included in every FFmpeg installation) to read video metadata, and ffmpeg itself for transcoding. You point SmartGallery to the ffprobe binary via the FFPROBE_MANUAL_PATH variable in your launch script.
Install FFmpeg on Windows
- Download a pre-built release from ffmpeg.org/download.html (the "Windows builds" section, for example from gyan.dev or BtbN).
- Extract the archive to a permanent location, for example
C:/ffmpeg. - The binaries you need are inside the
binfolder:ffmpeg.exeandffprobe.exe. - In your
run_smartgallery.bat, set:
set "FFPROBE_MANUAL_PATH=C:/ffmpeg/bin/ffprobe.exe"
You do not need to add FFmpeg to your system PATH. SmartGallery only needs the full path to ffprobe.exe.
Install FFmpeg on macOS
The easiest way is Homebrew:
brew install ffmpeg
After installation, ffprobe will typically be at /opt/homebrew/bin/ffprobe (Apple Silicon) or /usr/local/bin/ffprobe (Intel). Set it in your launch script:
export FFPROBE_MANUAL_PATH="/opt/homebrew/bin/ffprobe"
To confirm the path on your machine: which ffprobe
Install FFmpeg on Linux
On Debian/Ubuntu:
sudo apt update && sudo apt install ffmpeg
On Fedora/RHEL:
sudo dnf install ffmpeg
ffprobe is installed alongside ffmpeg. The default path is usually /usr/bin/ffprobe. Set it in your launch script:
export FFPROBE_MANUAL_PATH="/usr/bin/ffprobe"
To confirm: which ffprobe
Docker: nothing to install
The official Docker image (mmartial/smart-comfyui-gallery) already includes FFmpeg and ffprobe. Video transcoding, thumbnail generation, and storyboard creation all work out of the box with no additional configuration.
3. INTERFACE WALKTHROUGH
3.1 The Main Workspace (Creator Hub)
Access: http://localhost:8189/galleryout
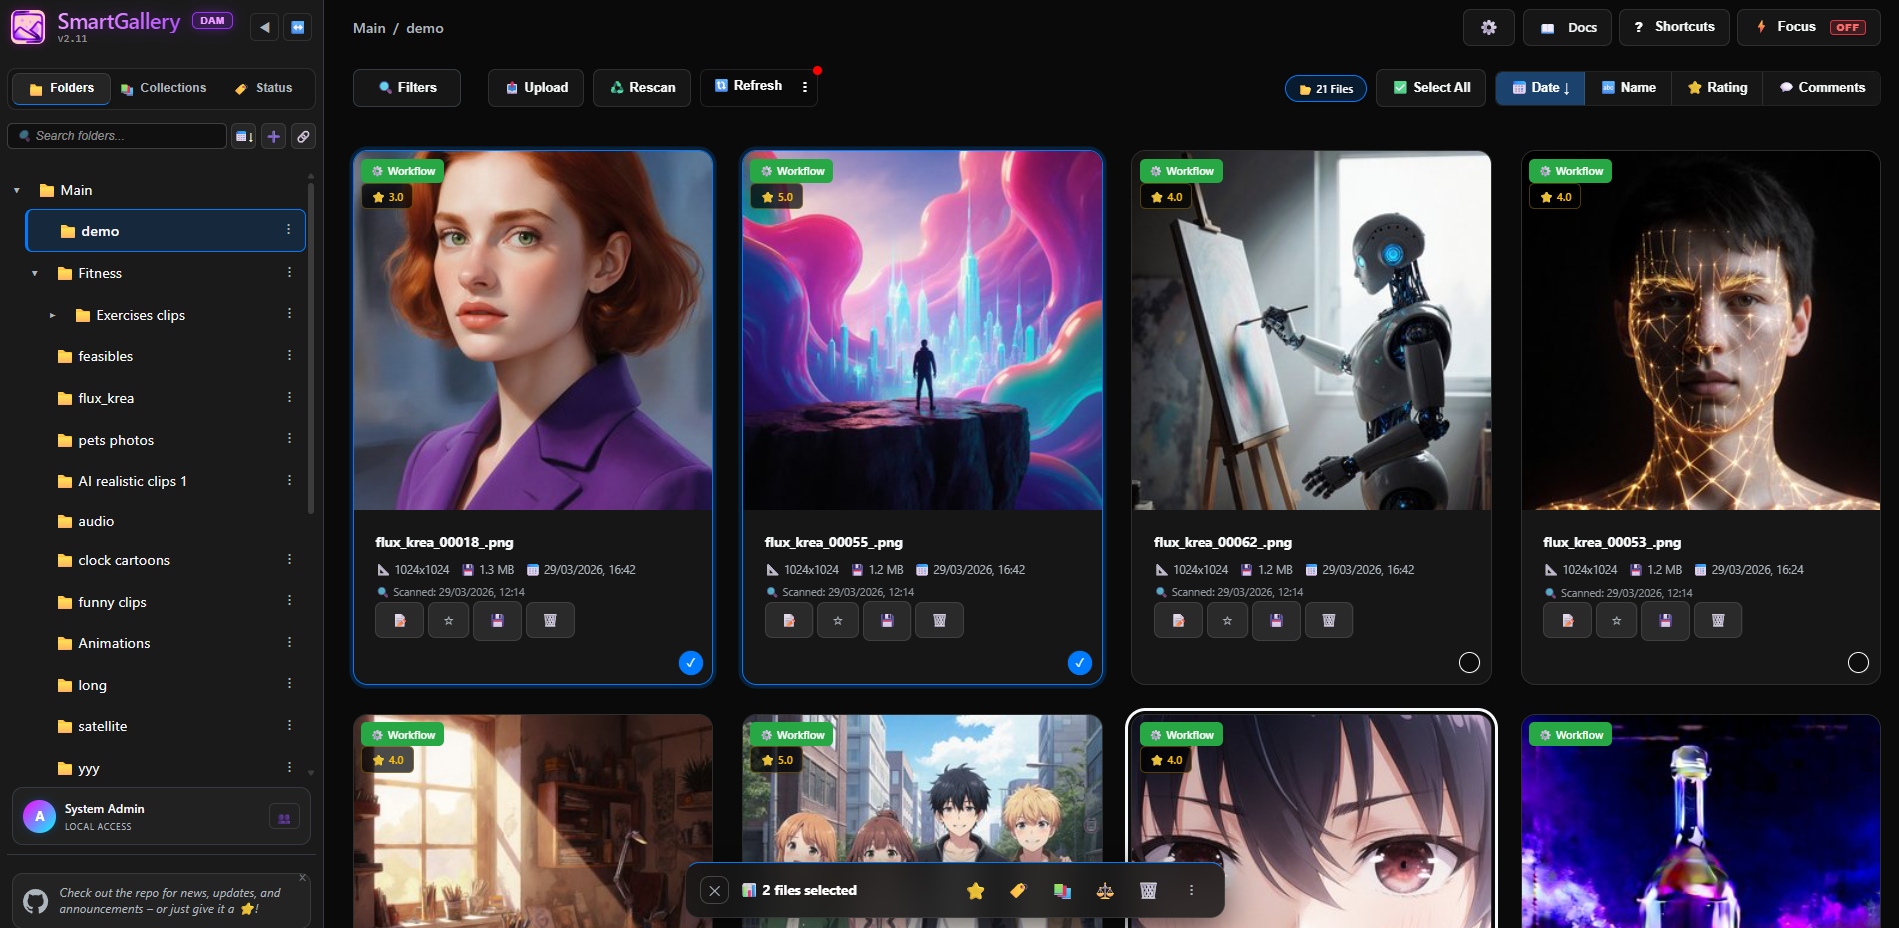
The Main Workspace: grid view with sidebar navigation, batch selection bar at the bottom, and Workflow badges on each card. Fully responsive and functional on mobile devices.
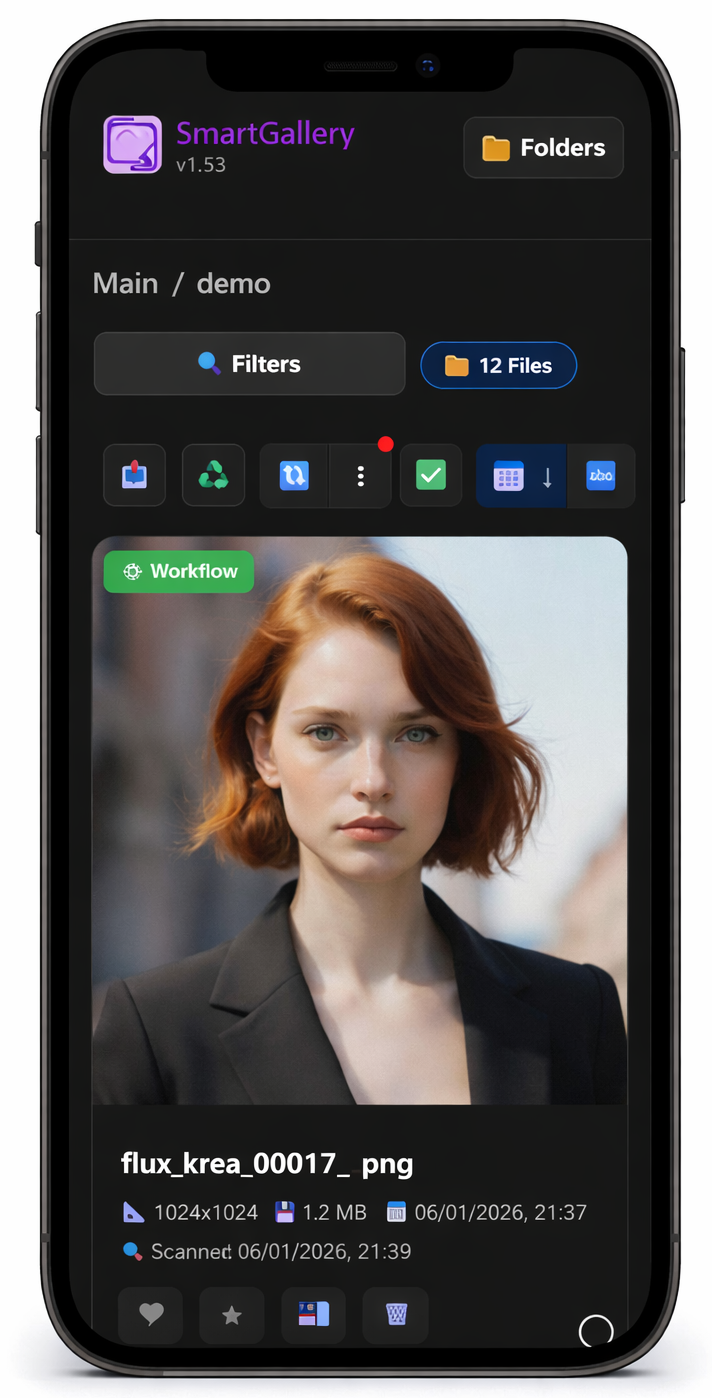 |
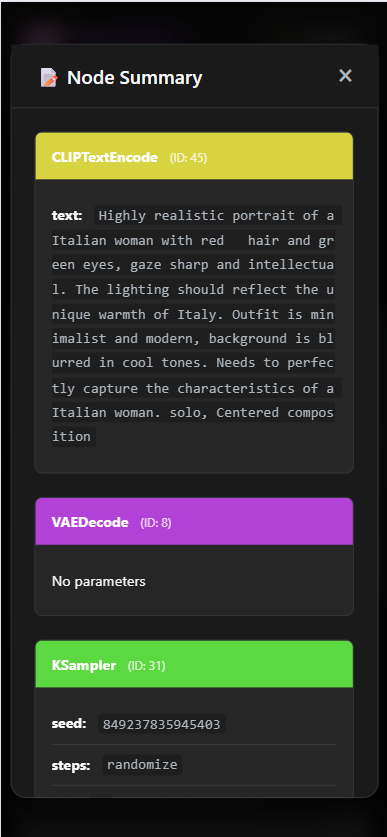 |
| Mobile interface | Node Summary: full workflow recall at a glance |
3.1.1 Sidebar Navigation
The left sidebar contains three main tabs:
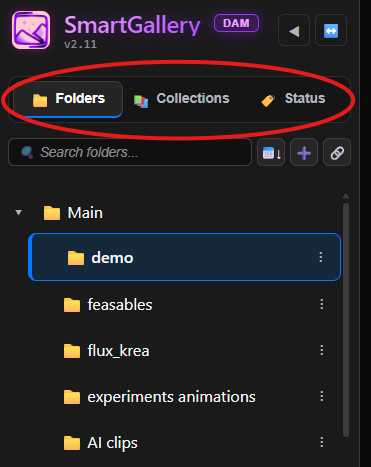
The three-tab sidebar: Folders (directory tree), Collections (virtual albums), Status (browse by pipeline state).
- 📁 Folders (Physical): Browse actual folders on your hard drive.
+— Create a subfolder- 🔗 — Mount an external drive or network folder via symlink
⋮— Rename, Delete, Unmount, or force AI Indexing on a folder
- 📚 Collections (Virtual): Virtual albums grouping files from different folders without moving them on disk. Collections with attached Collection Notes feature a distinct yellow accent.
- 🏷 Status: Browse all files by their color-coded pipeline status across every folder at once.
- 👤 User Profile (bottom): Shows your current role. Click 👥 to open User Management,
×to log out.
3.1.2 Top Toolbar & Global Actions

The top toolbar: action buttons on the left, file count and sort options on the right.
- 🛠️ Tools: Opens tools menu including ⚡ ComfyUI Queue Deck (
Shift+Q), 🧬 Smart Clustering (Shift+C), Remix Workflow, and ComfyUI launcher. - ⚙️ Options: Global settings — thumbnail size (Normal 320px / Compact 220px), video autoplay, and 🧬 Cluster Badges toggle.
- ? Shortcuts: Full keyboard shortcut list for the current interface.
- ⚡ Focus (Q): Toggle Focus Mode.
- 🕵️ My Ratings: Quickly toggle between the global average rating view and your personal, blind rating view.
- 📤 Upload: Magic Upload via drag & drop. ComfyUI metadata is extracted automatically.
- ♻️ Rescan: Forces a background disk scan for externally added or modified files.
Auto-Watch & Refresh
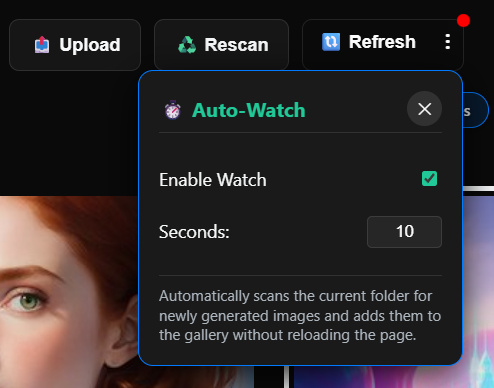
Auto-Watch: click the ⋮ next to Refresh, enable the toggle and set an interval. A pulsing red dot confirms it's active.
- Manual Refresh: Click the 🔃 icon to instantly scan for new files.
- Auto-Watch (
⋮): Silently scans in the background and injects new ComfyUI files into the grid without a page reload. Enable it while ComfyUI is generating to cull in real time.
3.1.3 Search, Filters & Fuzzy Auto-Suggest
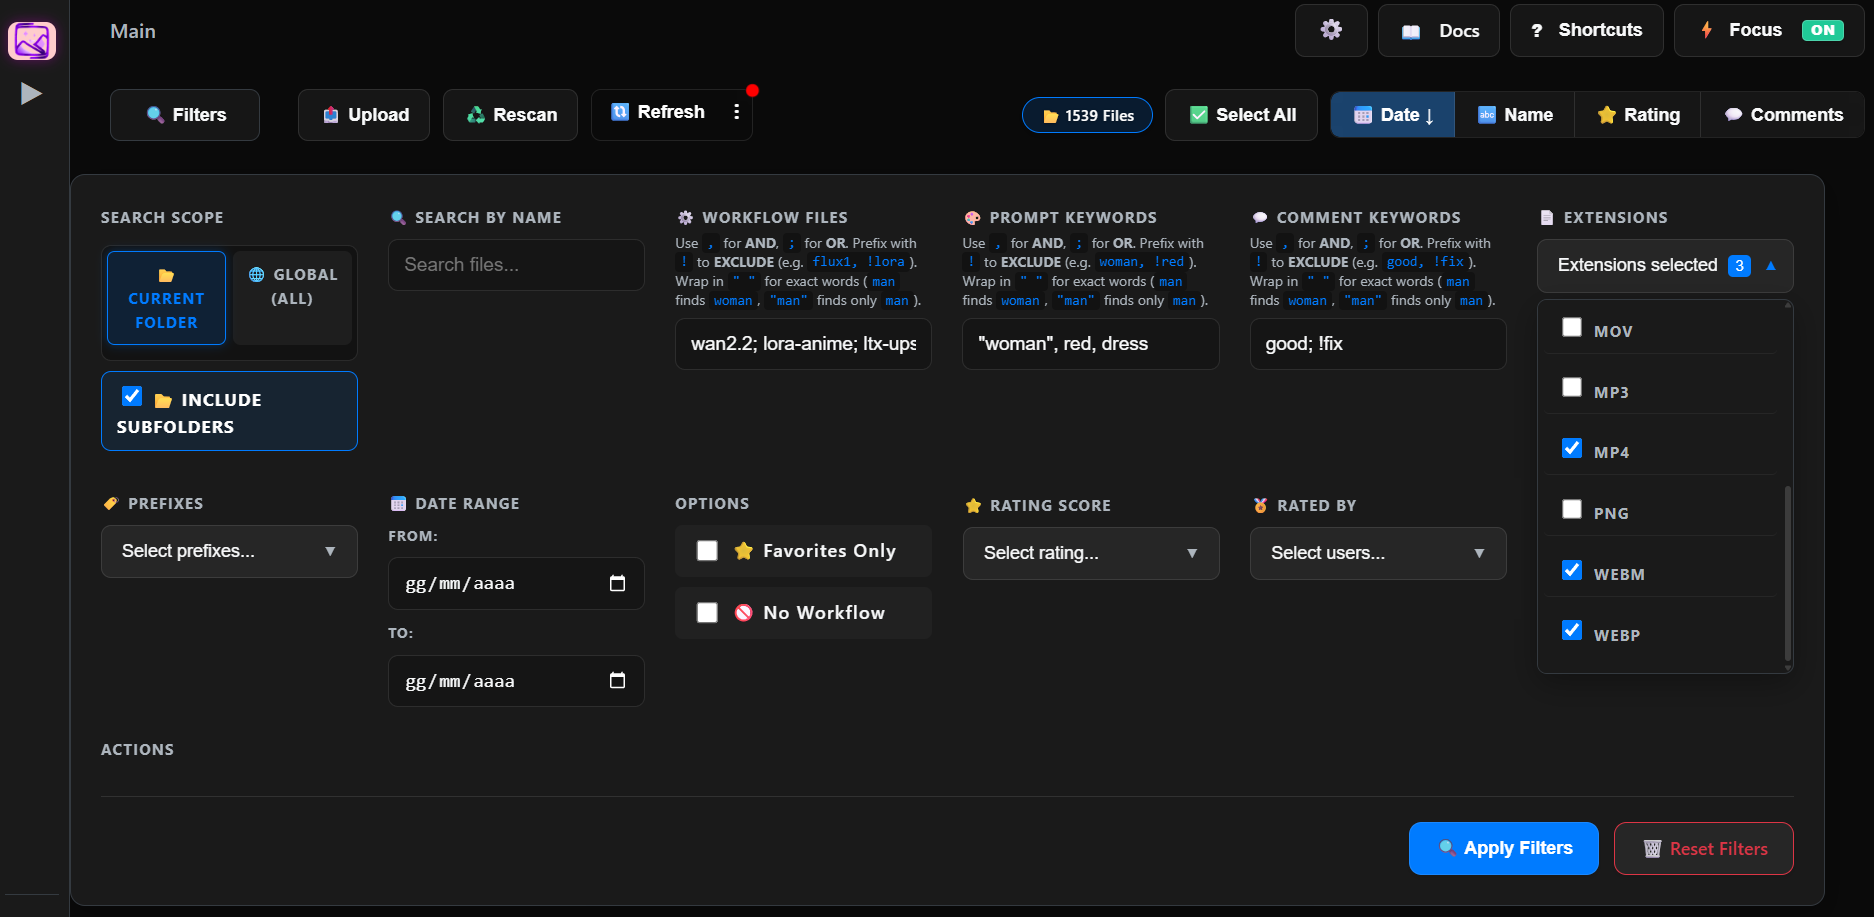
The Filters panel: search scope, multi-keyword fields, extensions, date range, and options.
Click 🔍 Filters to open the advanced search engine. Filters work across both physical Folders and virtual Collections.
Search Scope: Current Folder or Global (All Folders). Toggle Include Subfolders for recursive search.
Fuzzy Search & Live Auto-Suggest:
The ⚙️ Workflow Files input features alphanumeric normalization (e.g. wan 2.2 seamlessly matches wan2.2_i2v_high.safetensors). As you type, a two-line autocomplete dropdown displays clean filenames alongside folder paths. Native difflib string matching provides "Did You Mean?" suggestions when queries yield zero or low results.
Multi-Keyword Fields (Workflow Files, Prompt Keywords, Comment Keywords):
| Syntax | Logic | Example |
|---|---|---|
, comma |
AND — must contain both | red, car |
; semicolon |
OR — contains either | cat; dog |
! exclamation |
NOT — exclude keyword | !lora, !cat |
" " quotes |
Exact Match | "man" (won't match woman) |
💡 Pro Tip: You can combine Exact Matches and Exclusions! Use !"bad anatomy" to completely exclude a specific phrase from your search results.
Extensions & Prefixes: Filter by file type or filename prefix.
Date Range: Filter by generation/upload date.
Options: Favorites Only · No Workflow.
Advanced Ratings Filtering: Filter feedback by Star Rating Ranges (e.g., select '4-5 stars' and '1-2 stars' simultaneously) and by Specific Raters to isolate feedback from key clients or team members.
Sort Buttons
Sort by Date (📅), Name (🔤), Rating (⭐), or Comments (💬).
Sorting criteria for Ratings and Comments feature sub-menus to effortlessly toggle between "Highest/Lowest Rated", "Not Rated", "Most/Least Discussed", "Uncommented", or "Newest Comments".
3.1.4 OmniQuery – AI-Powered SQL Explorer
If you can describe it, you can find it.
Click the ⚡ OmniQuery icon in the gallery toolbar to open the AI-Assisted SQL Explorer. Ask questions in natural language, let an LLM generate read-only SQLite queries, and execute them safely.
👉 Read the full OmniQuery Guide for detailed instructions and examples.
3.1.5 Gallery Grid & Focus Mode
Persistent Metadata Hover Bar: Hovering over any image reveals a status bar at the bottom of the screen with exact dimensions, calculated megapixels, file size, and current rating status without needing to open the Lightbox.
Cluster Badges Toggle: Enable 🧬 Cluster Badges in Settings to replace standard green workflow badges on thumbnails with interactive architecture and prompt #HASH badges.
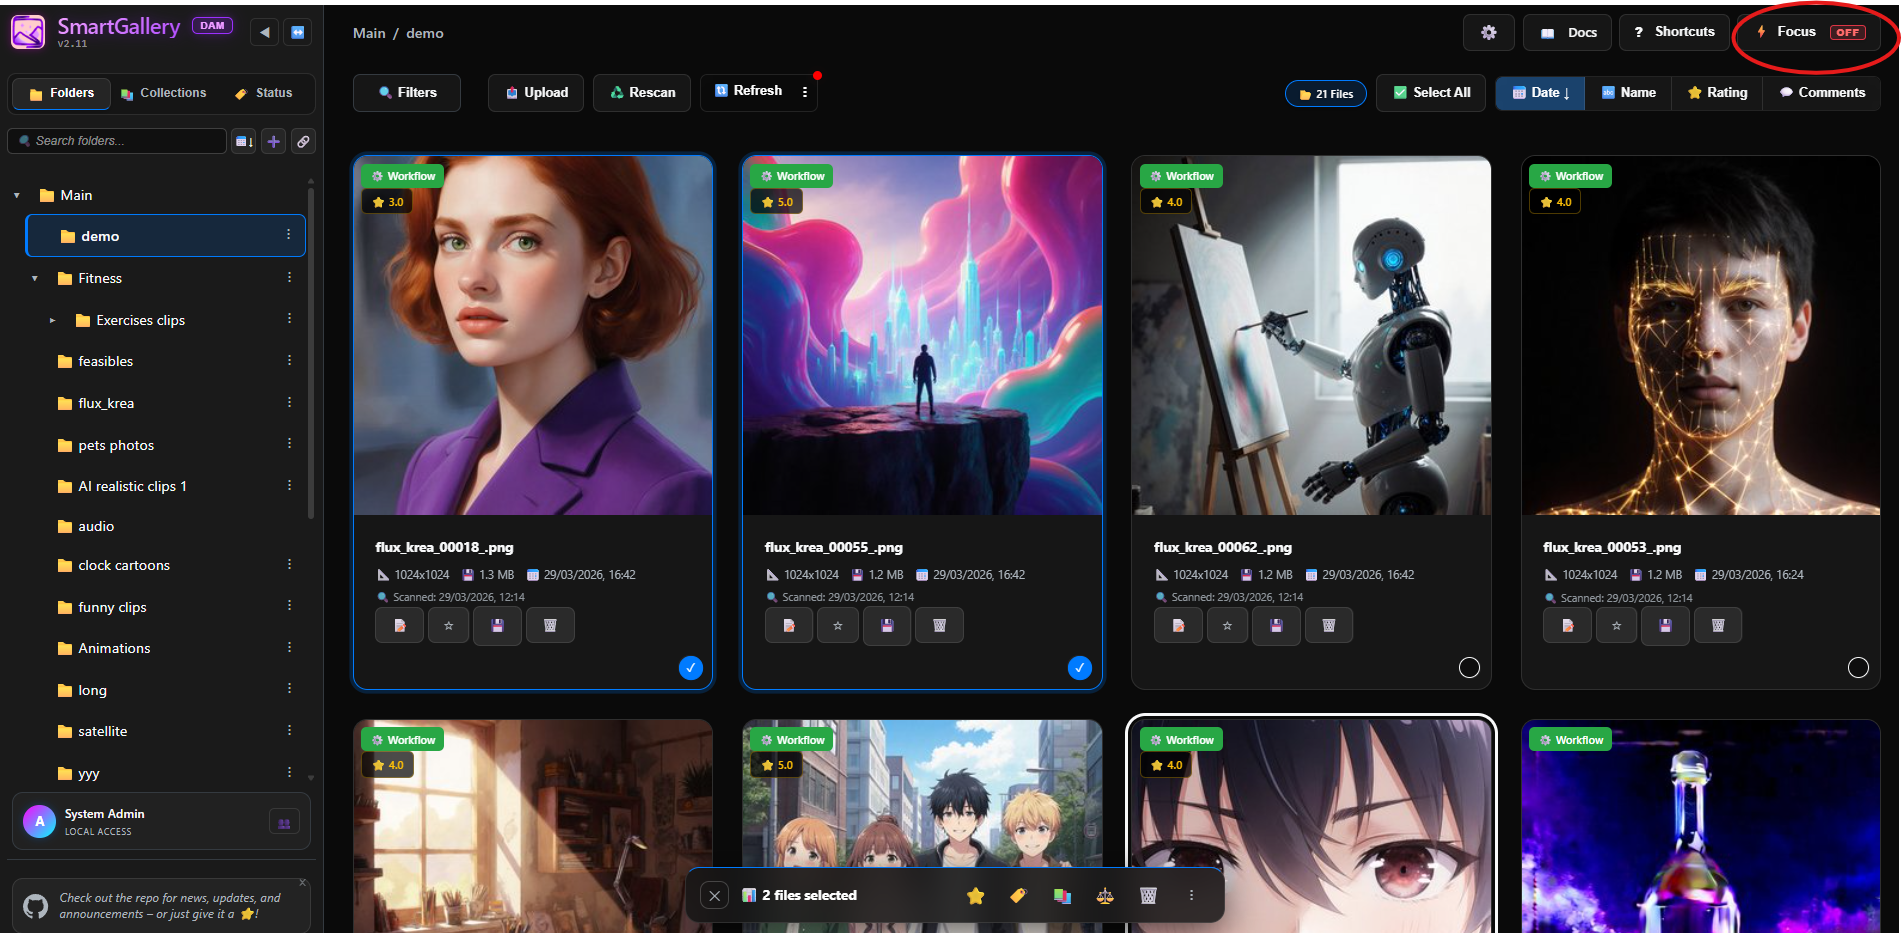
Standard Grid View (Focus Mode OFF): Hovering reveals the quick-action card with Node Summary (📝), Favorite (⭐), Download (💾), Delete (🗑️). Clicking opens the Lightbox.
Focus Mode ON (Q): Hides all UI chrome, metadata, titles, and quick-action cards. A golden star marks favorites. Selected items show a massive fuchsia border. Use keyboard arrows to navigate. Click or press V/Enter to open the Lightbox.
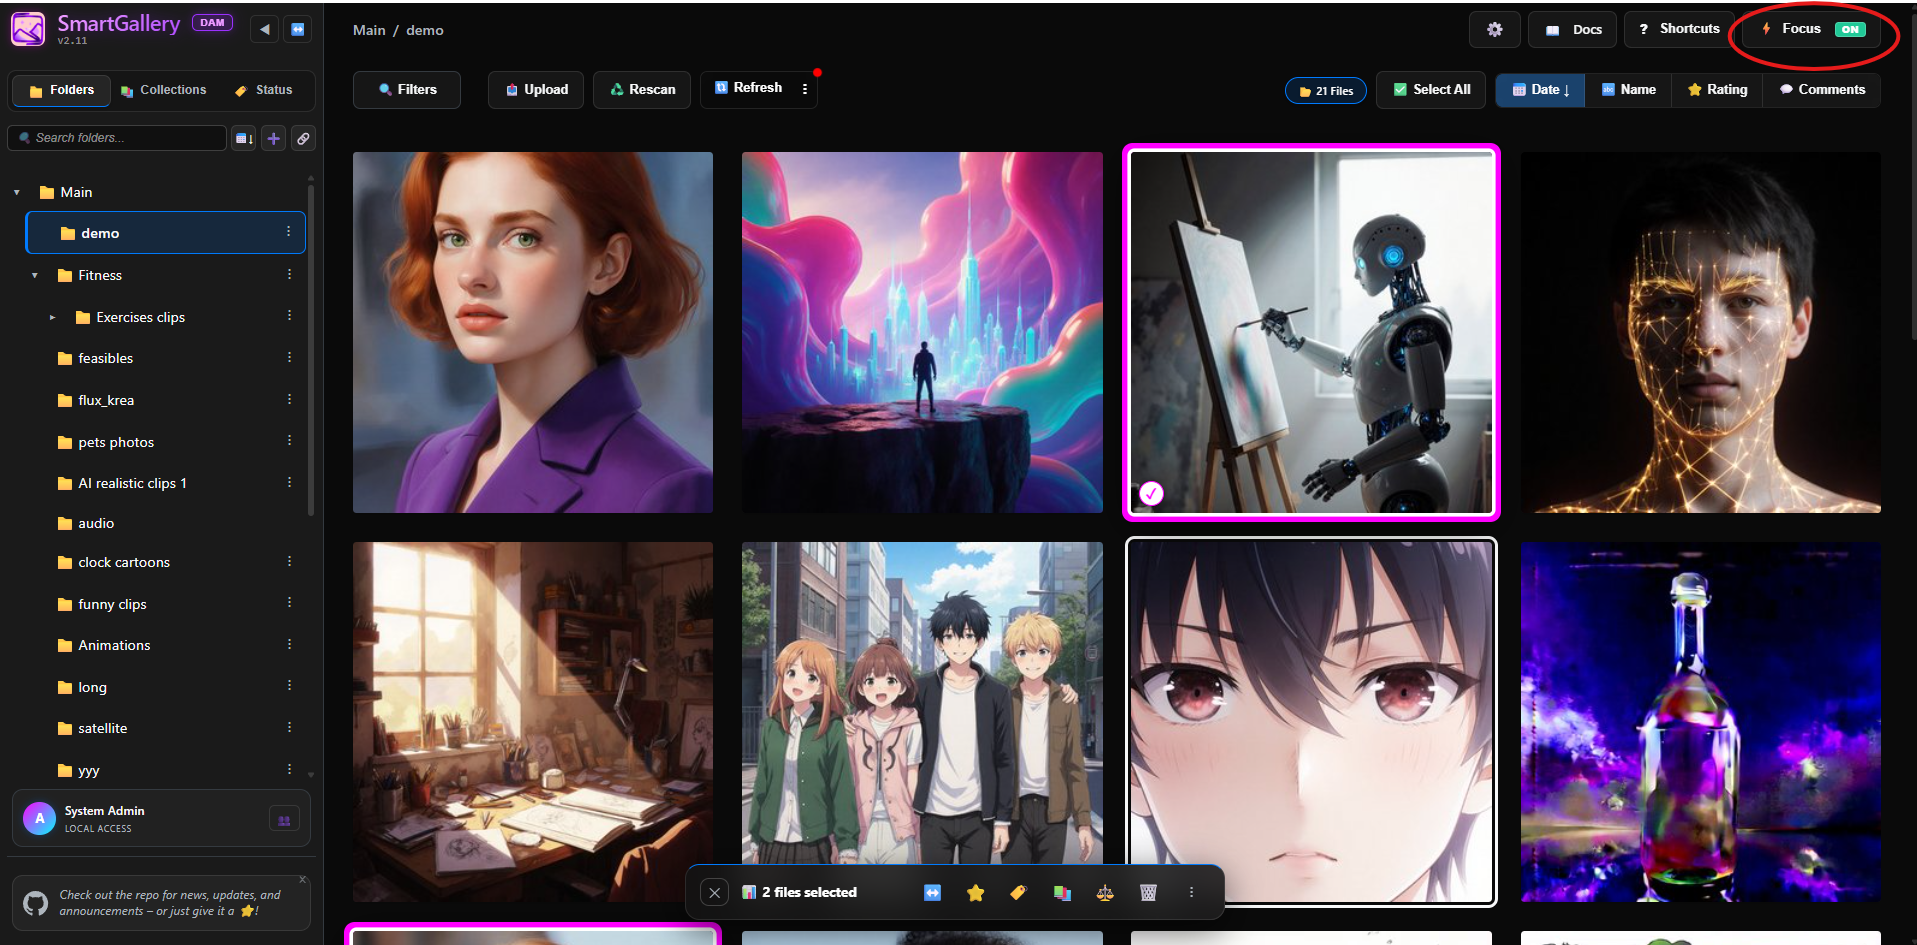
Power User Tip: Enable Auto-Watch, activate Focus Mode with
Q, then use←→arrows +Del/F/Xto blaze through a batch while it's still generating. PressIon any item to view its exact file path, real symlink source target, and node pipeline.
3.1.6 Batch Selection Bar
Click the checkmark ✓ on any image (or Space/X in Focus Mode) to select it. The floating Selection Bar appears at the bottom.
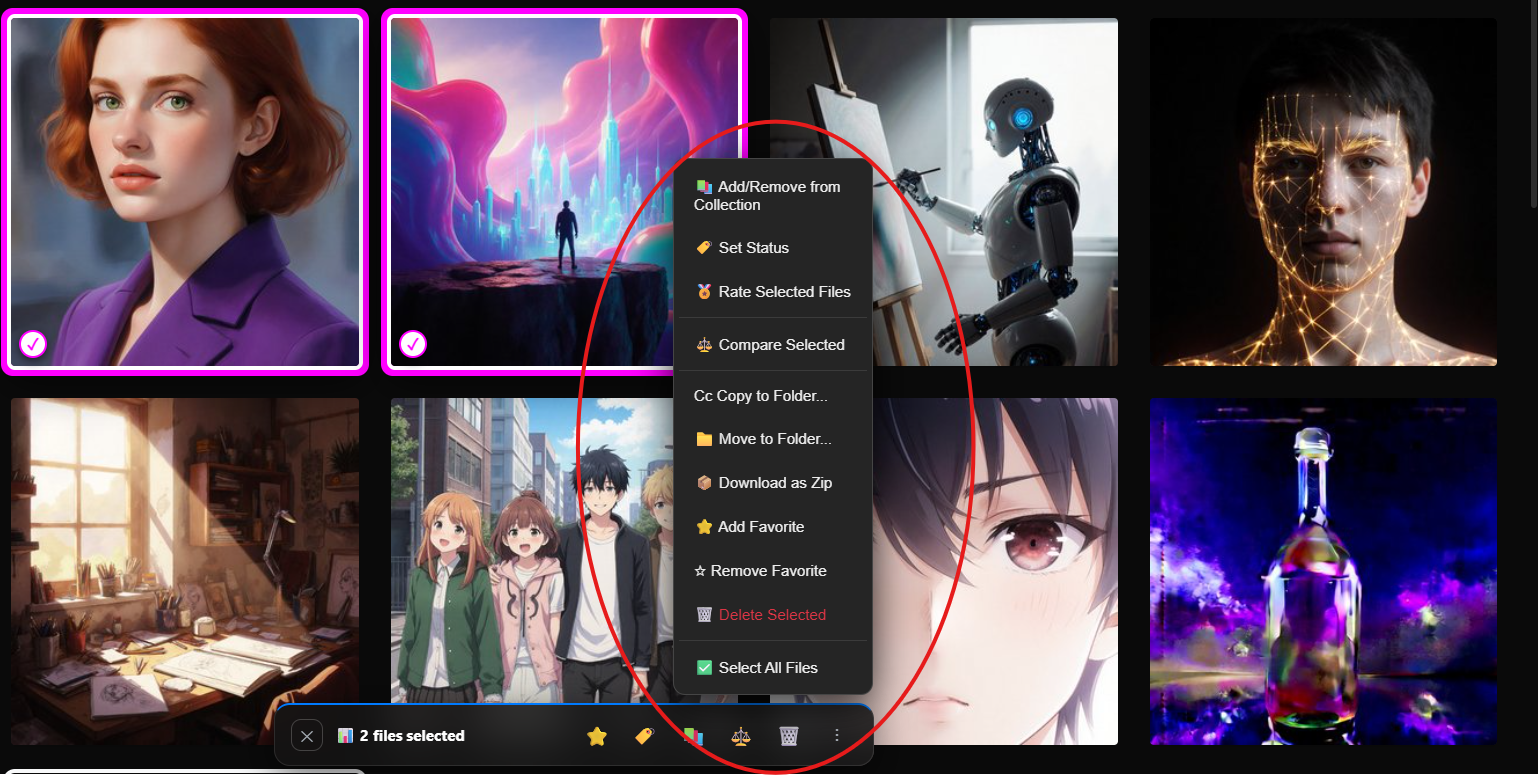
| Action | Shortcut | Description |
|---|---|---|
| ✕ Deselect All | Esc |
Clears the selection |
| ✅ Select All | Ctrl+A |
Selects all visible files |
| ↔️ Range Select | — | Appears when exactly 2 files selected; selects all between them |
| ⭐ Add Favorite | — | Marks all selected as favorites |
| 🏷 Set Status | Y |
Apply a pipeline color tag to the batch |
| 📚 Add/Remove Collections | A |
Add or remove batch from virtual albums |
| ⚖️ Compare Selected | — | Split-screen comparison (exactly 2 files required) |
| 🏅 Rate Selected | Shift+R |
Apply 1–5 stars to multiple files at once |
| 📁 Move / Copy | M |
Transfer files to another physical folder |
| 📦 Download as Zip | Z |
Package selection into a downloadable .zip |
| ☆ Remove Favorite | — | Remove the favorite flag from the batch |
| 🗑️ Delete Selected | Del |
Permanently delete selected files |
3.2 Advanced Media Inspection
3.2.1 The Lightbox (Media Viewer)
Open the full-screen Lightbox with V or Enter.
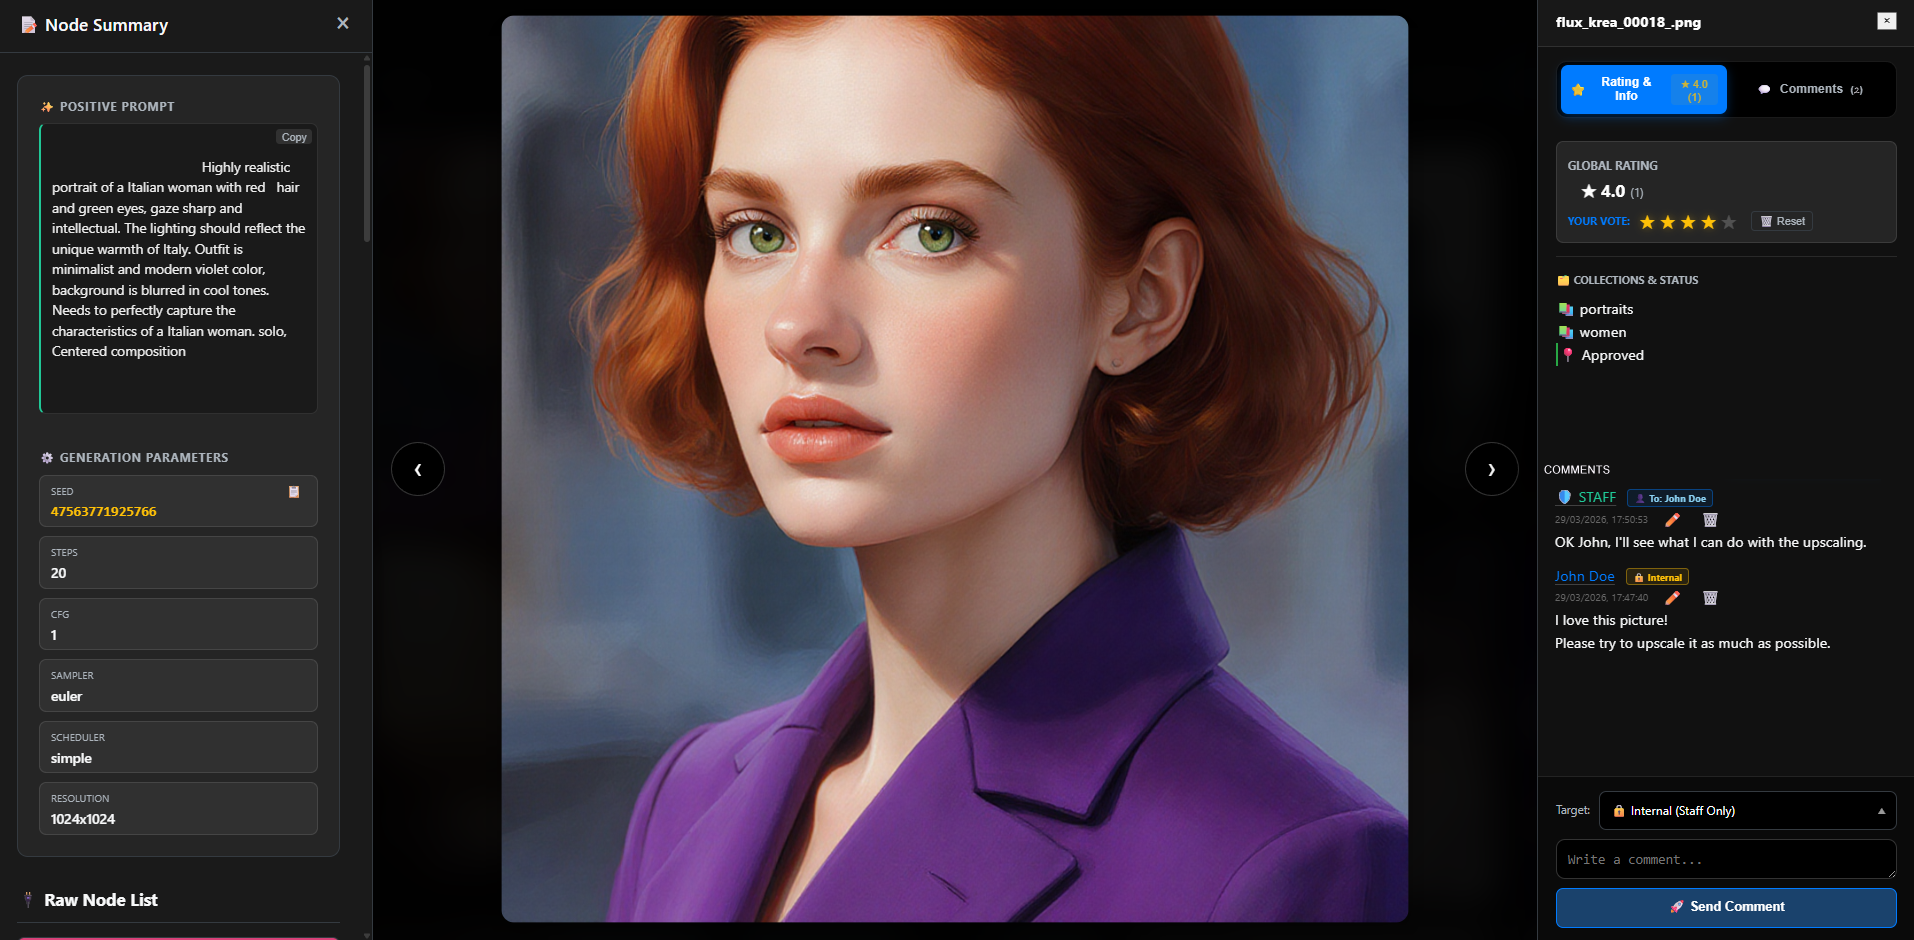
Enhanced Player Controls: The custom video/audio player supports Spacebar to Play/Pause, arrow keys to seek by 5 seconds, and full volume/mute controls (M).
Dynamic Audio Waveforms: Real-time visual waveforms (🌊) with an amplitude slider to adjust height without re-rendering media.
Toolbar Buttons:
| Button | Key | Description |
|---|---|---|
| / MENU | / |
Touch-friendly list of all commands |
| − / + | - / + |
Zoom out / Zoom in |
| 🔄 Rotate | T |
Rotate 90° (non-destructive) |
| 💾 Download | S |
Download original file |
| 🛡 Clean Export | Shift+W |
Download with all metadata stripped (prompts, nodes, EXIF) |
| ✏️ Rename | R |
Rename file on disk |
| 📋 Asset Details | I |
Open Full Asset Details Panel (2 tabs: Overview & Architecture) |
| 🧬 Clusterize | Shift+C |
Open Smart Asset Clustering modal for this file |
| 📝 Node Summary | N |
Open ComfyUI generation dashboard |
| ✦ Remix Workflow | B |
Edit workflow parameters and queue new generations |
| ⭐💬 Ratings & Comments | G |
Open side panel for ratings and messages |
| ⚙️ Workflow JSON | W |
Download raw ComfyUI .json workflow |
| 📋 Copy JSON | C |
Copy workflow to clipboard |
| 🎞 Storyboard | E |
Generate 11-frame video overview |
| 📁 Move File | M |
Open the Move File dialog |
| 👁 Hide Toolbar | H |
"Clean View" — hides all chrome |
| ↗️ Open in New Tab | O |
Full-resolution in a new browser tab |
| 🗑️ Delete | Del |
Delete the file |
| × Exit | Esc |
Return to Grid View |
3.2.2 Full Asset Details Panel (📋 / Shortcut I)
Press I on any image or click the ⓘ icon to open a high-density diagnostic panel featuring two organized tabs.
👉 Read the Full Asset Details Manual
- Tab 1: 📋 Overview & Paths:
- Header Card: Preview thumbnail/video, filename, file type badge, clickable
⚙️ WorkflowJSON download button, Favorite badge, and Workflow Status tag (📍 Approved,📍 Review, etc.). - Metrics Grid: Resolution with Megapixel density calculation (e.g.
1024x1024 (1 MP)), file size, modified date, scan date, and video/audio duration. - Folder Hierarchy: Full directory breadcrumb chain (
📂 Main ➔ 📂 Projects ➔ 📂 CharacterRenders). - Physical Disk Path: Absolute server path. If the folder is on an external drive, highlights the 🔗 Real Target physical path.
- Collection Ancestry: Complete parent-to-child hierarchy chains for every assigned Virtual Collection.
- Generation Metadata: Formatted A1111 / WebUI Forge parameters with a one-click
📋 Copybutton.
- Header Card: Preview thumbnail/video, filename, file type badge, clickable
- Tab 2: 🧬 Architecture & Cluster:
- Cluster Quick Stats: Counts of assets in your library sharing the same Architecture (
🧬 #HASH) or Prompt (💬 #HASH). - One-Click Clusterize:
🚀 Clusterize Gallery by this Reference Assetbutton to enter Cluster Mode immediately. - Interactive Node Pipeline: Sequential color-coded chips showing node execution flow (
[CheckpointLoaderSimple] ➔ [CLIPTextEncode] ➔ [KSampler] ➔ [VAEDecode]). Click any node chip to view its raw JSON definition! - Models Loaded: Itemized list of
.safetensors,.ckpt,.lora, and.gguffiles. - Prompt Text: Positive prompt string with a
📋 Copybutton.
- Cluster Quick Stats: Counts of assets in your library sharing the same Architecture (
3.2.3 Smart Asset Clustering & Inspector (🧬 / Shortcut Shift+C)
Smart Asset Clustering organizes your gallery into visual groups based on how your images were created, letting you group and compare images sharing either the same workflow pipeline or the same prompt text.
👉 Read the Smart Asset Clustering Manual ▶️ Look at the Video
- The 2 Clustering Modes:
- By Architecture (
workflow): Groups images created with the exact same workflow setup (node structure + model files), ignoring random seeds, steps, CFG, or prompt text changes. - By Prompt Text (
prompt): Groups images sharing the exact same positive prompt across different models, Flux/SDXL workflows, or settings.
- By Architecture (
- Interactive Hash Inspector Modal:
Clicking any
#HASHbadge on a thumbnail card opens an Inspector Panel showing you:- The Visual Pipeline: Sequence of color-coded chips (
CheckpointLoader ➔ LoraLoader ➔ KSampler ➔ VAEDecode). Click any node chip to inspect its raw JSON parameters! - Models Loaded: Exact checkpoint and LoRA model files used.
- Asset Prompt: Prompt text with a one-click 📋 Copy button.
- Cluster Stats: Total matching assets in your library.
- One-Click Launch: A
🚀 Clusterize Gallerybutton pre-targeted on that asset.
- The Visual Pipeline: Sequence of color-coded chips (
- Sub-Badges: When clustering by Prompt, badges display both the primary Prompt badge (
💬 #PROMPT) and secondary Architecture variant badge (🧬 #ARCH).
3.2.4 ComfyUI Node Summary (📝 / Shortcut N)
Press N on any image to open the Node Summary.
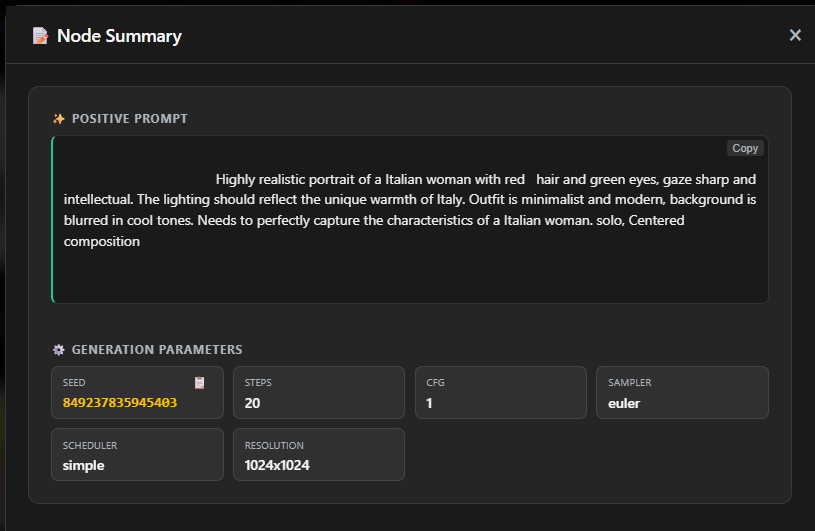 Node Summary dashboard: positive prompt with one-click Copy, and all generation parameters at a glance. |
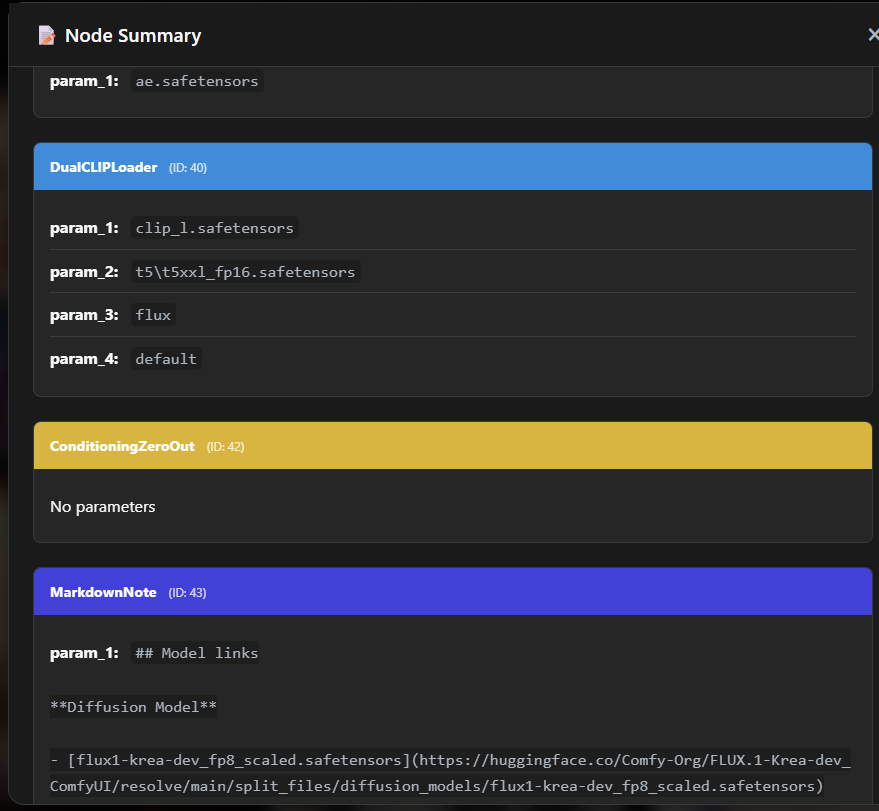 Raw Node List: every single node in the ComfyUI graph with all parameters. |
- Positive & Negative Prompts — with one-click Copy buttons
- Generation Parameters — Seed (with copy button), Steps, CFG, Sampler, Scheduler, Resolution
- Active LoRAs — all LoRAs used and their weights
- Source Media (Inputs) — downloadable source files for Image2Image, ControlNet, or Video workflows
- Raw Node List — complete scrollable list of every node in the workflow graph
3.2.5 Remix Workflow & The { } Nodepad (✦ / Shortcut B)
Select an image or video in your gallery and press B to open the Remix Engine.
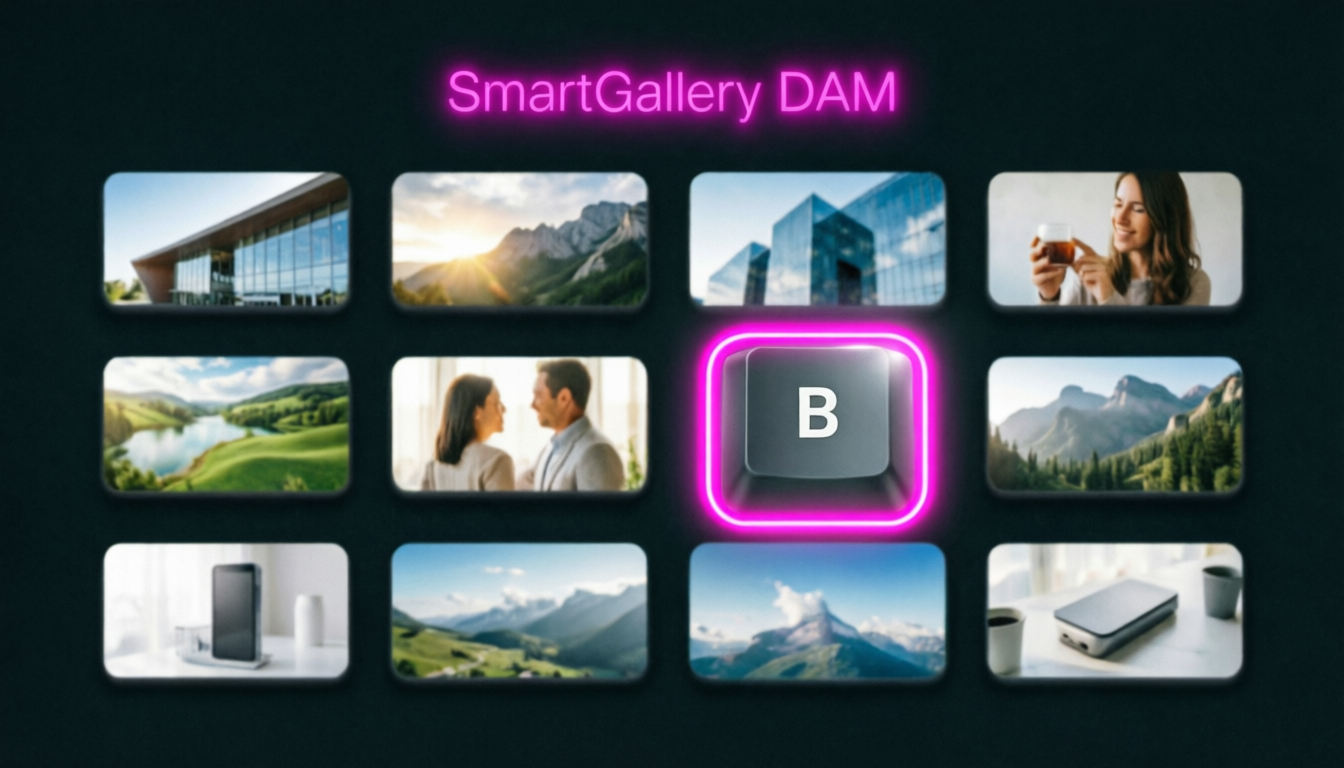
1️⃣ Simple Tweaks: 📝 Auto-Form
Scans embedded workflow and exposes the most important editable parameters (Prompts, Seeds, Steps, Denoise, Dimensions).
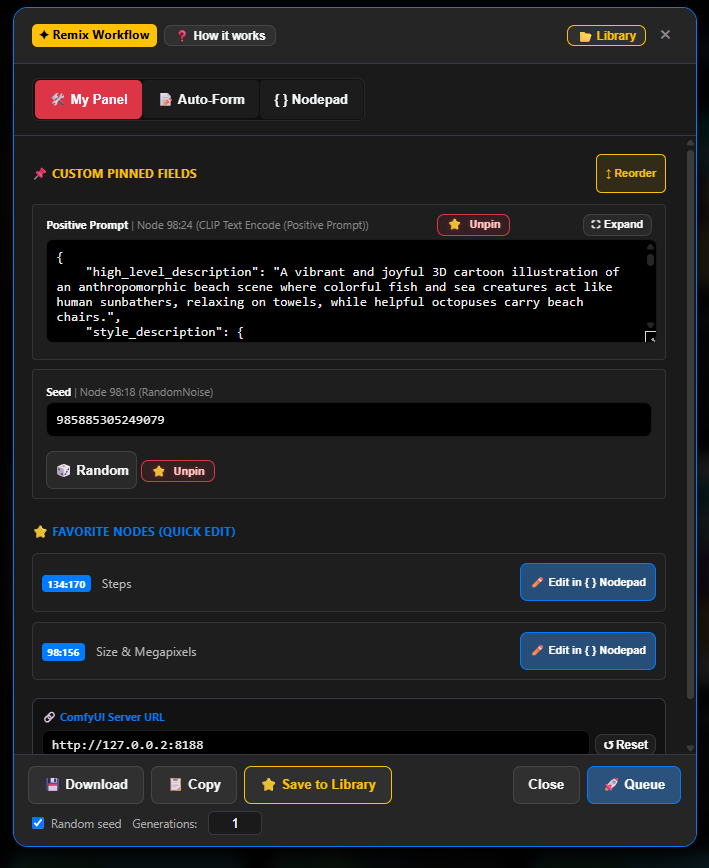
2️⃣ Build Your Dashboard: 🛠️ My Panel
Click the 📌 Pin icon next to inputs in the Auto-Form to build a clean dashboard populated exclusively with your pinned fields.
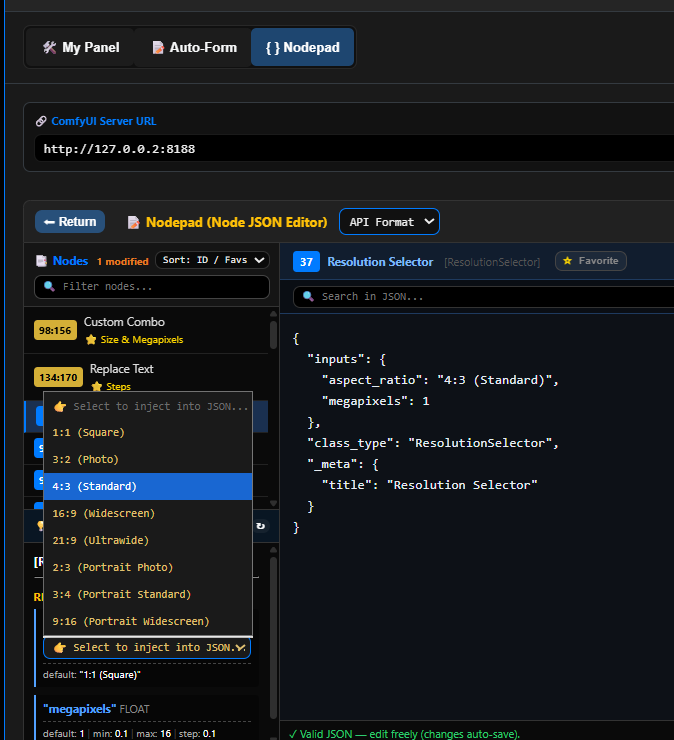
3️⃣ Pro Control: { } The Nodepad
An advanced JSON editor for power users. Interrogates your live ComfyUI server for node definitions, provides visual UI injectors for inputs, and formats JSON automatically.
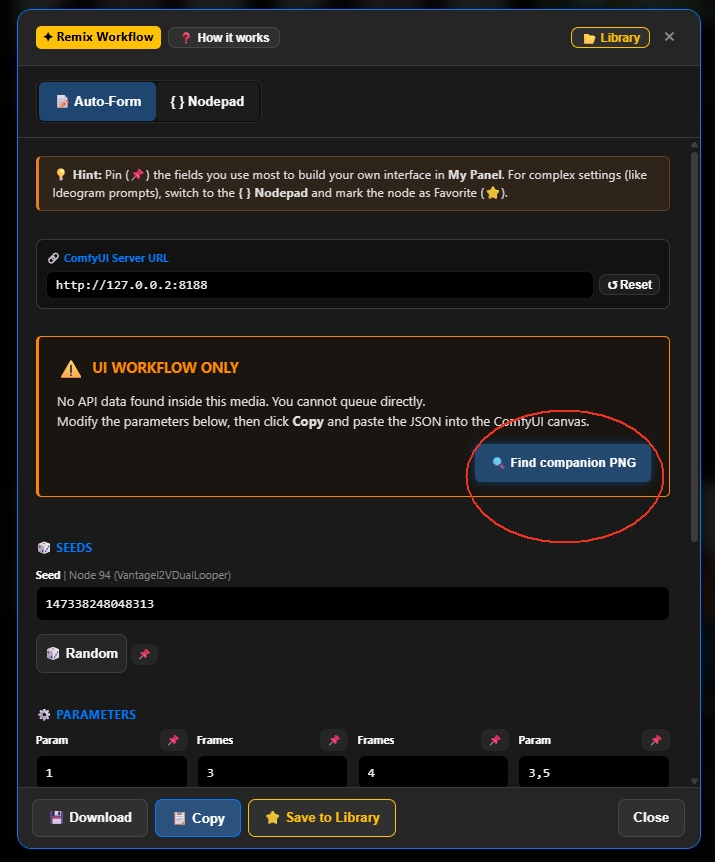
Video Companion PNGs
If a video file lacks API workflow data, click 🔍 Find companion PNG. SmartGallery automatically locates the VHS sidecar image, extracts the hidden data, and enables direct queuing.
3.2.6 ComfyUI Queue Deck (⚡ / Shortcut Shift+Q)
Press Shift+Q anywhere in SmartGallery (or select it from the Tools menu) to open the ComfyUI Queue Deck, a unified live control dashboard for your generation pipeline.
👉 Read the ComfyUI Queue Deck Manual ▶️ Look at the Video
- Live Execution Telemetry: Real-time progressive step tracker (
Step X / Y (Z%)), active sampler algorithm details (euler,dpmpp_2m), and live node indicators. - Real-Time Stream Preview: Direct latent preview decoding (
--preview-method auto/taesd) and immediate intermediate node output rendering with● LIVE/● READYbadges. - Hardware Load Monitoring: Live VRAM occupancy meter and host GPU compute engine load gauges (
nvidia-smi) with complete hardware tooltips. - Full Queue Control: Move pending jobs to top (
⬆ Top), delete individual jobs (🗑), batch-delete selections, clear the entire queue (🧹 Clear All), or interrupt running jobs (⏹ Stop). - Continuous Event Stream: Live real-time logging of WebSocket events, queue decrements, and node execution lifecycle.
- Recent Completed Jobs Inspector: View output thumbnails, download media directly with guaranteed state restore, and inspect full positive/negative prompts, loaded models, LoRAs, and interactive node JSON definitions.
3.2.7 LoRA Synergy™
Offline LoRA matchmaker built into Remix Workflow → Nodepad. Scans .safetensors headers to guarantee checkpoint architecture compatibility (SD1.5, SDXL, Flux), surfaces trigger words, and auto-wires MODEL and CLIP nodes.
👉 Read the full LoRA Synergy Guide for detailed instructions.
3.2.8 Compare Mode
Select 2 files → ⋮ in Selection Bar → Compare Selected.
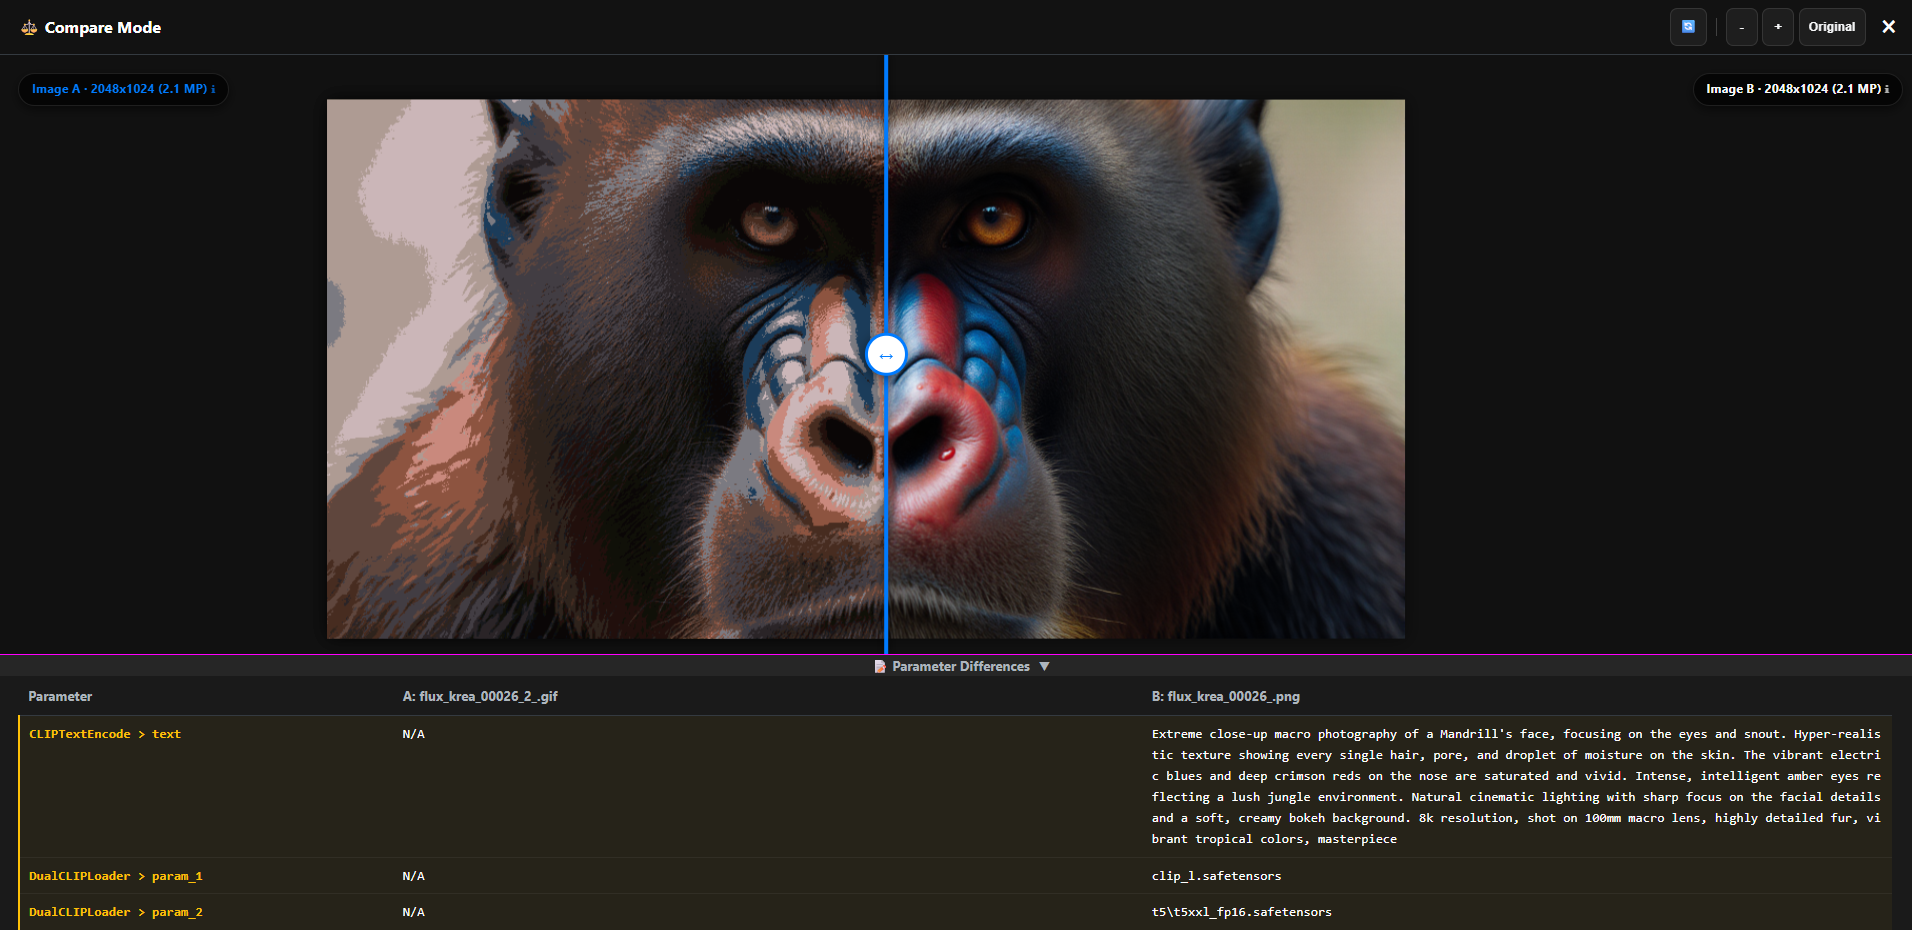
- Visual Slider: Drag central handle to compare. Videos synchronize automatically.
- Parameter Differences (
I): Table showing only changed parameters.
3.2.9 Video Storyboard (🎞)
Press E in the Lightbox on any video to generate 11 perfectly spaced frames in a grid to evaluate motion consistency.
3.3 Digital Asset Management (DAM) & Communication
3.3.1 Virtual Collections & Sharing
Virtual albums grouping files across physical folders without duplicating disk space. Supports nested parent/child tree hierarchies.
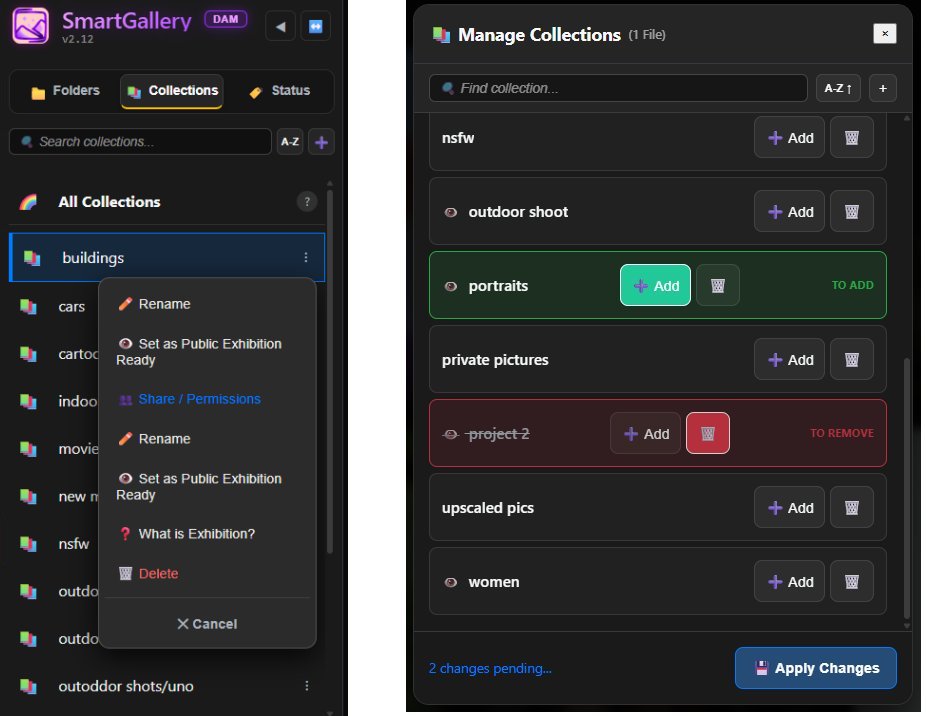
- Create: Collections tab →
+→ name it → choose Public, Private, or select specific users. - Add files: Select files → click 📚 in Selection Bar or press
A. - Untag (
U): Remove files from current collection.
3.3.2 Collection Notes & Production Briefs (📝)
Attach rich documentation to Virtual Collections.
👉 Read the Collection Notes Manual
- Simple Creation Workflow: Attach a brief to any collection by clicking the ⋮ menu next to its name in the sidebar and selecting 📤 Upload Note to upload
.txtor.mdfiles. - Visual Yellow Accent: Collections containing active notes are immediately highlighted with a distinct yellow accent across the sidebar and breadcrumbs.
- Top Header Access Button: When viewing a collection with notes, a prominent
📝 Collection Notesbutton automatically appears in the top toolbar header for instant one-click access. - Rich Markdown Rendering: Full native rendering of Markdown documentation (headers, lists, tables, code fences, task lists, and formatting).
- Multi-Note Reader & Feedback: View and switch between multiple notes via tabs, download notes, or open them in the details panel to leave ratings and public/private comments just like any media asset.
3.3.3 Pipeline Status Tags
Press keys 1–5 on any item or selection:
1Approved (Green) ·2Rejected (Red) ·3Review (Yellow) ·4Select (Purple) ·5To Edit (Blue) ·0Clear
3.3.4 Ratings & Comments (⭐💬)
Press G on any image to open Ratings & Comments.
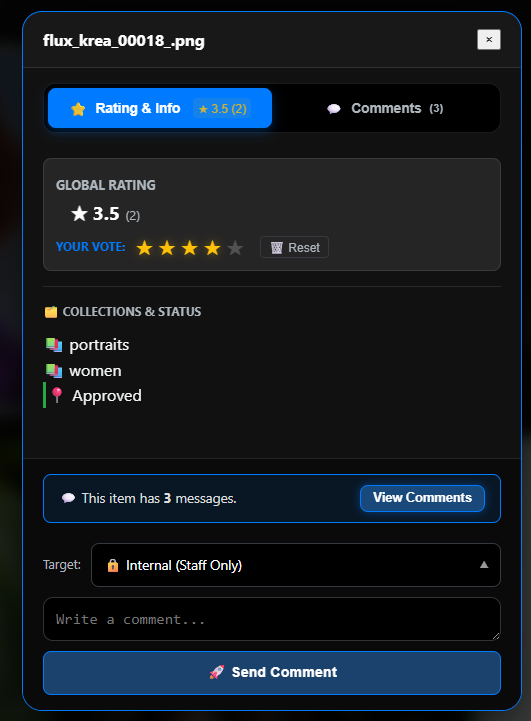
- Ratings: Click ⭐ stars (1–5) to vote. Click 👁️ Details to see voter breakdown. Use
--blind-ratingto hide averages and prevent voting bias. - Comments: Threaded discussions with visibility controls (🌐 Public, 🔒 Internal/Staff Only, 👤 Direct Message).
3.4 User Management & Access Control
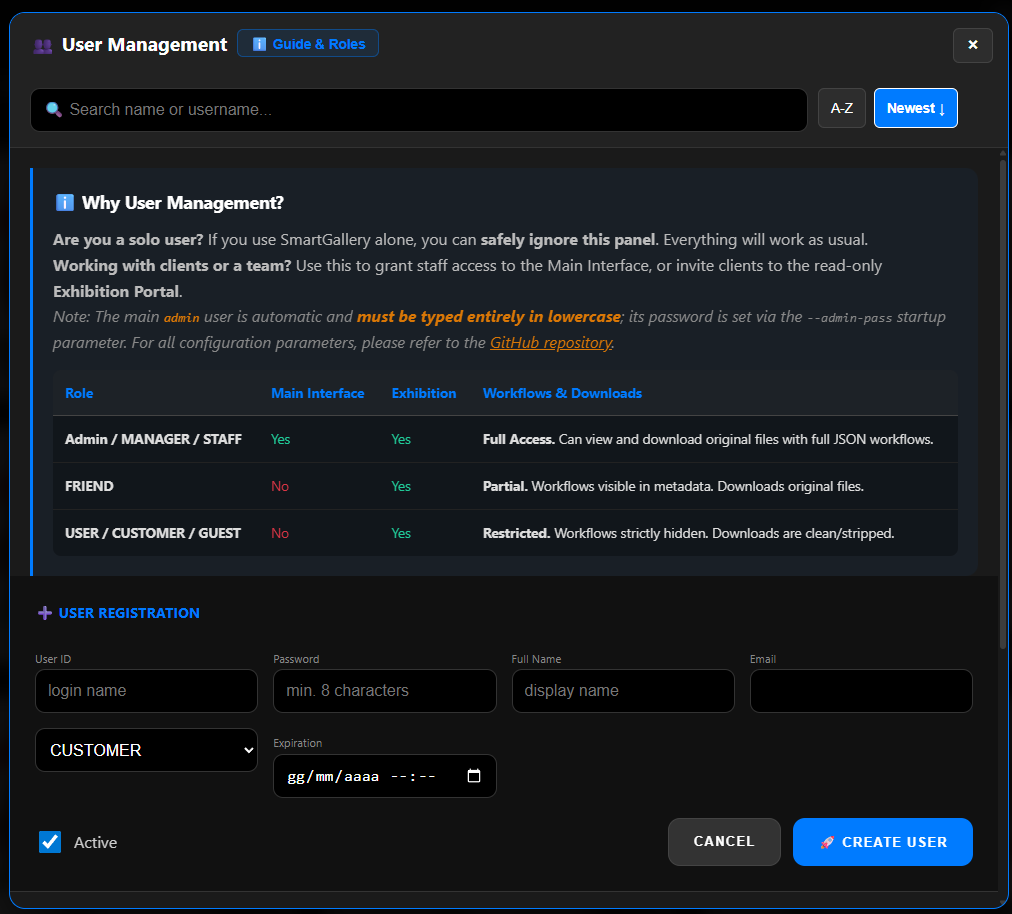
Click 👥 in the sidebar footer to manage users. Assign roles (ADMIN, MANAGER, STAFF, FRIEND, USER/CUSTOMER, GUEST) and monitor user activity via the Last Login timestamp.
3.5 The Exhibition Portal (Client Hub)
Access: Launch with --exhibition (port 8190).
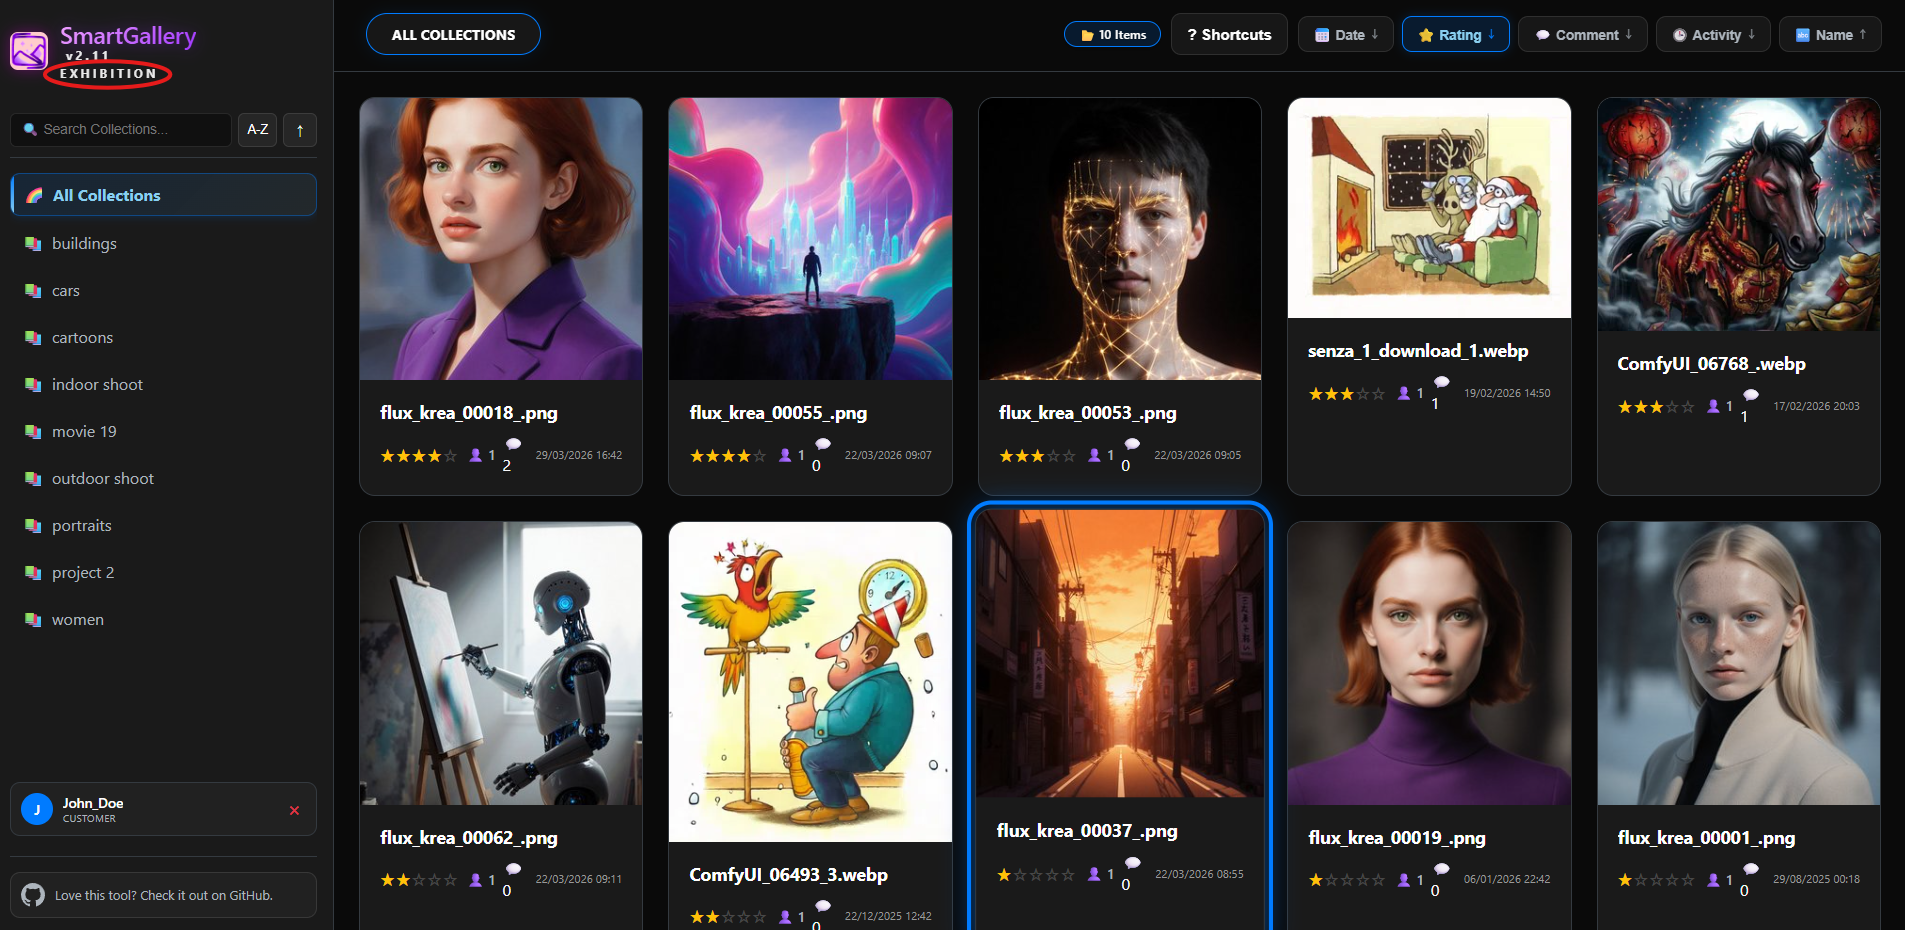
- Strictly Read-Only: Guests can vote and comment; they cannot delete, move, or alter files.
- Metadata Stripped: Workflows, prompts, and EXIF are completely hidden.
- Dedicated Exhibition Filter Panel: Allows clients to filter media by smart filename queries, file extensions, and date ranges.
- Embedded Audio Player: List View includes inline audio playback controls.
- Client Briefing: Clients can open Collection Notes, read project specs, and leave ratings/comments directly on production briefs.
4. ADVANCED TOPICS & REFERENCE
4.1 Sharing Online
Expose Exhibition (port 8190) remotely using Nginx, Apache, or tunnels like ngrok (ngrok http 8190) or Cloudflare Tunnel.
4.2 Keyboard Shortcuts Reference
Main Interface Shortcuts
Global App Controls
| Shortcut | Action |
|---|---|
? |
Open Shortcuts Help panel |
Shift+Q |
Open ComfyUI Queue Deck (Live Queue & Step Monitor) |
Shift+M |
Generation Data Overlay |
Q |
Toggle Focus Mode |
T |
Scroll to Top and open Search/Filters |
P |
Toggle Video Autoplay |
L |
Refresh view |
K |
Open Rescan Folder modal |
Ctrl+A / Cmd+A |
Select all files |
Esc |
Close modal / deselect all |
Home / End |
Scroll to top / bottom |
PgUp / PgDn |
Scroll page by page |
Grid & Lightbox Actions
| Shortcut | Action |
|---|---|
I |
Open Full Asset Details Panel (2 tabs: Overview & Paths / Architecture & Cluster) |
Shift+C |
Open Smart Asset Clustering modal / cluster by reference asset |
V / Enter |
Open Lightbox |
N |
View Node Summary |
B |
Open Remix Workflow modal |
F |
Toggle Favorite |
A |
Add to / remove from Virtual Collection |
Y |
Set Status Tag |
W |
Download Workflow JSON |
Shift+W |
Clean Export: download stripped of all metadata |
C |
Copy Workflow JSON |
S |
Download media file |
R |
Rename file |
E |
Generate Video Storyboard |
G |
Open Ratings & Comments panel |
Shift+R |
Batch Rate modal |
1–5 / 0 |
Assign / Clear Status Tag |
Del |
Delete file |
Selection & Batch Actions
| Shortcut | Action |
|---|---|
Click |
Focus OFF: opens Lightbox. Focus ON: selects item |
Ctrl+Click |
Add single item to selection |
Shift+Click |
Select range between two files |
A |
Add / remove selection to/from Collection |
Y |
Open Status Tagging modal |
M |
Move selected files to another folder |
U |
Remove selection from current Virtual Collection |
Z |
Download selection as ZIP |
Shift+R |
Batch Rate modal for selected files |
Del |
Delete selection |
Esc |
Deselect all |
Exhibition Portal Shortcuts
| Shortcut | Action |
|---|---|
← ↑ → ↓ |
Move keyboard focus |
Enter / V |
Open Lightbox / Theater |
1 to 5 / 0 |
Rate media 1–5 stars / clear rating |
H |
Toggle toolbar (clean view) |
G |
Toggle Ratings & Comments panel |
B |
Toggle Admin Blind Rating Override |
T |
Rotate media 90° |
+ / - |
Zoom in / out |
S |
Download media |
Esc |
Close Lightbox |
4.3 Experimental Features
The /experiments folder contains beta versions and hotfixes under active development.
4.4 Philosophy, Feedback & License
Local-first. Privacy-first. Minimal dependencies. Cross-platform. MIT License.
🎞️ Presentation Video
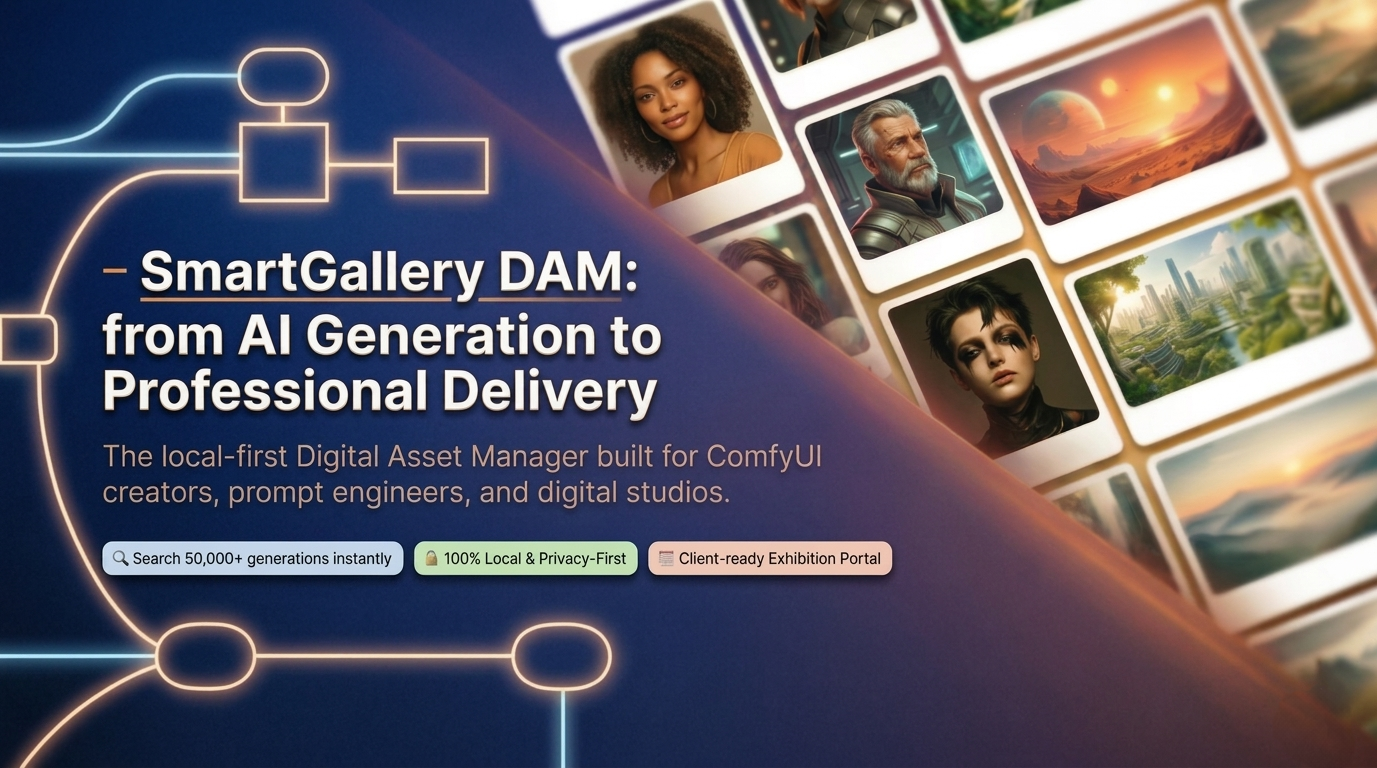
(Click on the image to play the video)
smartgallerydam.com · full documentation, wiki and feature reference

Made for the ComfyUI community and every digital creator who takes their work seriously.
Categories
Download Statistics
Total Downloads Over Time
Related apps
Explore more like this
Explore allDetails
mmartial/smart-comfyui-galleryRuntime arguments
- Web UI
http://[IP]:[PORT:8189]- Network
docker- Shell
bash- Privileged
- false
Template configuration
- Target
- 8189
- Default
- 8189
- Value
- 8189
Location to store SmartGallery data
- Target
- /mnt/SmartGallery
- Default
- /mnt/user/appdata/smart-comfyui-gallery
- Value
- /mnt/user/appdata/smart-comfyui-gallery
Location to find ComfyUI input data
- Target
- /mnt/input
- Default
- /mnt/user/appdata/comfyui-nvidia/basedir/input
- Value
- /mnt/user/appdata/comfyui-nvidia/basedir/input
Location to find ComfyUI output data
- Target
- /mnt/output
- Default
- /mnt/user/appdata/comfyui-nvidia/basedir/output
- Value
- /mnt/user/appdata/comfyui-nvidia/basedir/output
UID to use for content in mounted folders (should allow deletion of files)
- Default
- 99
- Value
- 99
GID to use for content in mounted folders (should allow deletion of files)
- Default
- 100
- Value
- 100
Set to true to force chown of the BASE_SMARTGALLERY_PATH folder only
- Default
- true
- Value
- true
Width (in pixels) of the generated thumbnails
- Default
- 300
- Value
- 300
Assumed frame rate for animated WebP files
- Default
- 16.0
- Value
- 16.0
Maximum number of files to load initially before showing a Load more button
- Default
- 100
- Value
- 100
Number of files to process at once during database sync
- Default
- 500
- Value
- 500
Target for SmartGallery directory mount, do not modify
- Default
- /mnt/SmartGallery
- Value
- /mnt/SmartGallery
Target for ComfyUI input directory mount, do not modify
- Default
- /mnt/input
- Value
- /mnt/input
Target for ComfyUI output directory mount, do not modify
- Default
- /mnt/output
- Value
- /mnt/output