
All apps · 0 apps

ONVIF-Server
Docker app from InstantCassette's Repository
Overview
Readme
View on GitHubTonys Onvif-RTSP-AI Proxy Server
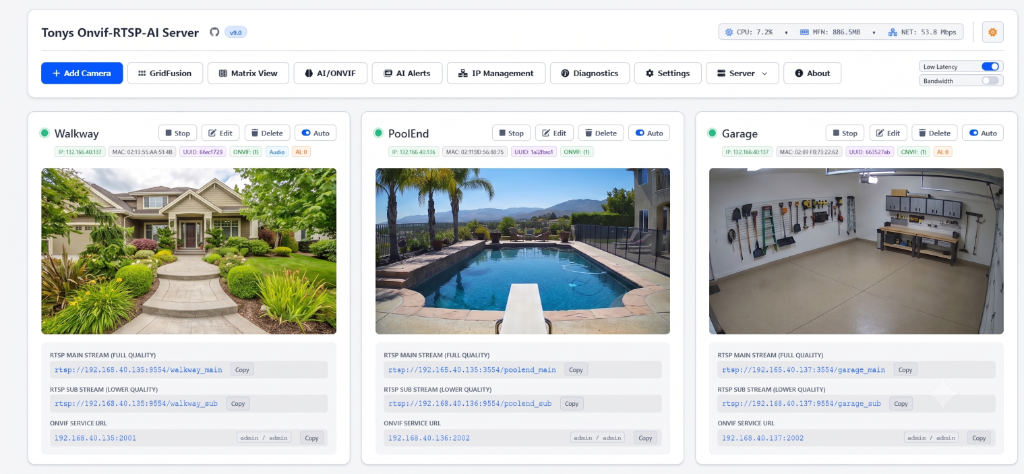
Bridge generic RTSP cameras into NVRs like UniFi Protect. This tool acts as a proxy, giving each of your cameras a unique identity (IP/MAC) so they work correctly with Protect's requirements.
ONVIF Event Forwarding & Local AI Object Detection (YOLO)
Turn standard RTSP feeds into intelligent, AI-capable cameras inside your NVR:
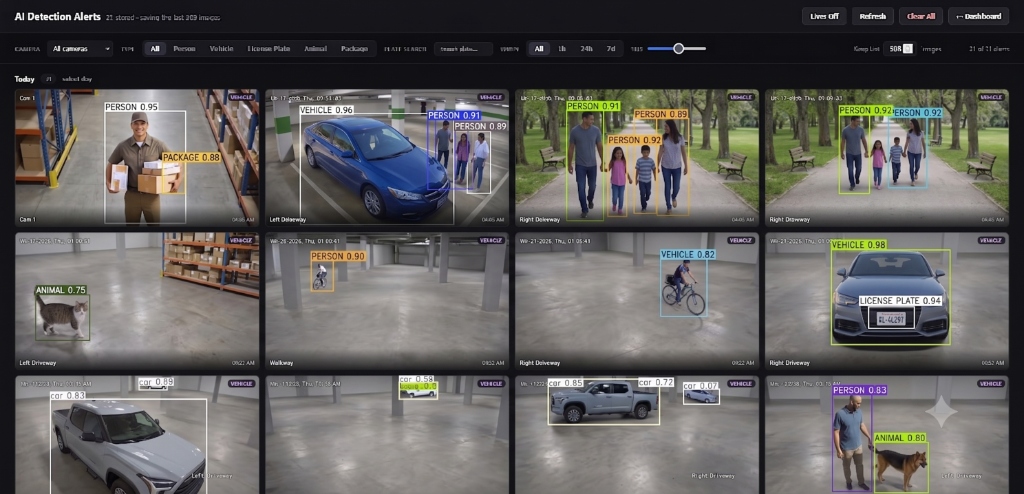
- ONVIF Event Forwarding: Automatically relays real-time camera motion events to UniFi Protect as native motion alarms.
- Local YOLOv8/11 Integration: Run local AI inference to detect People, Vehicles, and Animals, and create native Smart Detection events in Protect.
- Ultra-Efficient Two-Stage Pipeline: Keeps system CPU usage low. A lightweight OpenCV pixel-difference detector monitors the video stream and only fires the YOLO model when actual motion is detected.
- Easy Installation: The automated installer can set up the required AI packages (PyTorch, Ultralytics, and OpenCV-headless) with one click, or they can be installed later via the Web UI.
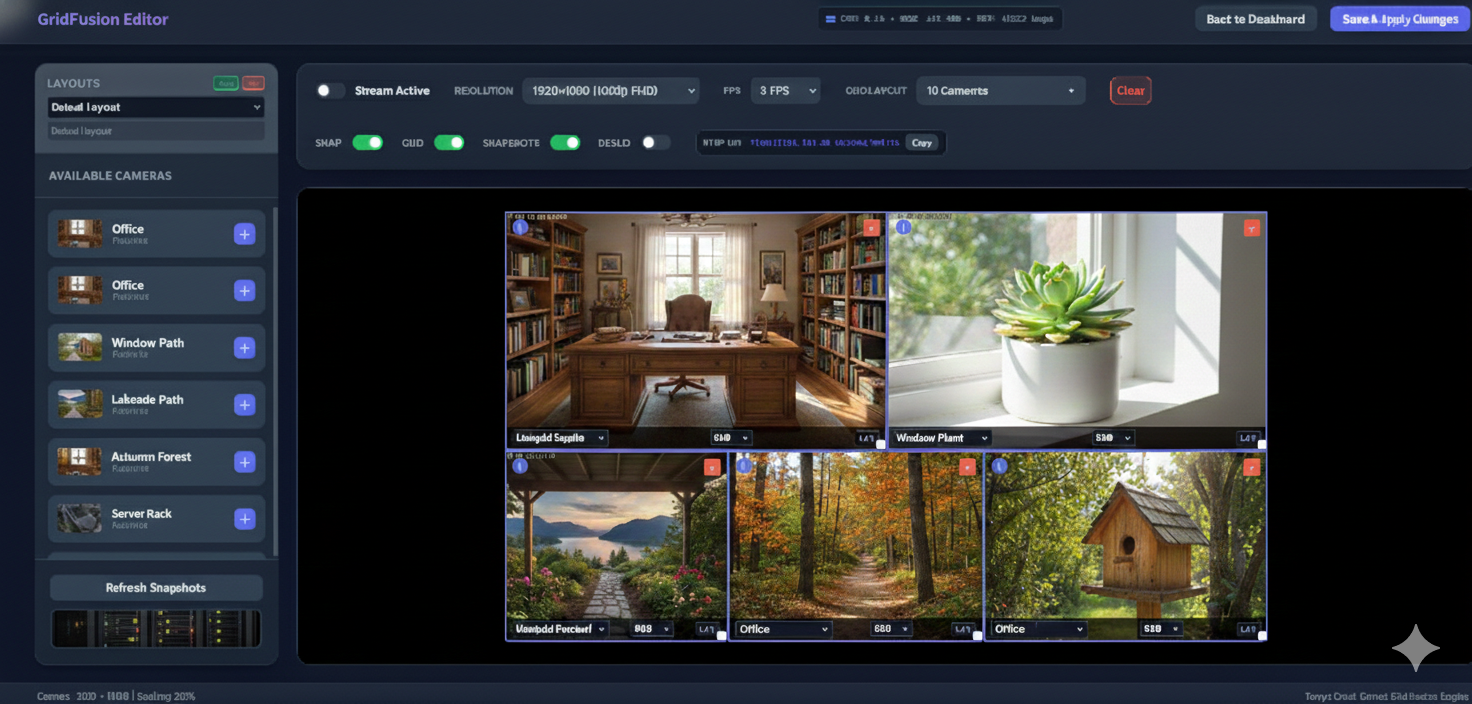
Introducing GridFusion - Multi-Camera Matrix Composer
GridFusion lets you combine multiple camera feeds into a single, customizable RTSP stream. Perfect for creating security monitoring walls, multi-angle views, or consolidated feeds for your NVR.
Key Features:
- Visual Drag-and-Drop Editor: Position cameras anywhere on the canvas with pixel-perfect control
- Flexible Layouts: Create any grid configuration - 2x2, 3x3, 4x4, or completely custom arrangements
- Custom Resolutions: Output at standard resolutions (1080p, 4K) or define your own dimensions
- Live Preview: See exactly how your matrix will look before saving. Visual camera placement using live snapshots from your feeds
- RTSP Output: The composed matrix is available as a standard RTSP stream that any NVR can consume
Quick Install (Recommended)
One-line automated installer - automatically installs and configures everything needed to run the server:
- Git - for cloning the repository
- Python 3 - runtime environment
- Python packages - Flask, Flask-CORS, Requests, PyYAML, psutil, onvif-zeep, paramiko, cryptography
- MediaMTX v1.18.1 - RTSP server for stream management
- FFmpeg - video processing and transcoding
- System configuration - file descriptor limits, permissions, and PATH setup
- Systemd/Launchd service - optional auto-start on boot (Linux/macOS)
Note: The one-line installer automatically installs all required dependencies and configures your system. If you prefer more control over the installation process, use the manual setup instructions below.
Linux/macOS:
curl -fsSL https://raw.githubusercontent.com/BigTonyTones/Tonys-Onvf-RTSP-Server/main/install.sh | sudo bash
Windows (PowerShell as Administrator):
irm https://raw.githubusercontent.com/BigTonyTones/Tonys-Onvf-RTSP-Server/main/install.ps1 | iex
After installation, access the web interface at http://localhost:5552
Docker Installation (Alternative Setup)
Run the server inside a Docker container. No manual dependency setup or touch commands are required:
Clone the Repository & Navigate to Folder:
git clone https://github.com/BigTonyTones/Tonys-Onvf-RTSP-Server.git
cd Tonys-Onvf-RTSP-Server
Start the Container:
sudo docker compose up -d --build
Access the web interface at http://localhost:5552. All settings and database files are automatically initialized and persisted inside the ./data directory.
Updating the Docker Container
To update the server to the latest version when running in Docker, navigate to your cloned repository and run:
git pull && docker compose down && docker compose up -d --build
This safely stops the running container, pulls the latest code, and rebuilds the image without losing your settings (which are safely persisted in the ./data directory).
Manual Installation
Linux
This server is optimized for Ubuntu 25.04 but is compatible with most modern Linux builds. The Virtual NIC feature requires a Linux environment. This has been confirmed to work perfectly on the Raspberry Pi 5 running the latest Debian 13 (Trixie) build for those looking to run the server on Raspberry Pi hardware.
Clone and enter the folder:
git clone https://github.com/BigTonyTones/Tonys-Onvf-RTSP-Server.git
cd Tonys-Onvf-RTSP-Server
Run the startup script:
sudo chmod +x start_ubuntu_25.sh
sudo ./start_ubuntu_25.sh
The script sets up a Python venv, installs dependencies (ffmpeg, etc.), and optimizes system limits.
Open the Web UI: Navigate to
http://localhost:5552to start adding cameras.
Windows
- Install Python 3.7+.
- Run
start_onvif_server.bat. Note: Virtual NICs (unique IP/MAC per camera) are not supported on Windows. All cameras will share the host IP.
Features & Tips
- Unique Identities: Use the Virtual NIC toggle on Linux to give each camera its own IP and MAC address.
- UniFi Protect: Use the ONVIF IP and credentials shown in the dashboard to manually adopt cameras in the Protect app.
- Performance: High-concurrency is handled via MediaMTX. No need for manual configuration.
- Transcoding: Only enable this if your camera's native codec isn't compatible. It is CPU intensive.
- VMs: If running in a VM (Proxmox, ESXi), you must enable Promiscuous Mode on the network interface for Virtual NICs to work.
- Auto-Boot: You can enable the systemd service in the Web UI settings to start the server on boot.
- H.264 vs H.265: High awareness is required regarding video codecs! See below.
💡 Important: Video Codecs (H.264 vs H.265)
For the best experience and lowest latency:
- Use H.264: It is highly recommended to set your physical cameras to H.264 in their own settings. H.264 is the universal standard for web browsers and provides the smoothest playback on the dashboard.
- H.265 (HEVC) Issues: While H.265 saves bandwidth, most web browsers cannot play it natively in a web player. If your camera is set to H.265, you may see a black screen or loading spinner on the dashboard.
- The Fix: Either change your camera's internal settings to H.264 (preferred) or enable Transcoding in the camera settings of this server. Note that transcoding is extremely CPU intensive, especially on Raspberry Pi hardware.
Credits
Built using MediaMTX and FFmpeg.

Install ONVIF-Server on Unraid in a few clicks.
Find ONVIF-Server in Community Apps on your Unraid server, review the template, and click Install. Unraid handles the Docker app or plugin setup from the published template.
Requirements
Categories
Download Statistics
Related apps
Explore more like this
Explore allDetails
instantcassette/tonys-onvif-server:latestRuntime arguments
- Web UI
http://[IP]:[PORT:5552]/- Network
host- Shell
bash- Privileged
- true
Template configuration
- Target
- /app/data
- Default
- /mnt/user/appdata/onvif-server