
All apps · 0 apps

ha-login-approval
Docker app from Nebur692's Repository
Overview
Readme
View on GitHubha-login-approval
Truly passwordless sign-in, approved from your phone — for ZITADEL, Keycloak, Authentik, or any standard OIDC identity provider




English
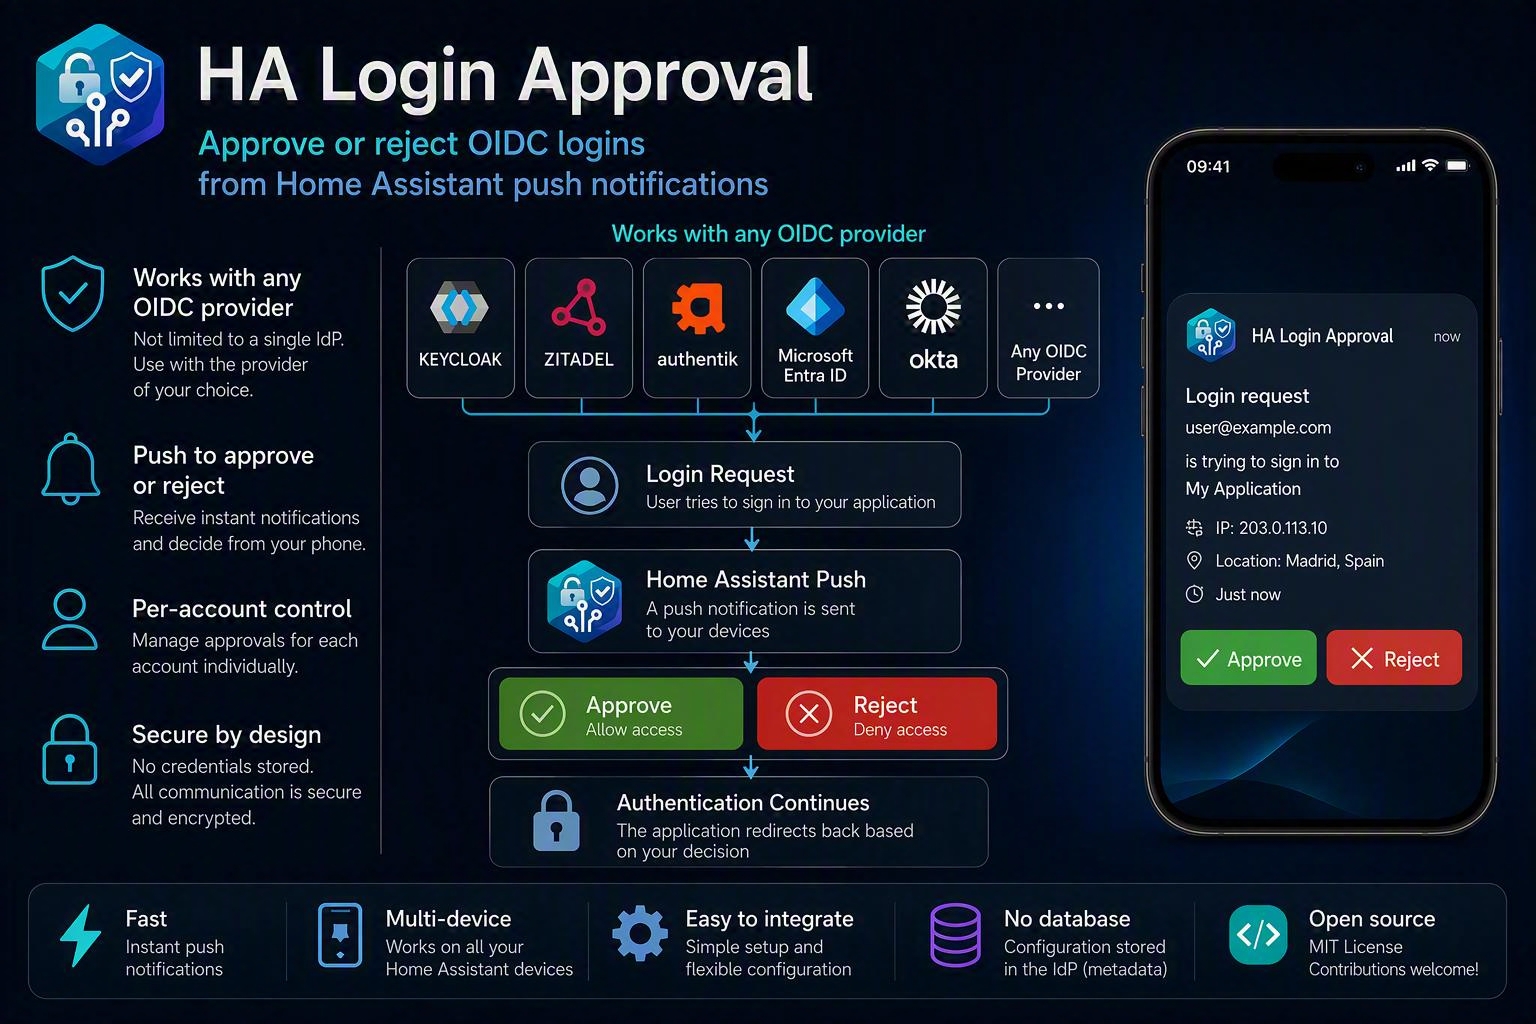
✨ What this is
This project turns your Home Assistant Companion App into your login method. Instead of typing a password, you type your email, get a push notification with Approve / Reject buttons, and tapping Approve logs you in — no password involved at any point.
It does this by acting as a generic external OIDC identity provider: any relying party that supports "log in with an external OIDC provider" (ZITADEL, Keycloak, Authentik, and in principle any other standards-compliant one) can redirect to this service, and it handles the rest.
- Real passwordless login — not just a second factor bolted in front of a password. Confirmed working end-to-end against a real ZITADEL instance (this project's own reference deployment); the provider itself is a standard OIDC implementation (authorization/token/JWKS/discovery, tested against Keycloak's own external-IDP button flow too), so it should work the same way with Keycloak, Authentik, or any other generic-OIDC-capable RP — see Setting up the passwordless flow for exactly what's confirmed vs. what should work by protocol compliance.
- Your own account directory — this service keeps its own small list of email → assigned devices in a self-contained SQLite file. It never calls any identity provider's admin API to figure out who's who, so it works identically no matter which RP is in front of it.
- Multiple devices per account, discovered live from your own Home Assistant.
- The bridge page speaks your browser's language — Spanish or English, detected from the
standard
Accept-Languageheader, no configuration needed. - One-time recovery codes as an emergency fallback if the push never arrives or you lose the device — shown once at generation time, stored only as irreversible hashes.
- Anti-abuse built in: an explicit Reject or a wrong recovery code counts toward a 3-strikes block (scoped to that one account + IP, never a global block), with manual unblock from the admin panel. A silent timeout does not count — only an explicit signal does. A definitively failed login always redirects back to your identity provider with a proper OIDC error response — it never leaves the browser stuck on a dead page.
- Optional GeoIP enrichment (self-hosted MaxMind GeoLite2 — no third-party API call per login) adds city/country/ISP to both the audit log and the push notification itself.
- Admin panel: an at-a-glance home page, the account directory, per-account login history, recovery-code management, blocked-IP list, and page branding.
📦 Installation
Requires Home Assistant with the Companion App installed on at least one device. Environment variables:
Core (always required):
| Variable | What it's for |
|---|---|
HA_BASE_URL |
Your Home Assistant's internal URL, no trailing slash (e.g. http://192.168.1.50:8123). |
HA_TOKEN |
A Home Assistant long-lived access token (Profile → Security → Long-Lived Access Tokens). Needs permission to call notify.* services and to read mobile_app_notification_action events over the WebSocket. |
ADMIN_USERNAME / ADMIN_PASSWORD |
Sign-in for this project's own /admin panel. The password must be at least 12 characters and not a default one; otherwise the panel stays off (sign-ins through this service are unaffected). |
OIDC provider (all required):
| Variable | What it's for |
|---|---|
IDP_ISSUER_URL |
A public https:// URL, behind your own reverse proxy — not a local IP. Your IDP's server-to-server calls (token/JWKS) and the browser of whoever's signing in both need to reach this. If you use a local IP or a LAN-only address here, sign-in will only work from inside your own network. Used as the iss claim and to build the /authorize, /token, /jwks.json URLs. |
IDP_CLIENT_ID / IDP_CLIENT_SECRET |
Credentials your IDP will use to authenticate against this service's /token endpoint — you choose these yourself (e.g. a name and a long random string) and enter the same values when registering this service as an external IDP on your ZITADEL/Keycloak/Authentik. |
IDP_CLIENT_REDIRECT_URI |
The exact callback URL your IDP uses after login (for ZITADEL, typically https://your-zitadel-domain/idps/callback). Validated on every request to prevent an open redirect. |
Tuning (optional, sensible defaults):
| Variable | Default | What it's for |
|---|---|---|
APPROVAL_TIMEOUT_SECONDS |
120 |
How long the flow waits for a tap before failing. |
BRIDGE_RECOVERY_UNLOCK_DELAY_SECONDS |
60 |
Seconds with no response before the bridge page offers retry/recovery-code options. The original approval keeps waiting in the background regardless. |
PUID / PGID |
1000 / 1000 |
User and group the service runs as — never root. On start it hands its /data folder to them, which also upgrades a folder created by an older version. On Unraid use 99 / 100. The database is kept readable by that user only (0600): it holds the key that signs every login. |
TRUSTED_PROXIES |
(empty) | Reverse proxies whose X-Forwarded-For / X-Real-IP headers this service reads, as IPs or CIDRs (e.g. ["172.18.0.0/16"]). Those headers are how a proxy reports who called it, and they are only used when the request arrives from an address listed here — otherwise the connecting address is used. Set this to your proxy so notifications, the audit log and IP blocking record the visitor rather than the proxy. |
IP_BLOCK_THRESHOLD |
3 |
Consecutive failures (explicit reject or wrong recovery code, same account + IP) before blocking. |
RECOVERY_CODE_BATCH_SIZE |
10 |
How many recovery codes get generated at once from /admin/recovery. |
RECOVERY_CODE_LOW_WARNING |
3 |
Push a warning once this many recovery codes (or fewer) remain. |
GEOIP_ACCOUNT_ID / GEOIP_LICENSE_KEY |
(empty) | Optional free MaxMind account, to add city/country/ISP to both the audit log and the push notification itself. Left empty, that part just stays blank — login still works exactly the same. |
ZITADEL_API_URL / ZITADEL_API_CLIENT_ID / ZITADEL_API_CLIENT_SECRET |
(empty) | Optional, ZITADEL only: name the app being signed in to in the notification (e.g. App: Grafana (grafana.example.com)). The login itself never says which app it is for, but ZITADEL records it, and this service can ask. Create a service user with a client secret and give it the read-only IAM_OWNER_VIEWER role (Default settings → Administrators); it only reads ZITADEL's event store. Left empty, or if ZITADEL does not answer within 3 s, the notification simply has no app line. With Keycloak nothing needs configuring: the app's address (not its name) is read from the request Keycloak itself sends. |
A ready-to-use Unraid Community Applications template is included:
ha-login-approval.xml, pointing at the published image
ghcr.io/nebur692/ha-login-approval:latest. It also mounts a persistent volume at /data —
this holds the SQLite database (accounts, recovery codes, audit log, IP blocks, branding) and the
optional GeoIP files; without it, everything resets when the container is recreated.
Plain Docker / Docker Compose (no Unraid required)
The image is published on GHCR — no need to build it yourself:
docker pull ghcr.io/nebur692/ha-login-approval:latest
Or with Compose: grab just the docker-compose.yml file from this repo (no
need to clone the whole thing), edit the environment values to match your own setup, then:
docker compose up -d
This exposes the service on port 8000 of the host running it — the /admin panel and the
/.well-known/openid-configuration discovery document both live there. Put a reverse proxy (nginx,
Nginx Proxy Manager, Traefik, Caddy...) with a real TLS certificate in front of it for
IDP_ISSUER_URL — see the note above about why a local IP doesn't work. Update in the future with
docker compose pull && docker compose up -d.
Available tags: latest (tracks the latest release), pinned version tags for each release.
🔐 Setting up the passwordless flow, step by step
The general shape, regardless of which IDP you use: register this service as a generic external
OIDC provider, pointing at IDP_ISSUER_URL (its discovery document is at
<IDP_ISSUER_URL>/.well-known/openid-configuration), using IDP_CLIENT_ID/IDP_CLIENT_SECRET as
the credentials, and configure that provider to redirect back to IDP_CLIENT_REDIRECT_URI. Give it
a friendly display name (e.g. "Home Assistant") when registering it — that name is exactly what
shows up on the "Log in with..." button your users see. Then add the accounts that should use it in
this service's own /admin/accounts panel (email + which devices get notified) — an account
with no device assigned can never complete a passwordless login, so nothing works by accident.
ZITADEL — confirmed working end-to-end in a real deployment:
- Console → Identity Providers → Add Provider → Generic OIDC.
- Name: whatever you want the button to say (e.g. "Home Assistant") — ZITADEL shows this name literally, so don't leave it as a technical identifier.
- Issuer: your
IDP_ISSUER_URL. - Client ID / Client secret: the same
IDP_CLIENT_ID/IDP_CLIENT_SECRETyou set on this container. - Scopes:
openid profile email. - Under provider options: enable "Is linking allowed", leave automatic creation/update
off (accounts must already exist in ZITADEL, this service only vouches for who they are,
it doesn't create ZITADEL users), and — critical, confirmed by hand — set Auto-linking to
Email. Without this, ZITADEL never tries to match the identity this service asserts against an existing account, and every login fails with "Account Not Found" even though the button and the notification both work fine. - If creating it fails with
Errors.Target.DeniedURL: ZITADEL blocks private IP ranges by default (SSRF protection) — another reasonIDP_ISSUER_URLshould be a public domain, not a LAN address.
- Add it to your org's login policy so the button actually shows up on the login screen (Console → your organization's Login Policy → Identity Providers → add the one you just created).
- Nothing else to do — the first real login links the account automatically. As long as the ZITADEL account's own email matches (lowercased) the email typed on the bridge page, ZITADEL creates the link itself the moment the login is approved, and signs the user straight in. There is no separate "go to account settings and link it" step to perform by hand — confirmed live, end to end, with a real account and a real push approval.
- Important, confirmed by hand: ZITADEL does not forward whatever's typed in the
loginnamefield to this service as alogin_hint(a known, still-open ZITADEL bug — Keycloak's default external-IDP button doesn't send it either). This is why the bridge page always asks for the email itself. In practice this means: on ZITADEL's login screen, don't bother typing anything into the loginname field — just click this service's button directly and type the email on the next screen. Confirmed that clicking the button with an empty loginname field works fine.
Keycloak — a full login confirmed live (Keycloak 26.4), button to token exchange:
Register a generic OpenID Connect v1.0 Identity Provider (Realm settings → Identity Providers), same Issuer/Client ID/Client secret as above, and set its own display name field too. Confirmed live that Keycloak's own external-IDP link on its login screen is a plain server-rendered link independent of the username field — same practical implication as ZITADEL: don't bother typing a username first, just click the button.
Keycloak sends a nonce and expects it back in the id_token, so it needs v2.4.0 or later;
earlier versions fail with "OpenID Provider did not return a nonce". PKCE works too: turn on
Use PKCE with method S256 in the provider's settings.
Authentik and other generic-OIDC-capable IDPs — not tested, should work by protocol compliance:
The provider this service exposes is a standard OIDC implementation with no ZITADEL-specific assumptions in its wire format — any RP that supports "generic external OIDC provider" should be able to use it the same way (register issuer + client credentials, point the redirect back here). This just hasn't been verified hands-on the way ZITADEL and Keycloak's button behavior have. If you try it, an issue report with what worked or didn't is very welcome.
🧑💻 Admin panel tour
All under /admin. You sign in with ADMIN_USERNAME/ADMIN_PASSWORD on a sign-in page; the session ends after 30 minutes without use or 8 hours after signing in, and Sign out ends it at once. Five wrong passwords from one address lock that address out for 15 minutes. The panel speaks Spanish (Spain) or English, following the browser's language.
| Section | What it's for |
|---|---|
| Home | At-a-glance: total accounts, how many have devices assigned, recovery codes running low, currently blocked IPs. |
| Accounts | Add an email, tick which devices get notified for it. This is the only account model the service uses — independent of any IDP. A device assigned to an account but missing from Home Assistant right now is still listed and kept, unless you untick it. |
| Audit | Per-account history: approved / rejected / timed out / recovery code used / send failed, with timestamp, IP, browser, and (if GeoIP is configured) city/country/ISP. |
| Recovery codes | Generate or regenerate a batch per account — shown once, then never retrievable again. Regenerating instantly invalidates every code from the previous batch. |
| Blocked IPs | See who's currently blocked and unblock manually — important if three accidental rejects (or mistyped codes) lock out the real account owner. |
| Branding | Upload a logo/background/favicon and set a title for the bridge page. Any image format or size is accepted — each is automatically converted and resized (logo/favicon to PNG, background to JPEG). |
| Signing key | The key that signs every login. Rotate makes a new one sign from that moment, while the old one keeps verifying for an hour so nothing in flight breaks; tick the box to delete the old one at once instead, if it may have leaked. Relying parties pick up the new key on their own. |
| Activity | Who is signed in to the panel right now (and a button to sign any of them out), and the last 200 sign-ins — good and bad — and changes made in the panel, with who, when and from where. |
🧭 Usage — what it looks like for the person logging in
- On your IDP's login screen, click this service's button (no need to type a username first).
- Type your email on the bridge page that appears — shown in Spanish or English automatically, based on your browser's language.
- Check your phone (or whichever devices are assigned to that account) — approve or reject.
- Approve → you're logged in, no password ever asked.
- Nothing happens for a while → after
BRIDGE_RECOVERY_UNLOCK_DELAY_SECONDS(60s by default), the page offers to resend the notification or use a one-time recovery code — the original approval keeps waiting in the background too, so a late tap still works. - Reject, or the login fails for any other reason → a "Back to login" button appears, returning you to your identity provider's own login screen with a standard error — you're never left stuck on a dead page.
- Three rejects (or wrong recovery codes) in a row from the same place block further attempts until an admin unblocks it.
🩹 Troubleshooting
Notification never arrives: confirm the email is added in
/admin/accountswith at least one device ticked.The button says a weird technical name instead of something like "Home Assistant": rename the identity provider itself in your IDP's console — the name you gave it there is exactly what's shown on the button.
Sign-in only works from inside my own network:
IDP_ISSUER_URLis pointing at a local IP — put this service behind a reverse proxy with a real public domain and HTTPS, and use that domain asIDP_ISSUER_URLinstead (see Installation).Recovery code / retry option not showing up: it's gated server-side and only appears after
BRIDGE_RECOVERY_UNLOCK_DELAY_SECONDS, or immediately if the notification send itself failed outright — it's not just a client-side timer, so it won't appear early no matter what.Account (or its IP) not responding to anything: check
/admin/blocked-ips— three explicit rejects or wrong recovery codes block that account+IP pair until manually unblocked there.Notification is approved but the RP says "Account Not Found" (ZITADEL) or refuses to link: the IDP's auto-linking option isn't set to match by email — see the "Auto-linking" bullet under Setting up the passwordless flow. Confirmed live: with "Is linking allowed" enabled but auto-linking left off, ZITADEL never even offers to link the account, it just fails outright.
The notification, audit log, and IP-blocking all show your reverse proxy's own address instead of the real caller's: this service reads the client IP from the standard
X-Forwarded-Forheader when present, falling back to the raw connection otherwise — if your reverse proxy doesn't set that header, everyone behind it looks like the same single IP (the proxy itself), which also means the 3-strikes IP block would end up shared across every real visitor. Nginx Proxy Manager sets it correctly out of the box; if you're using something else, make sure it forwardsX-Forwarded-For(orX-Real-IP) to this container.Home Assistant is down (or hasn't finished booting): this service starts anyway and keeps retrying in the background, so it comes back on its own the moment Home Assistant answers — no restart needed. Sign-ins can't be approved meanwhile, of course.
GET /healthsays which of the two is actually down:"ha": "unreachable"means Home Assistant, not this container.The admin panel says it is turned off:
ADMIN_PASSWORDis shorter than 12 characters or a default one. Set a longer one and restart the container."Too many failed attempts" on the panel's sign-in page: five wrong passwords from your address in 15 minutes. Wait 15 minutes; the attempts are listed under Activity once you are in.
Is this container itself healthy?: it ships a Docker
HEALTHCHECKthat asks its own port, sodocker psshowshealthy/unhealthywithout you having to look./healthanswers 503 only when this service's own database is unreachable — Home Assistant being away reportsdegradedin the body but keeps a 200, so an outage next door doesn't paint this container red. Note that Docker does not restart an unhealthy container by itself: the healthcheck is there to make the problem visible to you and to your monitoring.
💙 Support
None of this would be possible without the community's support. If this project has been useful to you, consider supporting it via GitHub Sponsors, Ko-fi or PayPal — every bit helps keep it maintained.
⚠️ Disclaimer
Not affiliated with, endorsed by, or associated with ZITADEL (ZITADEL GmbH), Keycloak, Authentik, or Home Assistant / Nabu Casa Inc. All are trademarks of their respective owners.
📜 License
Español
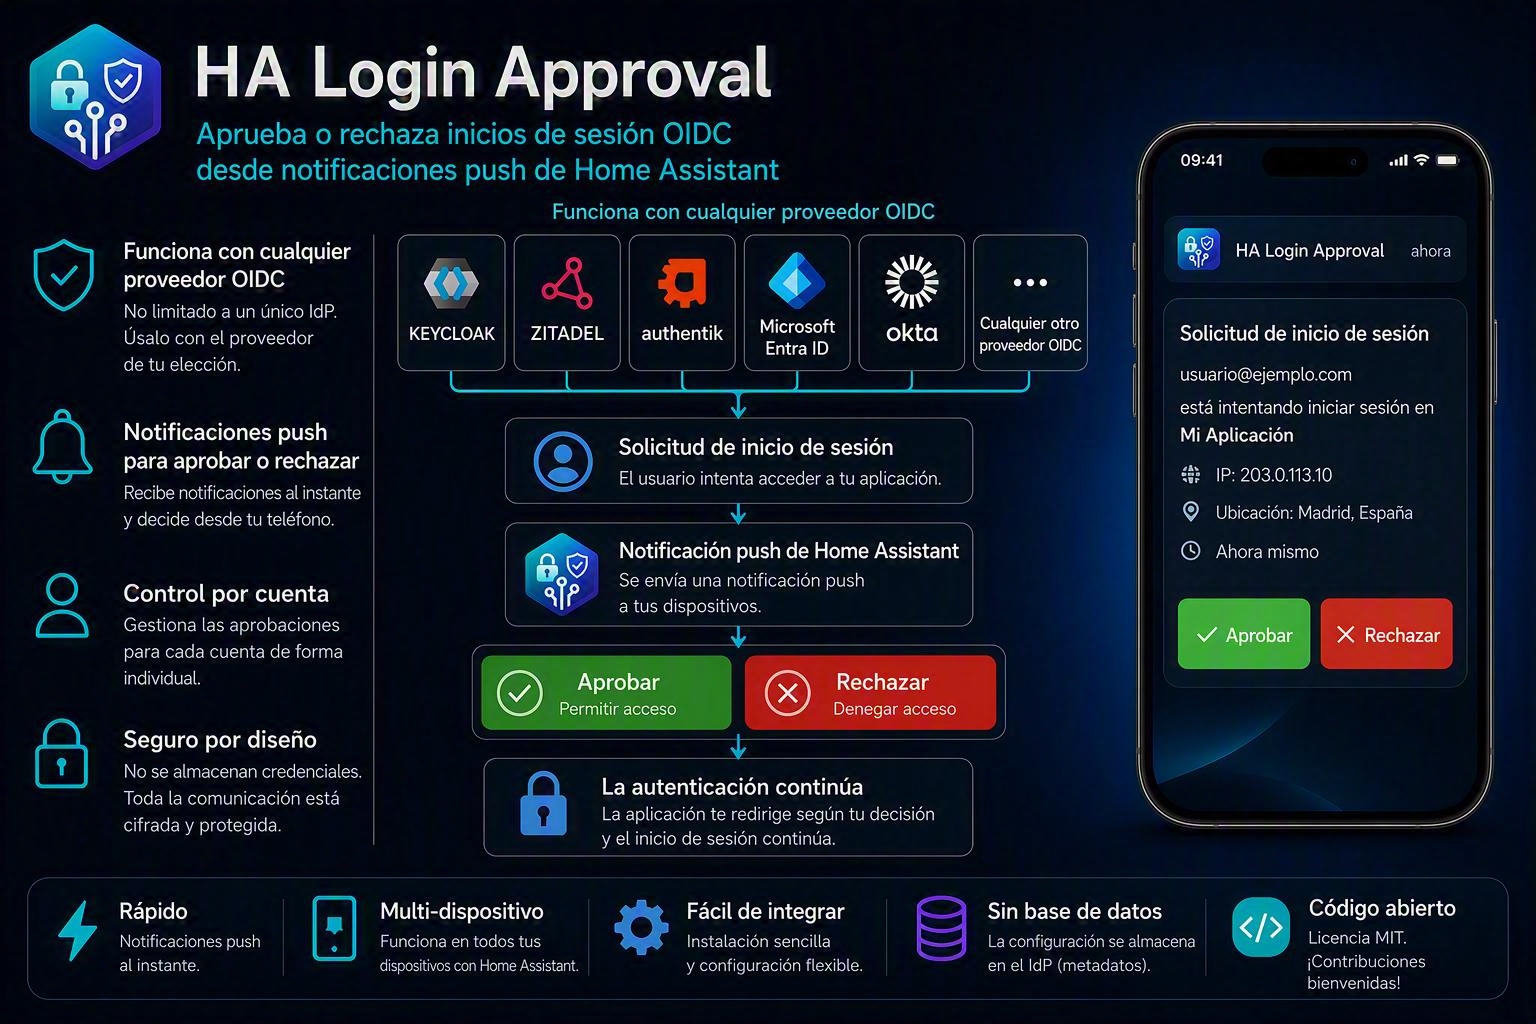
✨ Qué es esto
Este proyecto convierte la app Companion de Home Assistant en tu propio método de login. En vez de escribir una contraseña, escribes tu email, te llega una notificación con botones Aprobar / Rechazar, y pulsar Aprobar te da acceso — sin contraseña de por medio en ningún momento.
Lo consigue actuando como un proveedor OIDC externo genérico: cualquier aplicación que soporte "iniciar sesión con un proveedor OIDC externo" (ZITADEL, Keycloak, Authentik, y en principio cualquier otro que cumpla el estándar) puede redirigir a este servicio, que se encarga del resto.
- Login realmente sin contraseña — no es solo un segundo factor añadido delante de una contraseña. Confirmado funcionando de extremo a extremo contra una instancia real de ZITADEL (el propio despliegue de referencia de este proyecto); el proveedor en sí es una implementación OIDC estándar (authorization/token/JWKS/discovery, probado también contra el flujo de botón externo de Keycloak), así que debería funcionar igual con Keycloak, Authentik o cualquier otro RP compatible con OIDC genérico — ver Configurar el flujo sin contraseña para saber exactamente qué está confirmado y qué debería funcionar por cumplir el estándar.
- Directorio de cuentas propio — este servicio guarda su propia lista pequeña de email → dispositivos asignados en un fichero SQLite autocontenido. Nunca llama al API de gestión de ningún proveedor de identidad para saber quién es quién, así que funciona igual sin importar qué RP tenga delante.
- Varios dispositivos por cuenta, descubiertos en vivo desde tu propio Home Assistant.
- La página puente habla el idioma de tu navegador — español o inglés, detectado por la
cabecera estándar
Accept-Language, sin ninguna configuración necesaria. - Códigos de recuperación de un solo uso como salvavidas si la notificación nunca llega o pierdes el dispositivo — se muestran una sola vez al generarlos, se guardan solo como hash irreversible.
- Anti-abuso integrado: un Rechazo explícito o un código de recuperación incorrecto cuentan para un bloqueo a los 3 fallos (limitado a esa cuenta + IP concretas, nunca un bloqueo global), con desbloqueo manual desde el panel admin. Un timeout silencioso no cuenta — solo una señal explícita. Un login que falla definitivamente siempre redirige de vuelta a tu proveedor de identidad con un error OIDC en condiciones — nunca deja el navegador atascado en una página muerta.
- Enriquecimiento GeoIP opcional (MaxMind GeoLite2 autoalojado — sin llamar a ningún API de terceros en cada login) añade ciudad/país/operador tanto a la auditoría como a la propia notificación push.
- Panel de administración: resumen de un vistazo, directorio de cuentas, historial de login por cuenta, gestión de códigos de recuperación, lista de IPs bloqueadas, y personalización de la página.
📦 Instalación
Necesita Home Assistant con la app Companion instalada en al menos un dispositivo. Variables de entorno:
Básicas (siempre requeridas):
| Variable | Para qué sirve |
|---|---|
HA_BASE_URL |
La URL interna de tu Home Assistant, sin barra final (ej. http://192.168.1.50:8123). |
HA_TOKEN |
Un token de acceso de larga duración de Home Assistant (Perfil → Seguridad → Tokens de acceso de larga duración). Necesita permiso para llamar servicios notify.* y para leer eventos mobile_app_notification_action por WebSocket. |
ADMIN_USERNAME / ADMIN_PASSWORD |
Acceso al propio panel /admin. La contraseña debe tener al menos 12 caracteres y no ser una de las conocidas; si no, el panel queda apagado (los inicios de sesión a través de este servicio no se ven afectados). |
Proveedor OIDC (todas requeridas):
| Variable | Para qué sirve |
|---|---|
IDP_ISSUER_URL |
Una URL pública https://, detrás de tu propio proxy inverso — no una IP local. Tanto las llamadas servidor-a-servidor de tu IDP (token/JWKS) como el navegador de quien inicia sesión necesitan alcanzar esto. Si pones aquí una IP local o solo alcanzable dentro de tu red, el login solo funcionará desde dentro de casa. Se usa como claim iss y para construir las URLs de /authorize, /token, /jwks.json. |
IDP_CLIENT_ID / IDP_CLIENT_SECRET |
Credenciales que tu IDP usará para autenticarse contra el /token de este servicio — las eliges tú (un nombre y una cadena aleatoria larga) y pones los mismos valores al registrar este servicio como IDP externo en tu ZITADEL/Keycloak/Authentik. |
IDP_CLIENT_REDIRECT_URI |
La URL de retorno exacta que usa tu IDP tras el login (para ZITADEL, normalmente https://tu-dominio-zitadel/idps/callback). Se valida en cada petición para evitar redirecciones no autorizadas. |
Ajustes (opcionales, con valores por defecto razonables):
| Variable | Por defecto | Para qué sirve |
|---|---|---|
APPROVAL_TIMEOUT_SECONDS |
120 |
Cuánto espera el flujo a que pulses antes de fallar. |
BRIDGE_RECOVERY_UNLOCK_DELAY_SECONDS |
60 |
Segundos sin respuesta antes de que la página ofrezca reintentar o usar un código de recuperación. La aprobación original sigue esperando en paralelo. |
PUID / PGID |
1000 / 1000 |
Usuario y grupo con los que corre el servicio — nunca root. Al arrancar les entrega su carpeta /data, lo que también actualiza una carpeta creada por una versión anterior. En Unraid usa 99 / 100. La base de datos solo la puede leer ese usuario (0600): guarda la clave que firma cada login. |
TRUSTED_PROXIES |
(vacío) | Proxies inversos cuyas cabeceras X-Forwarded-For / X-Real-IP lee este servicio, como IPs o CIDRs (p. ej. ["172.18.0.0/16"]). Esas cabeceras son la forma que tiene un proxy de decir quién le llamó, y solo se usan cuando la petición llega desde una dirección de esta lista; si no, se usa la dirección de conexión. Ponlo apuntando a tu proxy para que las notificaciones, la auditoría y el bloqueo por IP registren al visitante y no al propio proxy. |
IP_BLOCK_THRESHOLD |
3 |
Fallos consecutivos (rechazo explícito o código incorrecto, misma cuenta + IP) antes de bloquear. |
RECOVERY_CODE_BATCH_SIZE |
10 |
Cuántos códigos de recuperación se generan de golpe desde /admin/recovery. |
RECOVERY_CODE_LOW_WARNING |
3 |
Avisar por push cuando queden este número de códigos o menos. |
GEOIP_ACCOUNT_ID / GEOIP_LICENSE_KEY |
(vacío) | Cuenta gratuita opcional de MaxMind, para añadir ciudad/país/operador tanto a la auditoría como a la propia notificación push. Vacío = esa parte queda en blanco, el login sigue funcionando igual. |
ZITADEL_API_URL / ZITADEL_API_CLIENT_ID / ZITADEL_API_CLIENT_SECRET |
(vacío) | Opcional, solo ZITADEL: nombra en la notificación la app en la que se está iniciando sesión (p. ej. App: Grafana (grafana.example.com)). El login en sí nunca dice para qué app es, pero ZITADEL lo registra y este servicio puede preguntárselo. Crea un usuario de servicio con secreto de cliente y dale el rol de solo lectura IAM_OWNER_VIEWER (Default settings → Administrators); solo lee el registro de eventos de ZITADEL. Vacío, o si ZITADEL no responde en 3 s, la notificación sale sin la línea de la app. Con Keycloak no hace falta configurar nada: la dirección de la app (no su nombre) se lee de la propia petición que manda Keycloak. |
Incluye una plantilla lista para Community Applications de Unraid:
ha-login-approval.xml, que apunta a la imagen ya publicada
ghcr.io/nebur692/ha-login-approval:latest. También monta un volumen persistente en /data —
ahí vive la base de datos SQLite (cuentas, códigos de recuperación, auditoría, bloqueos de IP,
personalización) y los ficheros de GeoIP opcionales; sin él, todo se reinicia al recrear el
contenedor.
Docker normal / Docker Compose (sin necesidad de Unraid)
La imagen está publicada en GHCR — no hace falta construirla tú mismo:
docker pull ghcr.io/nebur692/ha-login-approval:latest
O con Compose: descarga solo el fichero docker-compose.yml de este repo
(no hace falta clonarlo entero), edita los valores de entorno para que coincidan con tu propia
instalación, y luego:
docker compose up -d
Esto expone el servicio en el puerto 8000 del host donde lo ejecutes — ahí viven tanto el panel
/admin como el documento de descubrimiento /.well-known/openid-configuration. Pon un proxy
inverso (nginx, Nginx Proxy Manager, Traefik, Caddy...) con un certificado TLS real delante para
IDP_ISSUER_URL — ver la nota de arriba sobre por qué una IP local no funciona. Para actualizar en
el futuro: docker compose pull && docker compose up -d.
Tags disponibles: latest (la última versión publicada), tags fijos por cada versión.
🔐 Configurar el flujo sin contraseña, paso a paso
La idea general, sea cual sea tu IDP: registra este servicio como proveedor OIDC externo
genérico, apuntando a IDP_ISSUER_URL (su documento de descubrimiento está en
<IDP_ISSUER_URL>/.well-known/openid-configuration), usando IDP_CLIENT_ID/IDP_CLIENT_SECRET
como credenciales, y configura ese proveedor para que redirija de vuelta a
IDP_CLIENT_REDIRECT_URI. Ponle un nombre visible (ej. "Home Assistant") al registrarlo — ese
nombre es exactamente lo que verán tus usuarios en el botón de "Iniciar sesión con...". Luego añade
las cuentas que deban usarlo en el propio panel /admin/accounts de este servicio (email + qué
dispositivos se notifican) — una cuenta sin ningún dispositivo asignado nunca puede completar un
login sin contraseña, así que nada funciona por accidente.
ZITADEL — confirmado funcionando de extremo a extremo en un despliegue real:
- Consola → Identity Providers → Add Provider → Generic OIDC.
- Name: lo que quieras que diga el botón (ej. "Home Assistant") — ZITADEL muestra este nombre tal cual, así que no lo dejes como un identificador técnico.
- Issuer: tu
IDP_ISSUER_URL. - Client ID / Client secret: los mismos
IDP_CLIENT_ID/IDP_CLIENT_SECRETque pusiste en este contenedor. - Scopes:
openid profile email. - En las opciones del proveedor: activa "Is linking allowed", deja la creación/actualización
automática desactivadas (las cuentas ya deben existir en ZITADEL, este servicio solo
confirma quién es quién, no crea usuarios de ZITADEL), y — crítico, confirmado a mano —
pon Auto-linking en
Email. Sin esto, ZITADEL nunca intenta casar la identidad que afirma este servicio con una cuenta existente, y todos los logins fallan con "Account Not Found" aunque el botón y la notificación funcionen perfectamente. - Si falla al crearlo con
Errors.Target.DeniedURL: ZITADEL bloquea rangos de IP privados por defecto (protección SSRF) — otra razón más para queIDP_ISSUER_URLsea un dominio público, no una dirección de tu red local.
- Añádelo a la política de login de tu organización para que el botón aparezca de verdad en la pantalla de login (Consola → Login Policy de tu organización → Identity Providers → añade el que acabas de crear).
- No hace falta nada más — el primer login real vincula la cuenta automáticamente. Mientras el email de la propia cuenta de ZITADEL coincida (en minúsculas) con el email tecleado en la página puente, ZITADEL crea el vínculo él solo en el momento en que se aprueba el login, y entra directamente. No hay ningún paso separado de "ir a la configuración de la cuenta y vincularlo a mano" — confirmado en vivo, de extremo a extremo, con una cuenta real y una aprobación real.
- Importante, confirmado a mano: ZITADEL no reenvía lo que se escriba en el campo
loginnamea este servicio comologin_hint(un bug real y todavía abierto de ZITADEL — el botón por defecto de Keycloak tampoco lo manda). Por eso la página puente siempre pide el email ella misma. En la práctica: en la pantalla de login de ZITADEL, no hace falta escribir nada en el campo de usuario — pulsa directamente el botón de este servicio y escribe el email en la siguiente pantalla. Confirmado que pulsar el botón con el campo vacío funciona sin problema.
Keycloak — un login completo confirmado en vivo (Keycloak 26.4), del botón al intercambio del token:
Registra un Identity Provider genérico OpenID Connect v1.0 (Realm settings → Identity Providers), mismo Issuer/Client ID/Client secret que arriba, y pon también su propio nombre visible. Confirmado en vivo que el propio enlace de IDP externo de Keycloak en su pantalla de login es un enlace estático generado por el servidor, independiente del campo de usuario — misma implicación práctica que ZITADEL: no hace falta escribir un usuario antes, pulsa directamente el botón.
Keycloak manda un nonce y exige que vuelva en el id_token, así que necesita la v2.4.0 o
posterior; las anteriores fallan con "OpenID Provider did not return a nonce". PKCE también
funciona: activa Use PKCE con el método S256 en los ajustes del proveedor.
Authentik y otros IDP compatibles con OIDC genérico — sin probar, deberían funcionar por cumplir el estándar:
El proveedor que expone este servicio es una implementación OIDC estándar sin ninguna suposición específica de ZITADEL en su formato de comunicación — cualquier RP que soporte "proveedor OIDC externo genérico" debería poder usarlo igual (registrar issuer + credenciales de cliente, apuntar la redirección aquí). Simplemente no se ha comprobado a mano como sí se ha hecho con el comportamiento del botón de ZITADEL y Keycloak. Si lo pruebas, un issue contando qué funcionó o no es muy bienvenido.
🧑💻 Recorrido por el panel de administración
Todo bajo /admin. Se entra con ADMIN_USERNAME/ADMIN_PASSWORD en una página de acceso; la sesión termina tras 30 minutos sin uso u 8 horas después de entrar, y Sign out la cierra al momento. Cinco contraseñas erróneas desde una dirección la bloquean 15 minutos. El panel habla español de España o inglés, según el idioma del navegador.
| Sección | Para qué sirve |
|---|---|
| Home | De un vistazo: cuentas totales, cuántas tienen dispositivo asignado, códigos de recuperación bajos, IPs bloqueadas ahora mismo. |
| Accounts | Añade un email, marca qué dispositivos se notifican. Es el único modelo de cuentas que usa el servicio; independiente de cualquier IDP. Un dispositivo asignado a una cuenta que ahora mismo no aparece en Home Assistant se sigue mostrando y se conserva, salvo que lo desmarques. |
| Audit | Historial por cuenta: aprobado / rechazado / timeout / código de recuperación usado / envío fallido, con fecha, IP, navegador y (si GeoIP está configurado) ciudad/país/operador. |
| Recovery codes | Generar o regenerar un lote por cuenta — se muestran una sola vez, luego nunca se pueden recuperar. Regenerar invalida al instante todos los códigos del lote anterior. |
| Blocked IPs | Ver quién está bloqueado ahora mismo y desbloquear manualmente — importante si tres rechazos accidentales (o códigos mal tecleados) dejan fuera al dueño real de la cuenta. |
| Branding | Sube un logo/fondo/favicon y pon un título para la página puente. Se acepta cualquier formato o tamaño de imagen — cada una se convierte y redimensiona automáticamente (logo/favicon a PNG, fondo a JPEG). |
| Signing key | La clave que firma cada login. Rotate hace que una nueva firme desde ese momento, mientras la anterior sigue sirviendo para verificar durante una hora, para que no se rompa nada en curso; marca la casilla para borrar la anterior al instante, si puede haberse filtrado. Los proveedores recogen la clave nueva solos. |
| Activity | Quién tiene la sesión abierta en el panel ahora mismo (con un botón para cerrar cualquiera), y los últimos 200 accesos — buenos y malos — y cambios hechos en el panel, con quién, cuándo y desde dónde. |
🧭 Uso — cómo lo vive quien inicia sesión
- En la pantalla de login de tu IDP, pulsa el botón de este servicio (sin necesidad de escribir un usuario antes).
- Escribe tu email en la página puente que aparece — se muestra en español o inglés automáticamente, según el idioma de tu navegador.
- Mira tu móvil (o los dispositivos asignados a esa cuenta) — aprueba o rechaza.
- Aprobar → sesión iniciada, sin pedir contraseña en ningún momento.
- Si no pasa nada durante un rato → tras
BRIDGE_RECOVERY_UNLOCK_DELAY_SECONDS(60s por defecto), la página ofrece reenviar la notificación o usar un código de recuperación de un solo uso — la aprobación original sigue esperando en segundo plano, así que una pulsación tardía también funciona. - Rechazar, o que el login falle por cualquier otro motivo → aparece un botón "Volver al inicio de sesión" que te devuelve a la pantalla de tu proveedor de identidad con un error estándar — nunca te quedas atascado en una página muerta.
- Tres rechazos (o códigos incorrectos) seguidos desde el mismo sitio bloquean nuevos intentos hasta que un administrador lo desbloquee.
🩹 Solución de problemas
La notificación nunca llega: comprueba que el email está añadido en
/admin/accountscon al menos un dispositivo marcado.El botón dice un nombre técnico raro en vez de algo como "Home Assistant": renombra el propio proveedor de identidad en la consola de tu IDP — el nombre que le pusiste ahí es exactamente lo que se muestra en el botón.
El login solo funciona desde dentro de mi propia red:
IDP_ISSUER_URLapunta a una IP local — pon este servicio detrás de un proxy inverso con un dominio público real y HTTPS, y usa ese dominio comoIDP_ISSUER_URL(ver Instalación).La opción de reintentar/código de recuperación no aparece: está controlada en el servidor y solo aparece tras
BRIDGE_RECOVERY_UNLOCK_DELAY_SECONDS, o de inmediato si el envío de la notificación falló del todo — no es solo un temporizador del navegador, así que no aparecerá antes pase lo que pase.La cuenta (o su IP) no responde a nada: revisa
/admin/blocked-ips— tres rechazos explícitos o códigos de recuperación incorrectos bloquean esa pareja cuenta+IP hasta desbloquearla ahí a mano.Se aprueba la notificación pero el RP dice "Account Not Found" (ZITADEL) o se niega a vincular: la opción de auto-linking del IDP no está puesta en "por email" — ver el punto de "Auto-linking" en Configurar el flujo sin contraseña. Confirmado en vivo: con "Is linking allowed" activado pero el auto-linking desactivado, ZITADEL ni siquiera ofrece vincular la cuenta, directamente falla.
La notificación, la auditoría y el bloqueo por IP muestran la dirección de tu propio proxy inverso en vez de la del que llama de verdad: este servicio lee la IP del cliente de la cabecera estándar
X-Forwarded-Forcuando está presente, y si no deX-Real-IP, cayendo a la conexión cruda solo si ninguna de las dos existe — si tu proxy inverso no manda esa cabecera, todo el mundo detrás de él parece la misma única IP (la del propio proxy), lo que además haría que el bloqueo a los 3 fallos se compartiera entre todos los visitantes reales. Nginx Proxy Manager la manda bien de fábrica; si usas otra cosa, asegúrate de que reenvíaX-Forwarded-For(oX-Real-IP) a este contenedor.Home Assistant está caído (o aún no ha terminado de arrancar): este servicio arranca igual y sigue reintentando por su cuenta, así que vuelve solo en cuanto Home Assistant responda — no hay que reiniciar nada. Mientras tanto no se pueden aprobar inicios de sesión, claro.
GET /healthdice cuál de los dos está caído de verdad:"ha": "unreachable"es Home Assistant, no este contenedor.El panel de administración dice que está apagado:
ADMIN_PASSWORDtiene menos de 12 caracteres o es una de las conocidas. Pon una más larga y reinicia el contenedor."Too many failed attempts" en la página de acceso al panel: cinco contraseñas erróneas desde tu dirección en 15 minutos. Espera 15 minutos; los intentos aparecen en Activity al entrar.
¿Está sano este contenedor?: trae un
HEALTHCHECKde Docker que pregunta a su propio puerto, así quedocker psmuestrahealthy/unhealthysin que tengas que mirar nada./healthresponde 503 solo cuando la base de datos propia de este servicio no está disponible — que Home Assistant falte se informa comodegradeden el cuerpo pero sigue devolviendo 200, para que una caída del vecino no pinte de rojo este contenedor. Ojo: Docker no reinicia por sí solo un contenedorunhealthy; el healthcheck está para que el problema se vea, a ti y a tu monitorización.
💙 Apoya el proyecto
Sin el apoyo de la comunidad estos proyectos no serían posibles. Si te ha resultado útil, puedes apoyarlo vía GitHub Sponsors, Ko-fi o PayPal — cualquier aportación ayuda a seguir manteniéndolo.
⚠️ Aviso legal
No afiliado, respaldado ni asociado con ZITADEL (ZITADEL GmbH), Keycloak, Authentik, ni Home Assistant / Nabu Casa Inc. Todas son marcas registradas de sus respectivos propietarios.
📜 Licencia
Requirements
Categories
Related apps
Explore more like this
Explore allDetails
ghcr.io/nebur692/ha-login-approval:latestRuntime arguments
- Web UI
http://[IP]:[PORT:8000]/admin- Network
bridge- Shell
sh- Privileged
- false
- Extra Params
--restart unless-stopped
Template configuration
REQUIRED. Your Home Assistant's internal URL, no trailing slash. Example: http://192.168.1.50:8123. This container calls Home Assistant's REST API and WebSocket to send push notifications and read the approve/reject action back.
- Target
- HA_BASE_URL
REQUIRED. A Home Assistant long-lived access token (Profile -> Security -> Long-Lived Access Tokens, at the bottom of the page). Needs permission to call notify.* services and to read mobile_app_notification_action events over the WebSocket.
- Target
- HA_TOKEN
Username for this container's own /admin panel, entered on its sign-in page.
- Target
- ADMIN_USERNAME
- Default
- admin
- Value
- admin
REQUIRED. Password for the /admin panel, paired with Admin Username above. At least 12 characters and not a default one, or the panel stays off (sign-ins are not affected).
- Target
- ADMIN_PASSWORD
Internal port. Used for the /admin panel and as the base for the identity provider's own URLs (authorize/token/jwks, built from IDP Issuer URL below).
- Target
- 8000
- Default
- 8000
- Value
- 8000
Persistent folder for this service's own SQLite database (the account directory, recovery codes, audit log, IP blocks, branding) and for the optional GeoIP .mmdb files. Without this volume, everything resets whenever the container is recreated — do not skip it.
- Target
- /data
- Default
- /mnt/user/appdata/ha-login-approval
- Value
- /mnt/user/appdata/ha-login-approval
REQUIRED. The PUBLIC https:// URL your identity provider (ZITADEL/Keycloak/Authentik) and the browser of whoever is signing in both use to reach this service. Must be a real domain behind a reverse proxy with a valid TLS certificate (nginx, Nginx Proxy Manager, Traefik, Caddy...) — NOT a local/LAN IP address, or nobody will be able to sign in from outside your own network. Example: https://login.yourdomain.com. Used as the OIDC issuer (iss claim) and to build the /authorize, /token, and /jwks.json URLs.
- Target
- IDP_ISSUER_URL
REQUIRED. The identifier your identity provider will present when authenticating against this service's /token endpoint. You make this value up yourself (e.g. ha-login-approval) — it must exactly match the Client ID you enter when registering this service as a generic external OIDC provider in your ZITADEL/Keycloak/Authentik.
- Target
- IDP_CLIENT_ID
REQUIRED. A long, random secret you generate yourself, paired with IDP Client ID above — again, it must exactly match what you enter on the identity provider's side when registering this service.
- Target
- IDP_CLIENT_SECRET
REQUIRED. The exact callback URL your identity provider redirects to after a successful login (for ZITADEL, typically https://your-zitadel-domain/idps/callback). Validated on every request — a mismatch is rejected outright, to prevent an open redirect.
- Target
- IDP_CLIENT_REDIRECT_URI
The service runs as this user, never as root. On start it hands its data folder to this user. 99 is Unraid's nobody.
- Target
- PUID
- Default
- 99
- Value
- 99
The service runs with this group. 100 is Unraid's users.
- Target
- PGID
- Default
- 100
- Value
- 100
STRONGLY RECOMMENDED if you run this behind a reverse proxy. JSON array of the reverse proxies this service reads X-Forwarded-For / X-Real-IP from, as IPs or CIDRs — for example ["192.168.1.10"] or ["172.18.0.0/16"]. Those headers are how a proxy reports who called it, and they are only trusted when the request actually arrives from an address listed here; otherwise the connecting address is used, so a visitor cannot fake their own IP. Left empty, notifications, the audit log, IP blocking and GeoIP lookups will all show your proxy instead of the visitor.
- Target
- TRUSTED_PROXIES
How many seconds to wait for an approve/reject tap on the phone before giving up and treating the login as failed.
- Target
- APPROVAL_TIMEOUT_SECONDS
- Default
- 120
- Value
- 120
Seconds with no response before the bridge page offers to resend the notification or use a one-time recovery code instead. The original approval keeps waiting in the background too, so a late tap on the phone still works normally.
- Target
- BRIDGE_RECOVERY_UNLOCK_DELAY_SECONDS
- Default
- 60
- Value
- 60
Consecutive failures (an explicit Reject, or a wrong recovery code — same account plus same IP) before that account+IP pair is blocked. Not a time window, a straight consecutive-failure counter; any success resets it back to zero. Unblock manually from /admin/blocked-ips.
- Target
- IP_BLOCK_THRESHOLD
- Default
- 3
- Value
- 3
How many one-time recovery codes get generated at once from the /admin/recovery panel. Generating a new batch instantly invalidates every code from the previous one.
- Target
- RECOVERY_CODE_BATCH_SIZE
- Default
- 10
- Value
- 10
Push a warning notification once this many unused recovery codes (or fewer) remain for an account, so you notice before running out entirely.
- Target
- RECOVERY_CODE_LOW_WARNING
- Default
- 3
- Value
- 3
OPTIONAL. A free MaxMind (maxmind.com) account ID, used to download the self-hosted GeoLite2-City/ASN databases and add city/country/ISP to both the audit log and the push notification itself. Left empty, that part of the audit log and notification just stays blank — login still works exactly the same.
- Target
- GEOIP_ACCOUNT_ID
OPTIONAL, used together with the Account ID above. The license key generated in your MaxMind account settings.
- Target
- GEOIP_LICENSE_KEY
OPTIONAL, ZITADEL only. Your ZITADEL's base URL (e.g. https://sso.example.com), so the approval notification can say which app is being signed in to. Needs the two fields below too. Left empty, the notification simply has no app line.
- Target
- ZITADEL_API_URL
OPTIONAL. Client ID of a ZITADEL service user with the read-only IAM_OWNER_VIEWER role. It only reads ZITADEL's event store.
- Target
- ZITADEL_API_CLIENT_ID
OPTIONAL. Client secret of that same service user.
- Target
- ZITADEL_API_CLIENT_SECRET