
Watch BladeVault video
Watch BladeVault video
BladeVault

BladeVault
Docker app from dedkola's Repository
Overview
Readme
View on GitHub
BladeVault
A sharp, local-first knife collection manager.
Catalog your knives, compare them side by side, and keep your collection data under your control.


Install · Screenshots · MCP · Backups · Development
What it does
- Catalog: Keep specifications, pricing, provenance, notes, links, and local photos for every knife. Import product details from supported retailer URLs, with an interactive browser fallback.
- Capture source pages: Save a full-page screenshot with URL imports, view or download it later, retry failed captures, and backfill screenshots for older records. Captures are included in local and cloud backups.
- Organize: Search, filter, pin, and bulk-edit records. Add custom text, number, and date fields, and choose which details appear on collection cards and in the pinned sidebar.
- Browse: Save filters as Smart Collections that update with your records, or browse variants together in Model families. Global search supports model names and
/model A4301for model numbers. - Compare: Create named shortlists, add a knife to several lists, show only differences, and print or export comparisons as PDF.
- Maintain: Log cleaning, lubrication, sharpening, stropping, and disassembly with dated notes and sharpening details. Review maintenance history and collection changes in Logs.
- Understand: Explore makers, materials, dimensions, completeness, and activity through collection insights. Open chart details to inspect matching knives or print the Overview as a report.
- Connect: Use MCP to search and analyze your collection from an AI client, with optional metadata updates and maintenance logging.
- Keep control: Store your vault locally in SQLite, create portable ZIP backups, and optionally sign in for cloud backup.
Download the latest release or browse the full release history.
Choose a setup
| Option | Best for | Start here |
|---|---|---|
| Desktop app | A native macOS or Windows experience | Download the latest release |
| Docker or Podman | A self-hosted local instance | Run a container |
| Kubernetes | k3s or another Kubernetes cluster | Install with Helm |
| Source | Development and customization | Run from source |
Screenshots
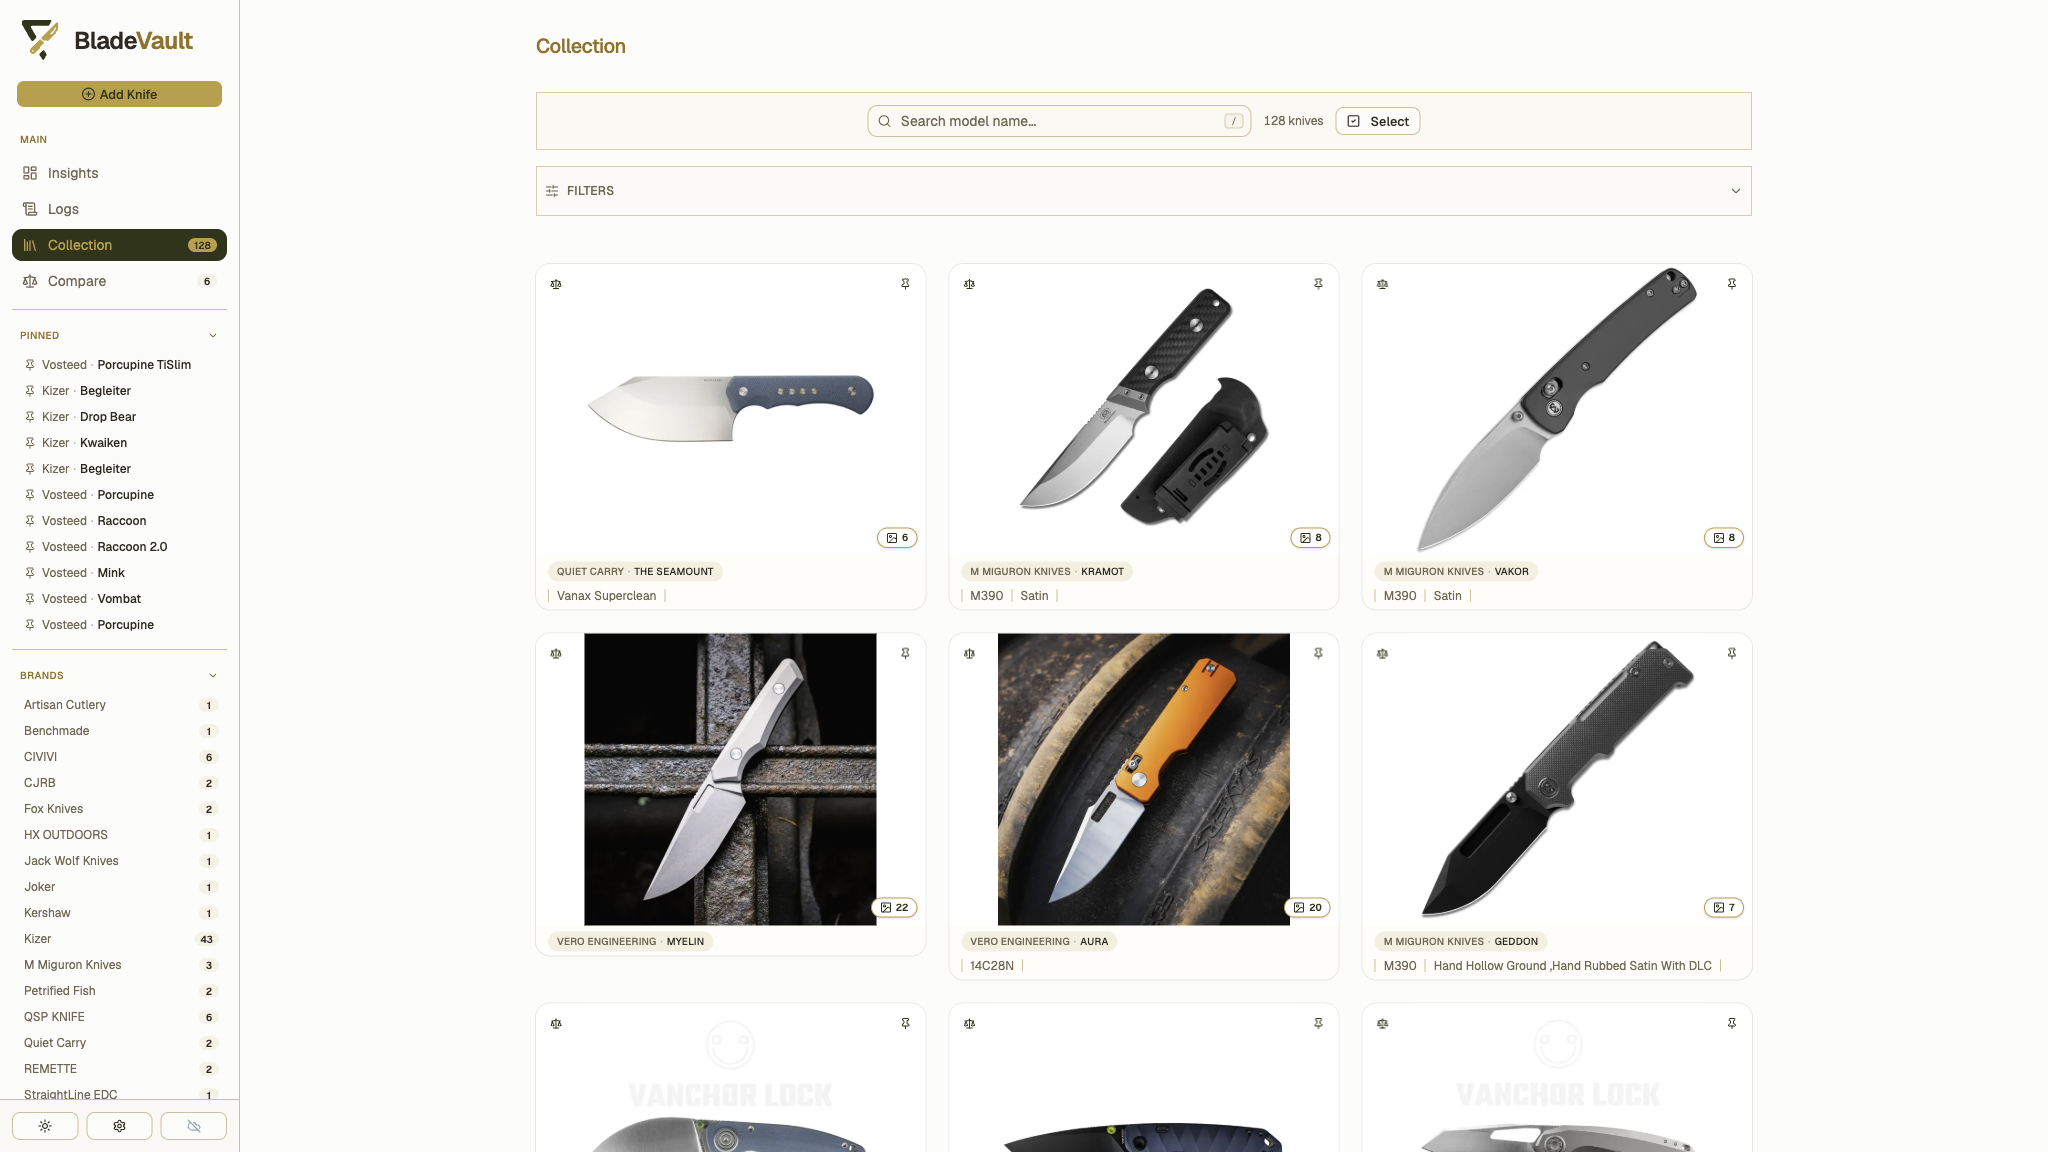
Collection — organize knives, browse model families, and save filters
More screenshots: insights, knife details, comparisons, and URL import
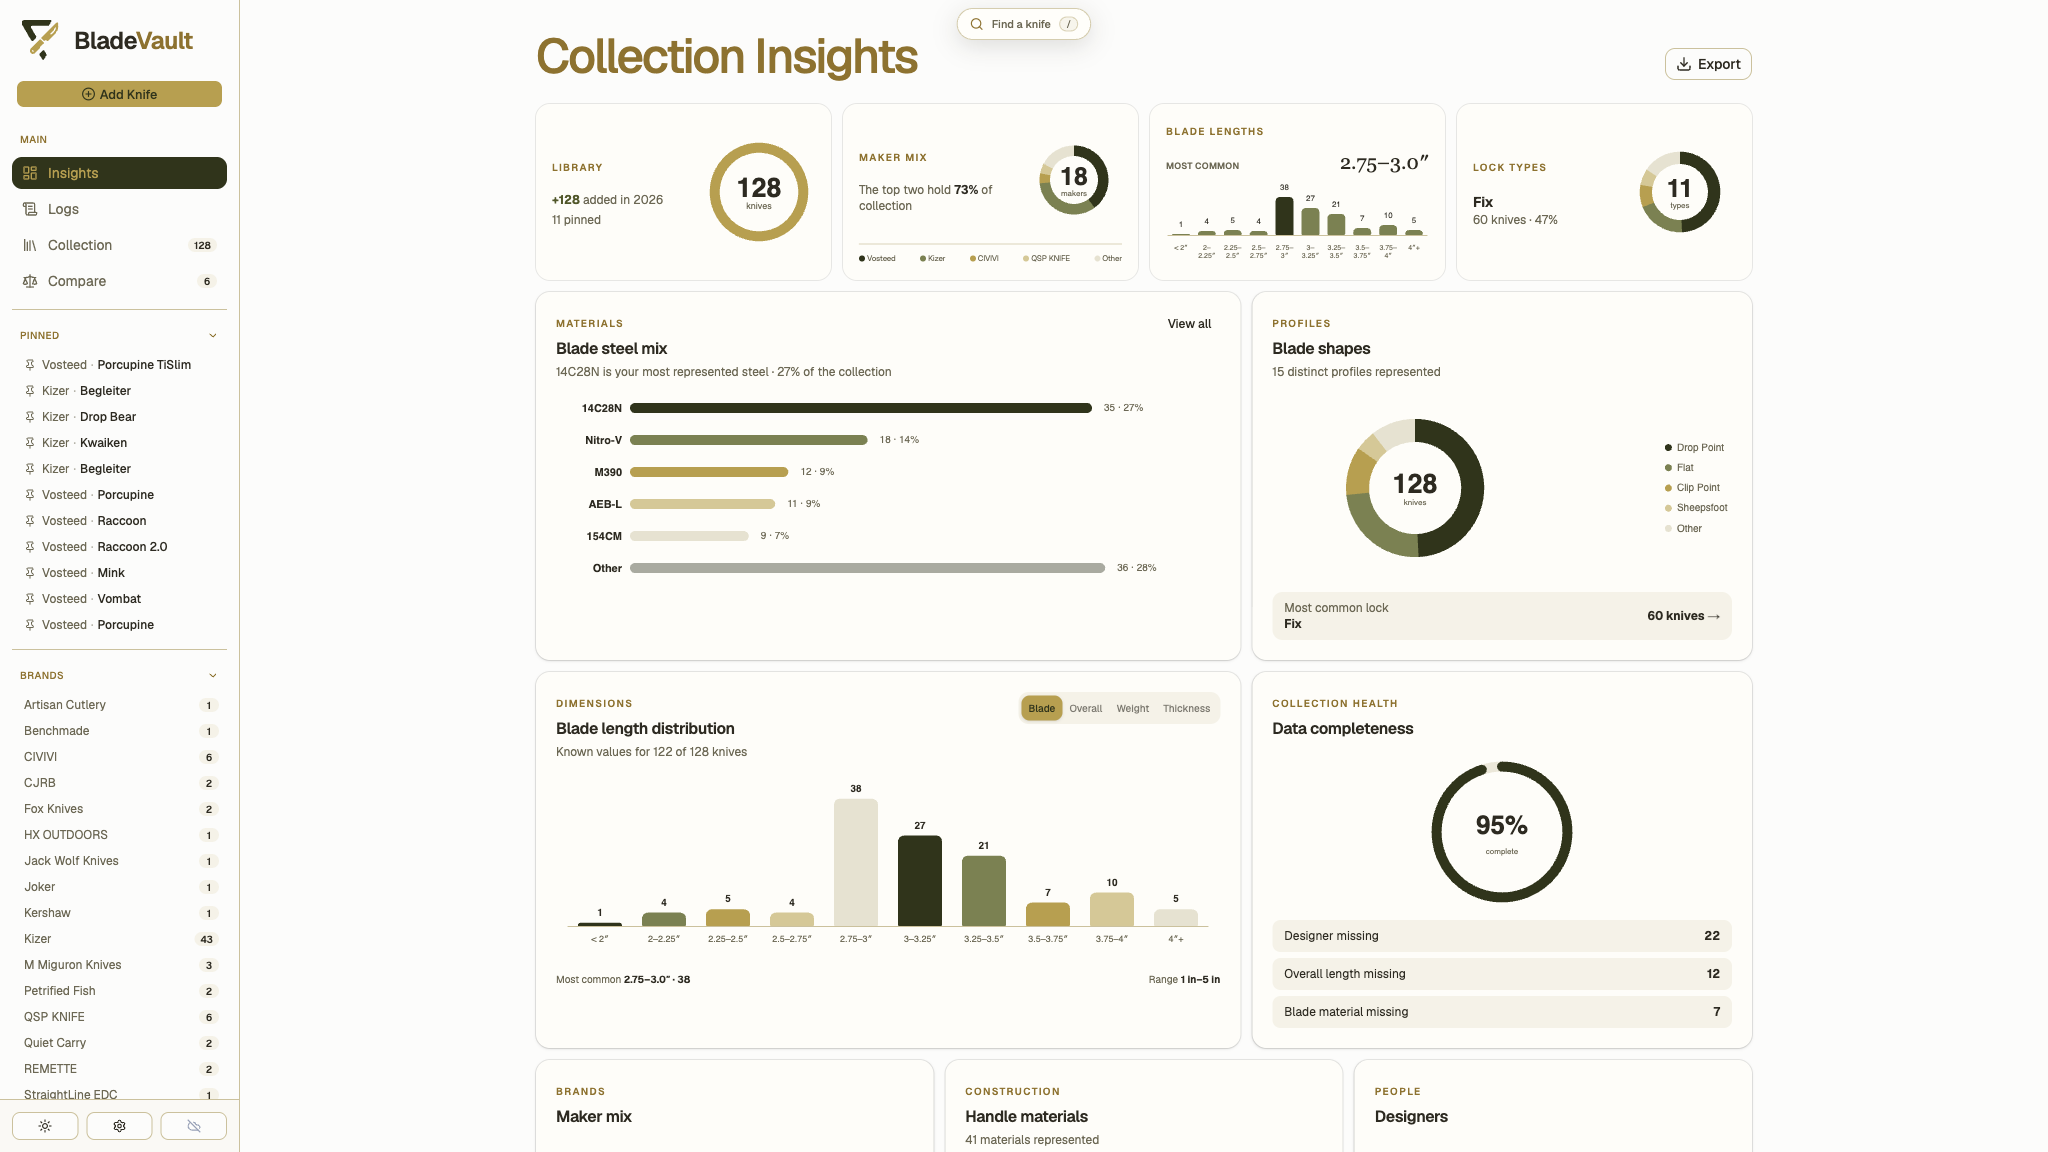
Insights — patterns, dimensions, materials, and collection health
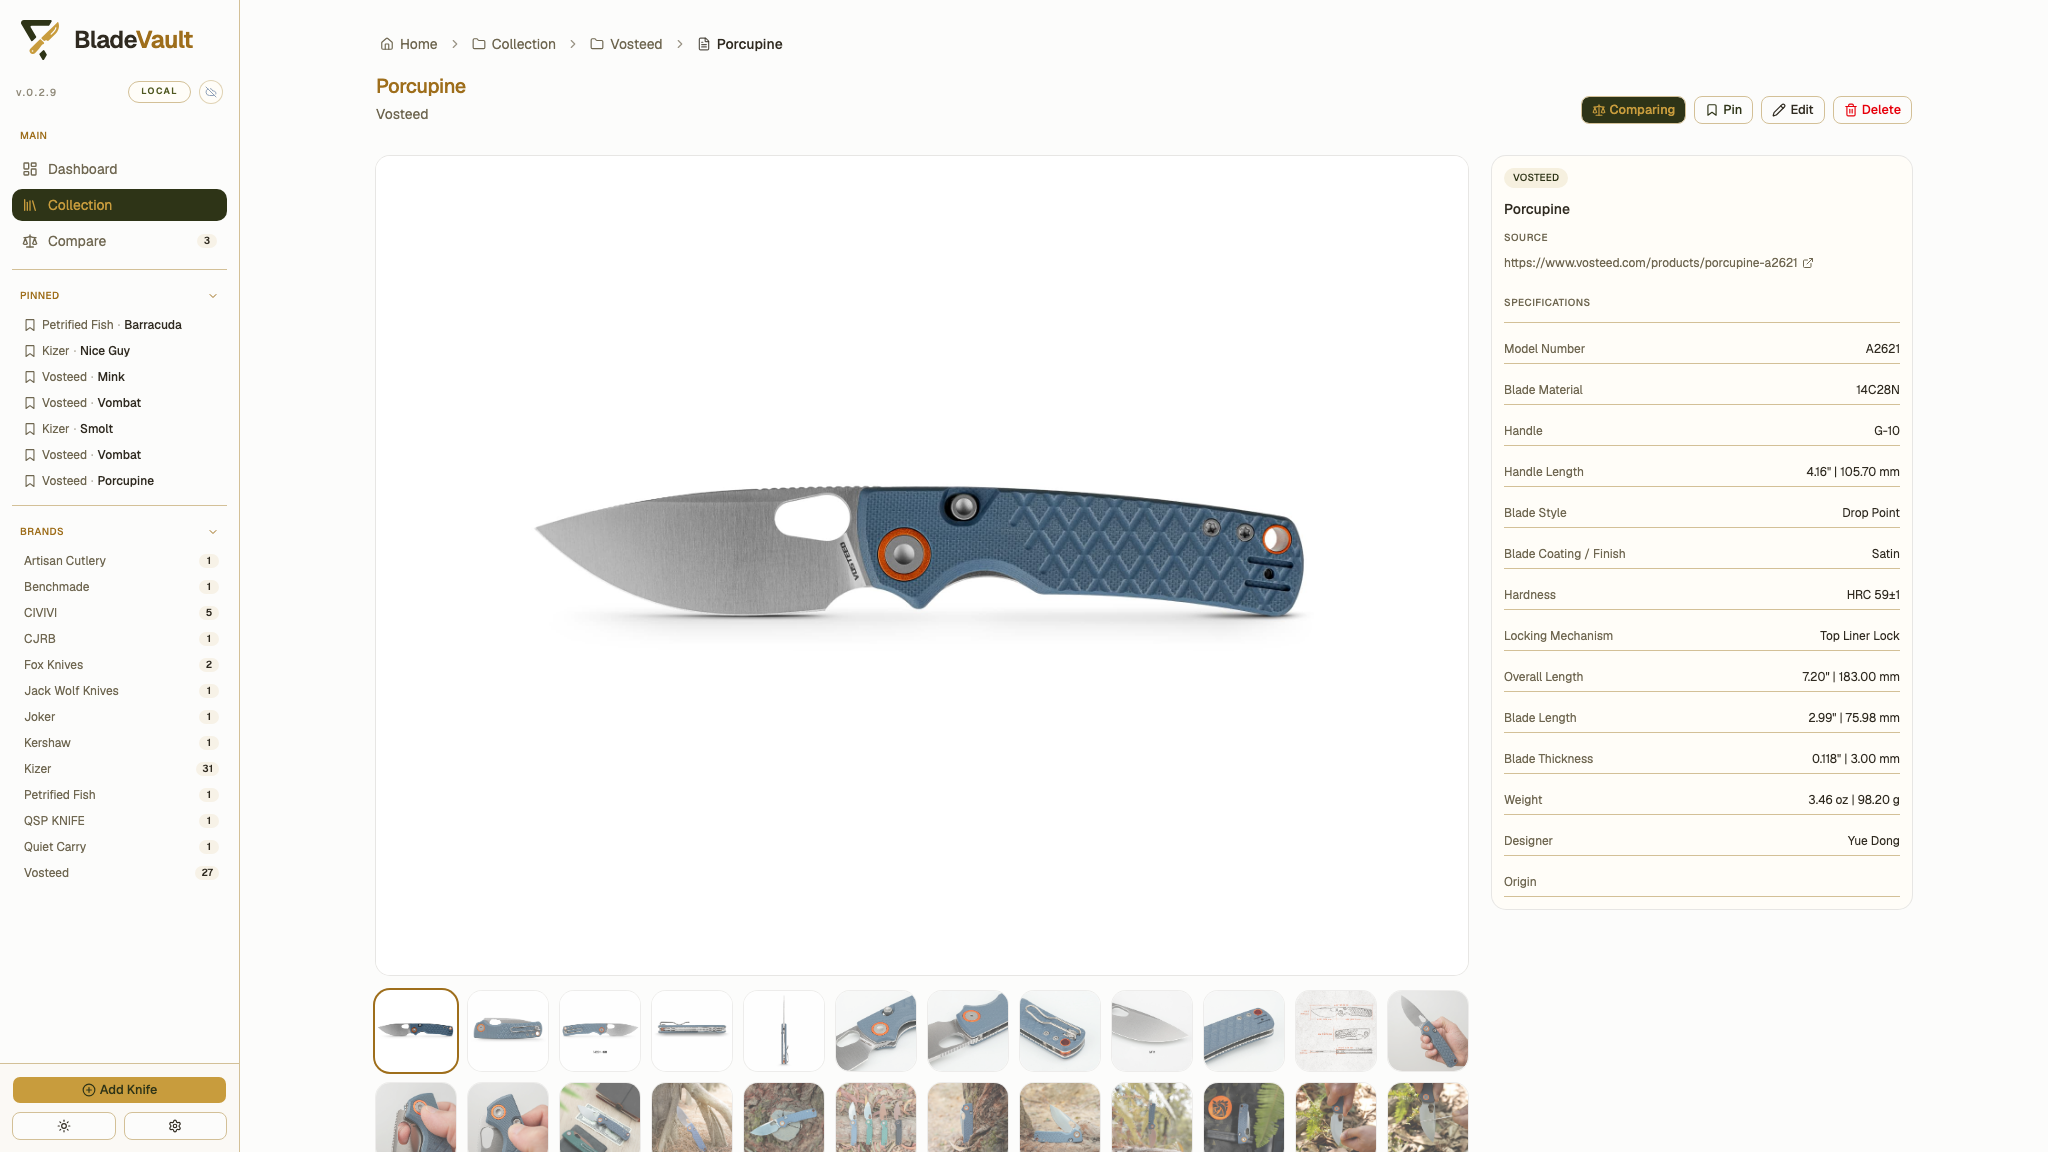
Knife detail — specifications, notes, and image gallery
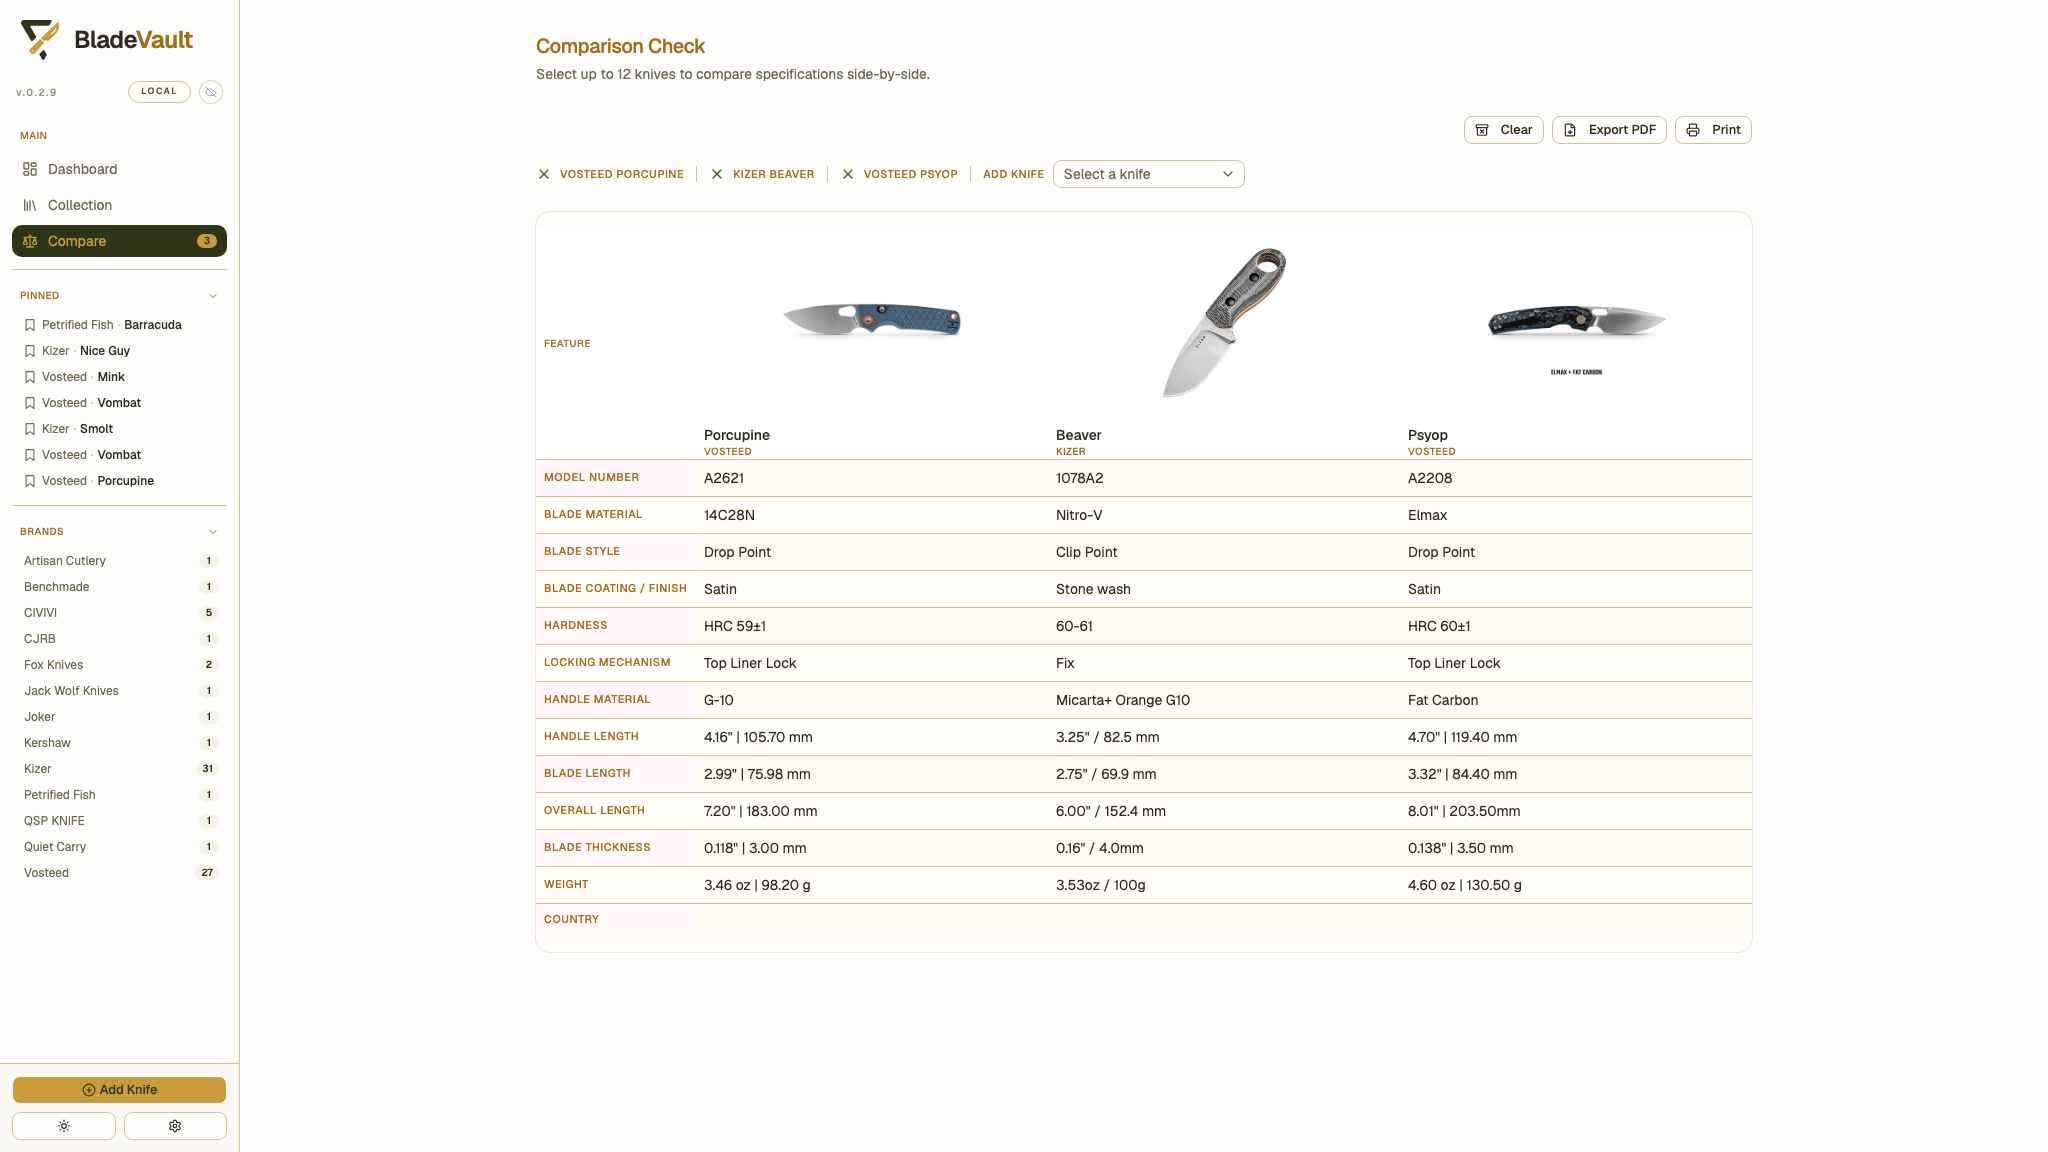
Compare — saved shortlists and specifications side by side
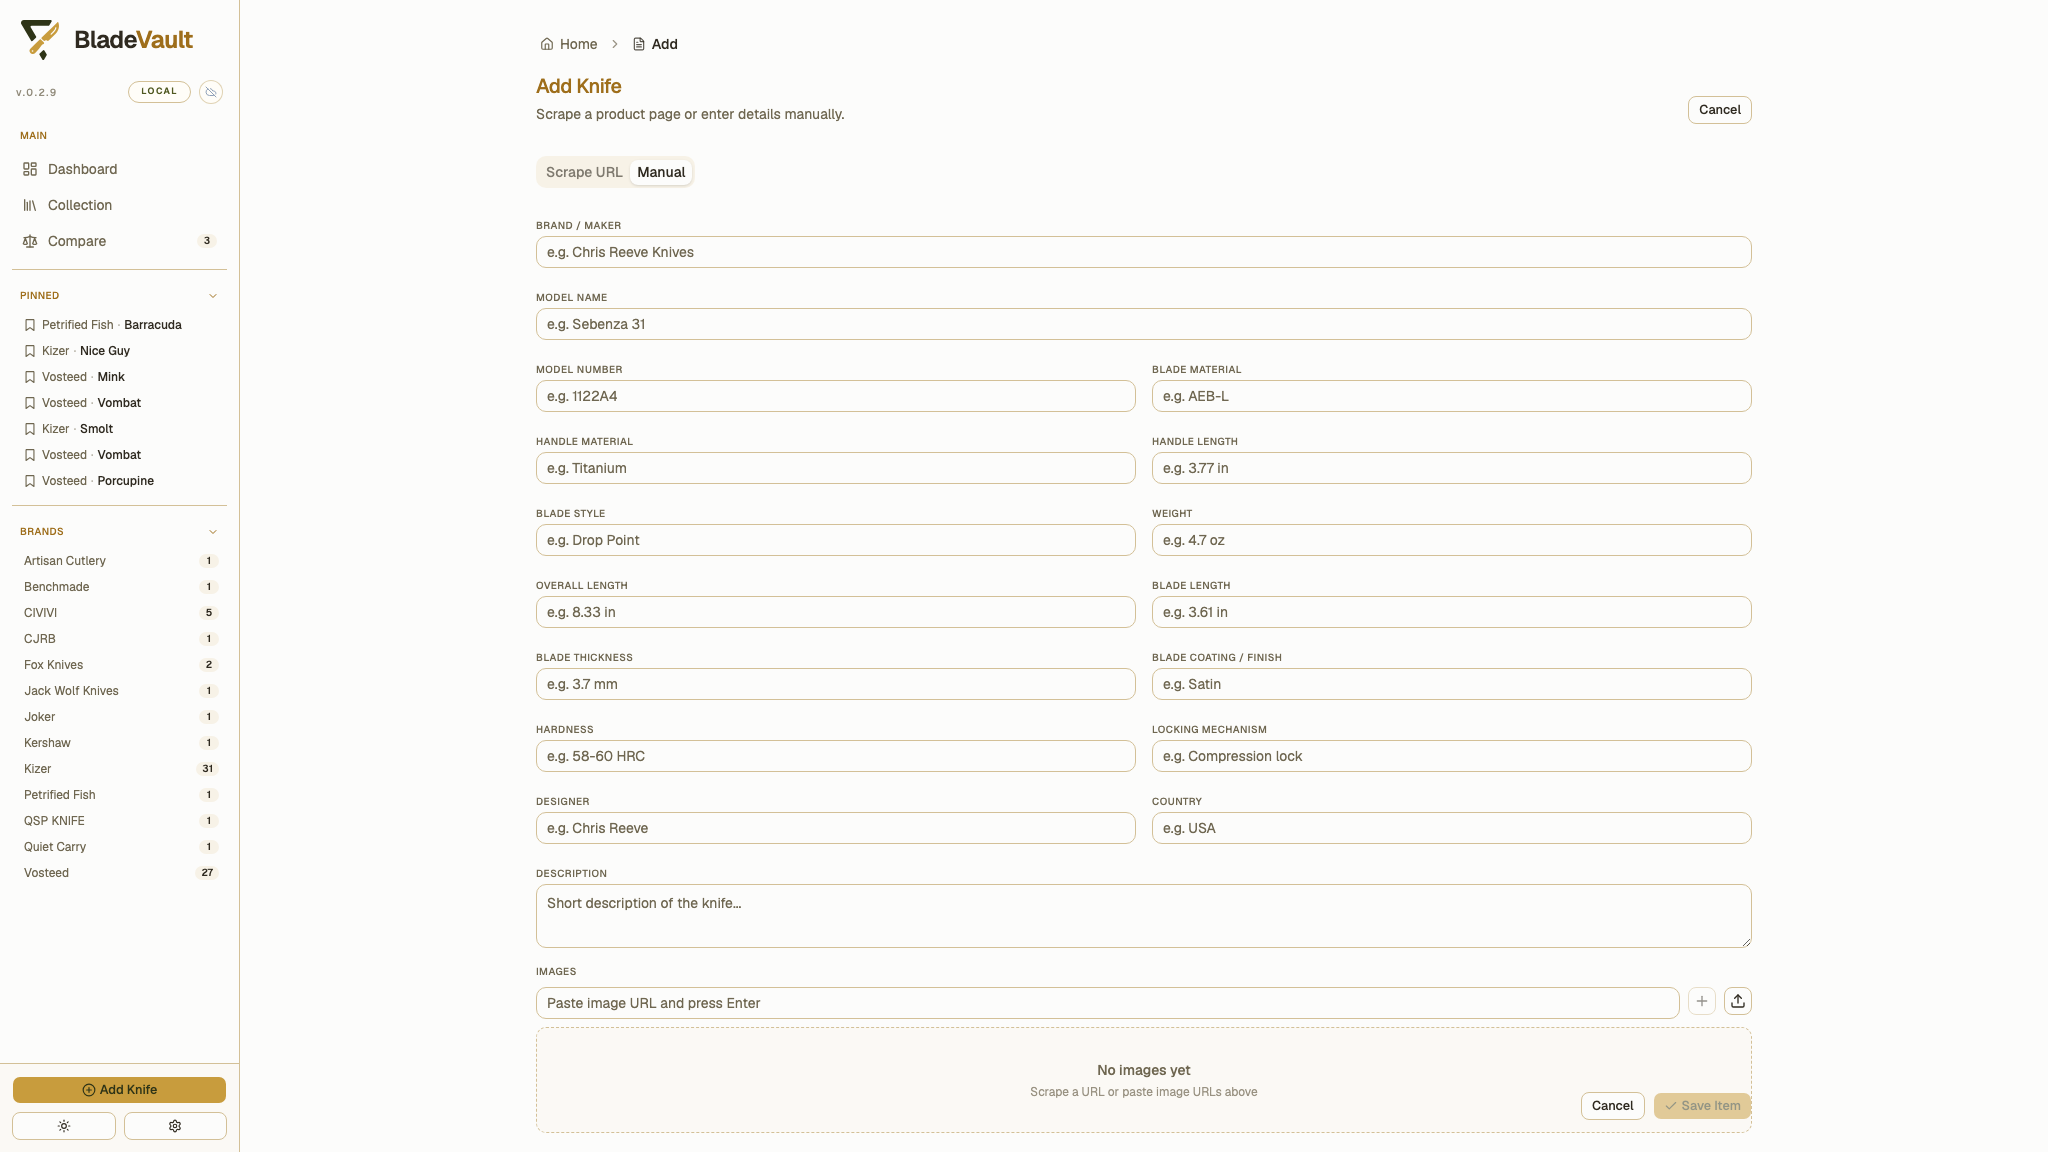
Add knife — import a product URL or enter it yourself
Run in a container
The prebuilt image stores the database and local images in /app/data. Mount a host folder to keep that data when the container is replaced.
The examples use :latest, which follows successful builds of main and can include changes newer than the published release. For a specific release, use its version tag, such as ghcr.io/dedkola/bladevault:v1.3.1.
Docker on macOS or Linux
mkdir -p "$HOME/BladeVault/data"

docker run -d \
  --name bladevault \
  --restart unless-stopped \
  -p 5500:3000 \
  -v "$HOME/BladeVault/data:/app/data" \
  ghcr.io/dedkola/bladevault:latest
Open http://localhost:5500.
Podman on macOS or Linux
mkdir -p "$HOME/BladeVault/data"

podman run -d \
  --name bladevault \
  --restart unless-stopped \
  -p 5500:3000 \
  -v "$HOME/BladeVault/data:/app/data" \
  ghcr.io/dedkola/bladevault:latest
Docker on Windows
docker run -d `
  --name bladevault `
  --restart unless-stopped `
  -p 5500:3000 `
  -v "${env:USERPROFILE}\BladeVault\data:/app/data" `
  ghcr.io/dedkola/bladevault:latest
Docker Compose
The included Compose file builds the source and uses named Docker volumes for the vault data and the bounded optimized-image cache. From a new checkout:
git clone https://github.com/dedkola/bladevault.git
cd bladevault
docker compose up -d --build
If you already have a checkout, run the Compose command from its root directory. Open http://localhost:5500. To stop it without deleting the persistent volume, run docker compose down.
Build the image yourself
git clone https://github.com/dedkola/bladevault.git
cd bladevault
docker build -t bladevault .

docker run -d \
  --name bladevault \
  --restart unless-stopped \
  -p 5500:3000 \
  -v "$HOME/BladeVault/data:/app/data" \
  bladevault
Install with Helm
The default chart is designed for k3s with MetalLB. It creates a dedicated
LoadBalancer address and a persistent 5 GiB volume for the SQLite database and
downloaded images.
Install
helm repo add bladevault https://dedkola.github.io/bladevault

helm install bladevault bladevault/bladevault \
  --namespace bladevault \
  --create-namespace
Get the address, then open http://<EXTERNAL-IP>:
kubectl get service bladevault --namespace bladevault
If the repository was already added, run helm repo update bladevault before
installing.
Update BladeVault
Each BladeVault release publishes a matching Helm chart and immutable container image. After the GitHub Build & Push Docker Image and Publish Helm Repository workflows complete, refresh the repository and upgrade the release:
helm repo update bladevault
helm upgrade bladevault bladevault/bladevault --namespace bladevault --wait
The chart version, displayed app version, and default image tag match the
BladeVault release. For example, chart 1.3.1 installs image v1.3.1.
If you explicitly override image.tag=latest, recreate the pod after a new
image is published because the mutable tag does not change the Deployment:
kubectl rollout restart deployment/bladevault --namespace bladevault
kubectl rollout status deployment/bladevault --namespace bladevault
Remove BladeVault
helm uninstall bladevault --namespace bladevault
The chart keeps the bladevault-data PVC so uninstalling does not remove your
collection. To permanently delete the stored database and images too:
kubectl delete pvc bladevault-data --namespace bladevault
kubectl delete namespace bladevault
See the chart README for NGINX ingress with a hostname, immutable image tags, existing PVCs, and other configuration.
Desktop app
macOS
BladeVault requires macOS 13 Ventura or newer.
Download BladeVault.dmg, open it, then drag BladeVault.app to Applications.
Releases are unsigned. If macOS blocks the first launch, right-click the app, choose Open, and confirm. If needed, run:
xattr -d com.apple.quarantine "/Applications/BladeVault.app"
open "/Applications/BladeVault.app"
Updates use a user-assisted flow: select Download update in Settings → About, open the downloaded DMG, quit BladeVault, and replace the app in Applications.
Windows
Download BladeVault-Setup.exe, run the installer, and open BladeVault from the Start menu or desktop shortcut.
Windows SmartScreen may show a warning for an unsigned build. Choose More info → Run anyway only if you trust the release source.
Check for updates in Settings → About. Download an available update, then select Restart to update to install it.
Run from source
Prerequisites: Node.js 24 LTS. The repository pins Node.js 24.21.0 in .nvmrc for local development and CI. Install Chromium as well if you want to use URL import and webpage capture.
git clone https://github.com/dedkola/bladevault.git
cd bladevault
npm ci
npx playwright install chromium
npm run dev
Open http://localhost:3000.
Production server
Build the app, copy its public files and static assets into the standalone output, then start the generated server:
npm run build
node -e "const fs = require('node:fs'); for (const dir of ['public', '.next/static']) fs.cpSync(dir, '.next/standalone/' + dir, { recursive: true });"
node .next/standalone/server.js
Open http://localhost:3000. This project uses Next.js standalone output; use the generated server for production.
Useful commands
| Command | Purpose |
|---|---|
npm run dev |
Start the Next.js development server. |
npm run build |
Create a production build. |
npm run lint |
Run ESLint. |
npm run format:check |
Check formatting with Prettier. |
npm run test |
Run the unit and integration suite once. |
npm run test:watch |
Run unit and integration tests in watch mode. |
npm run test:e2e |
Build the web app and run Chromium smoke tests. |
npm run test:e2e:ui |
Open Playwright's interactive test runner. |
npm run mcp:build |
Build the MCP stdio entry point. |
npm run mcp |
Build and start the MCP stdio server. |
npm run desktop:dev |
Run the Electron desktop shell in development. |
npm run desktop:smoke |
Build and smoke-test the desktop runtime. |
npm run dist:desktop |
Package desktop installers without publishing them. |
Model Context Protocol (MCP)
BladeVault exposes its existing local collection to MCP clients such as LM Studio, Codex, Claude Desktop, and Cursor. No separate database or cloud account is required.
| Tool | Ability | Access |
|---|---|---|
search_knives |
Search text and exact BladeVault fields | Read-only |
get_knife |
Retrieve one complete knife record | Read-only |
get_collection_stats |
Summarize completeness, categories, measurements, and recent records | Read-only |
find_missing_fields |
Find knives with missing built-in or custom fields | Read-only |
find_duplicates |
Score possible duplicate records without merging or deleting | Read-only |
propose_changes |
Validate suggested values without modifying the collection | Read-only |
update_knife |
Apply a timestamp-checked metadata update to one knife | Write mode |
bulk_update_knives |
Preview and atomically apply explicit multi-knife updates | Write mode |
get_knife_maintenance |
Retrieve maintenance history for one knife | Read-only |
add_maintenance_event |
Log a maintenance event for one knife | Write mode |
Open Settings → AI / MCP to review activity, copy the local client configuration, enable or disable HTTP access, and allow or deny write access. Write mode is off by default. Metadata updates require the expected record timestamp to prevent overwriting newer edits and are recorded in the change log. Maintenance writes append dated events to a knife's history. MCP cannot replace knife IDs, record timestamps, images, or entire records.
Connect an MCP client
Client configuration formats differ. Open Settings → AI / MCP through the
address you want to use and select Copy config, or copy the displayed URL
and token into your client's settings. For clients that accept an mcpServers
JSON configuration:
{
  "mcpServers": {
    "bladevault": {
      "url": "http://localhost:5500/mcp",
      "headers": {
        "Authorization": "Bearer <TOKEN_FROM_BLADEVAULT_SETTINGS>"
      }
    }
  }
}
| BladeVault runtime | MCP URL |
|---|---|
| Docker or Podman on the same computer | http://localhost:5500/mcp |
| Unraid or another LAN server | http://<SERVER_IP>:5500/mcp |
| macOS or Windows desktop app | http://127.0.0.1:5501/mcp |
| Source checkout | http://localhost:3000/mcp |
Replace the example URL when needed and replace the token placeholder with the value shown in BladeVault Settings. The copy buttons work on plain HTTP LAN addresses as well as secure origins.
Codex
To connect Codex, add BladeVault to ~/.codex/config.toml:
[mcp_servers.bladevault]
enabled = true
url = "http://<UNRAID_IP>:5500/mcp"
http_headers = { Authorization = "Bearer <TOKEN_FROM_BLADEVAULT_SETTINGS>" }
Use http://localhost:5500/mcp for Docker or Podman on the same computer, or
use the active desktop URL shown in Settings → AI / MCP. Restart Codex after
changing its configuration.
Codex also supports bearer_token_env_var, but its value must be the name of
an environment variable containing the raw token, not Bearer followed by the
token itself. The http_headers example above matches BladeVault's copied
client configuration directly.
For container setup, see Run in a container.
For Unraid, map host port 5500 to container port 3000. Keep the desktop app
running while its MCP connection is in use. If desktop port 5501 is busy,
BladeVault uses a free local port and Copy config includes the active URL.
BladeVault generates one permanent MCP access token and stores it with the persisted vault data. The token stays the same across restarts and updates.
MCP_AUTH_TOKEN, MCP_ALLOWED_HOSTS, and MCP_ALLOWED_ORIGINS remain
available as deployment overrides. When MCP_AUTH_TOKEN is set, its value is
used instead of the app-generated token and is required for local and remote
HTTP connections.
MCP_ENABLED and MCP_WRITE_ENABLED remain available for administrators who
explicitly add deployment overrides. Setting either variable locks its
corresponding app control.
Connect over stdio from source
For clients that launch a local MCP process, build the stdio entry point from your source checkout:
npm run mcp:build
Configure your client to run the built entry point directly:
{
  "mcpServers": {
    "bladevault": {
      "command": "node",
      "args": ["/absolute/path/to/bladevault/dist/mcp/bladevault.mjs", "mcp"],
      "env": {
        "BLADEVAULT_DATA_DIR": "/absolute/path/to/BladeVault/data"
      }
    }
  }
}
Replace both paths with your checkout and existing vault data folder. Use an
absolute path to your Node.js 24 executable if your client cannot find node.
The client starts the process, so the web or desktop app does not need to be
running. Stdio uses the same local database and write-access settings and does
not require an HTTP token. To start the stdio server manually, run npm run mcp.
Your data
BladeVault is local-first: it works without an account or API key.
| Runtime | Default data location |
|---|---|
| Source or installed desktop app | ~/BladeVault/data (%USERPROFILE%\BladeVault\data on Windows) |
| Docker or Podman | /app/data inside the container; mount it to a host folder for persistence |
| Desktop development | ~/.bladevault-desktop-dev/data |
The data directory contains bladevault.sqlite and local images. Settings → Local storage shows the active folder.
Set BLADEVAULT_DATA_DIR to choose a different directory for a source or container runtime. Without an explicit folder setting, BladeVault checks the default folder and legacy locations, including repo-local data/bladevault.sqlite and older macOS app folders, and uses the existing database with the most knives.
The desktop app can also move its local data folder from Settings when the location is not managed by BLADEVAULT_DATA_DIR.
Optional App lock
Open Settings → App lock to set a password for the local vault. App lock is off by default and works offline in the desktop app and Docker. Once enabled, new browser sessions and desktop launches show a password screen. Reloading stays unlocked for the current session; restarting the server requires the password again. Use Lock now, Change password, or Disable lock in the same panel.
This is a simple access lock. The password is stored as plain text in SQLite, and the collection is not encrypted. Full-vault backups include the lock setting; restoring one uses its password and clears existing unlock sessions. HTTP MCP clients need the existing MCP bearer token while App lock is enabled, including localhost clients. Local stdio MCP continues to use direct database access.
If you forget the password, stop BladeVault or its container and open bladevault.sqlite in the active data folder using a SQLite editor. Run this statement, then restart and set a new password:
DELETE FROM settings WHERE key = 'app_lock_password';
You can also change that setting's value directly to choose a replacement password.
Local backup and restore
Open Settings → Backup & Restore → Download ZIP to save a portable full-vault backup without a cloud account. The archive includes the database, collection settings, Smart Collections, saved comparisons, history, and local images.
Use Restore from local ZIP in the same panel to validate an archive and review its contents before replacing the current vault. BladeVault creates a safety copy of the current data before restoring. The panel also offers Print Report to open the Overview for printing or saving as a PDF.
Saved comparisons are included in full-vault backups, but changing a comparison list does not trigger an automatic cloud backup. When upgrading from before v1.2.0, the old comparison selection becomes My comparison.
For a manual filesystem backup, stop BladeVault and copy the whole data folder so the database and images stay together.
Optional cloud backup
Cloud backup is opt-in and leaves local storage as the source of truth. BladeVault uses https://auth.bladevault.pro and https://backup.bladevault.pro by default. Sign in from Settings → Cloud Backup to upload or restore a complete archive, including images.
Manual and automatic backups run quietly on the local server. You can switch pages or reload the browser while an upload continues; check its status and last successful backup in Cloud Backup settings. Keep the desktop app or self-hosted server running until it finishes. Automatic backups wait at least 30 seconds after edits settle and use a browser idle slot to start. During an open app session, changes made during a backup are grouped into a later backup. Backup uploads and restore downloads have no application-imposed speed cap. Completion does not show a popup.
Cloud restore also runs on the local server and continues when you switch pages or reload. You can browse the existing collection while the backup downloads and is validated; editing and automatic backups pause until it finishes. BladeVault waits for active saves, keeps a safety copy, briefly pauses access to install the restored vault, and refreshes open views and images afterward. Local MCP processes participate in the same access protection. Restoring a password-protected vault requires unlocking again with the backed-up password. Safety copies and interrupted-restore recovery files are kept in private ._bladevault-* folders inside the data directory and are excluded from app backup archives.
Deployments can override the service endpoints with NEXT_PUBLIC_BLADEVAULT_AUTH_URL and NEXT_PUBLIC_BLADEVAULT_BACKUP_URL. Leaving them unset uses the built-in defaults. You can use the local vault and ZIP backups without signing in.
License
BladeVault is released under the MIT License.
Media gallery
1 / 4Install BladeVault on Unraid in a few clicks.
Find BladeVault in Community Apps on your Unraid server, review the template, and click Install. Unraid handles the Docker app or plugin setup from the published template.
Categories
Download Statistics
Total Downloads Over Time
Related apps
Explore more like this
Explore allDetails
ghcr.io/dedkola/bladevault:latestRuntime arguments
- Web UI
http://[IP]:[PORT:3000]- Network
bridge- Shell
bash- Privileged
- false
Template configuration
HTTP port for the BladeVault web interface.
- Target
- 3000
- Default
- 5500
Persistent SQLite database and downloaded knife images.
- Target
- /app/data
- Default
- /mnt/user/appdata/bladevault